Last updated : Aug 26,2019
Overview
In this lab, you will learn how you can use Release Management(RM) in Visual Studio Team Services (VSTS) to deploy a Java web application to Apache Tomcat with a MySQL database on Azure. Apache Tomcat is an open-source Java Servlet Container developed by the Apache Software Foundation (ASF). MySQL is a popular open-source relational database management system.
For this purpose of the lab, we will use Azure App Service and Azure Database for MySQL, a relational database service based on the open source MySQL Server engine. It is a fully managed database as a service offering capable of handing mission-critical workload with predictable performance and dynamic scalability.
What’s covered in this lab
This lab will show how you can
- Create a new Azure App Service and configure it to use Apache Tomcat
- Create a new MySQL database
- Use Azure App Service Task to deploy a WAR file
Prerequisites for the lab
-
Microsoft Azure Account: You will need a valid and active Azure account for the Azure labs. If you do not have one, you can sign up for a free trial
-
If you are an active Visual Studio Subscriber, you are entitled for a $50-$150 credit per month. You can refer to this link to find out more information about this including how to activate and start using your monthly Azure credit.
-
If you are not a Visual Studio Subscriber, you can sign up for the FREE Visual Studio Dev Essentials program to create a Azure free account (includes 1 year of free services, $200 for 1st month).
-
-
You will need a Visual Studio Team Services Account. If you do not have one, you can sign up for free here
-
You will need a Personal Access Token to set up your project using the VSTS Demo Generator. Please see this article for instructions to create your token.
Note: You should treat Personal Access Tokens like passwords. It is recommended that you save them somewhere safe so that you can re-use them for future requests.
Exercise 1: Setting up VSTS team project
-
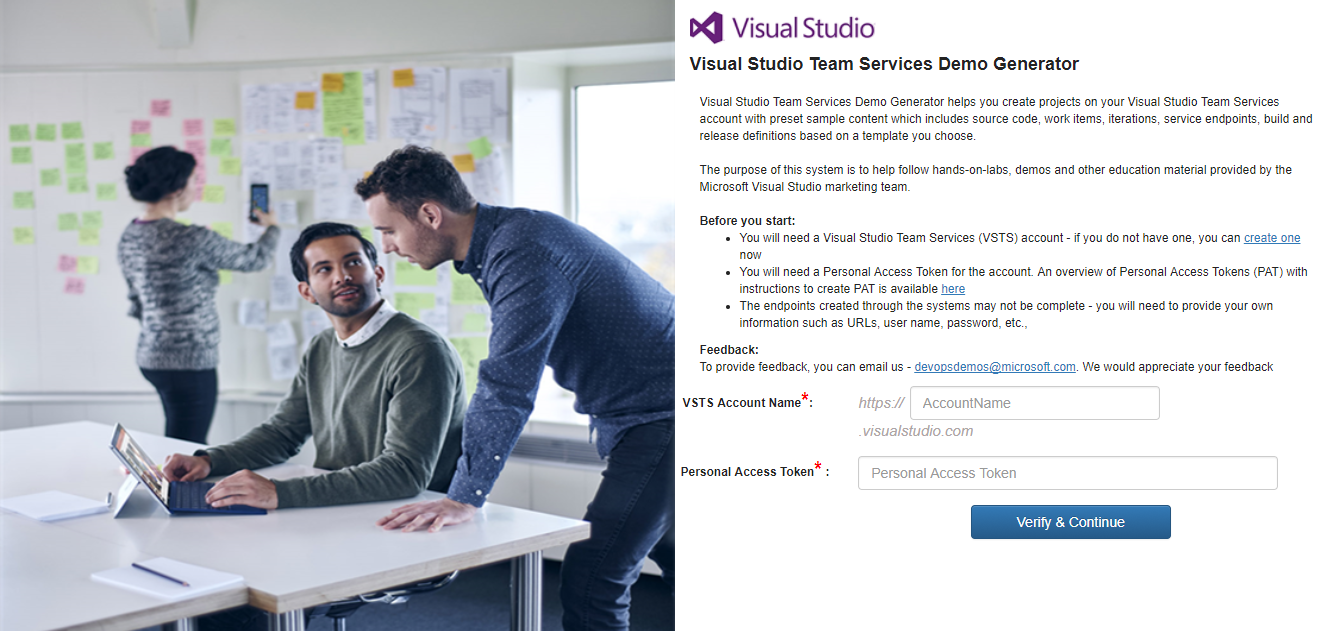
Provision a new VSTS project using the VSTS Demo Generator
VSTS Demo Generator helps you create team projects on your VSTS account with sample content that include source code, work items,iterations, service endpoints, build and release definitions based on the template you choose during the configuration.
-
Use MyShuttle for the template. Provide the Project Name and select Create Project. After the project is provisioned, click the URL to navigate to the project.
Note: This URL will automatically select the MyShuttle template in the demo generator. If you want to try other projects, use this URL instead - https://vstsdemogenerator.azurewebsites.net/
Exercise 2: Creating Azure Web App and MySQL database
-
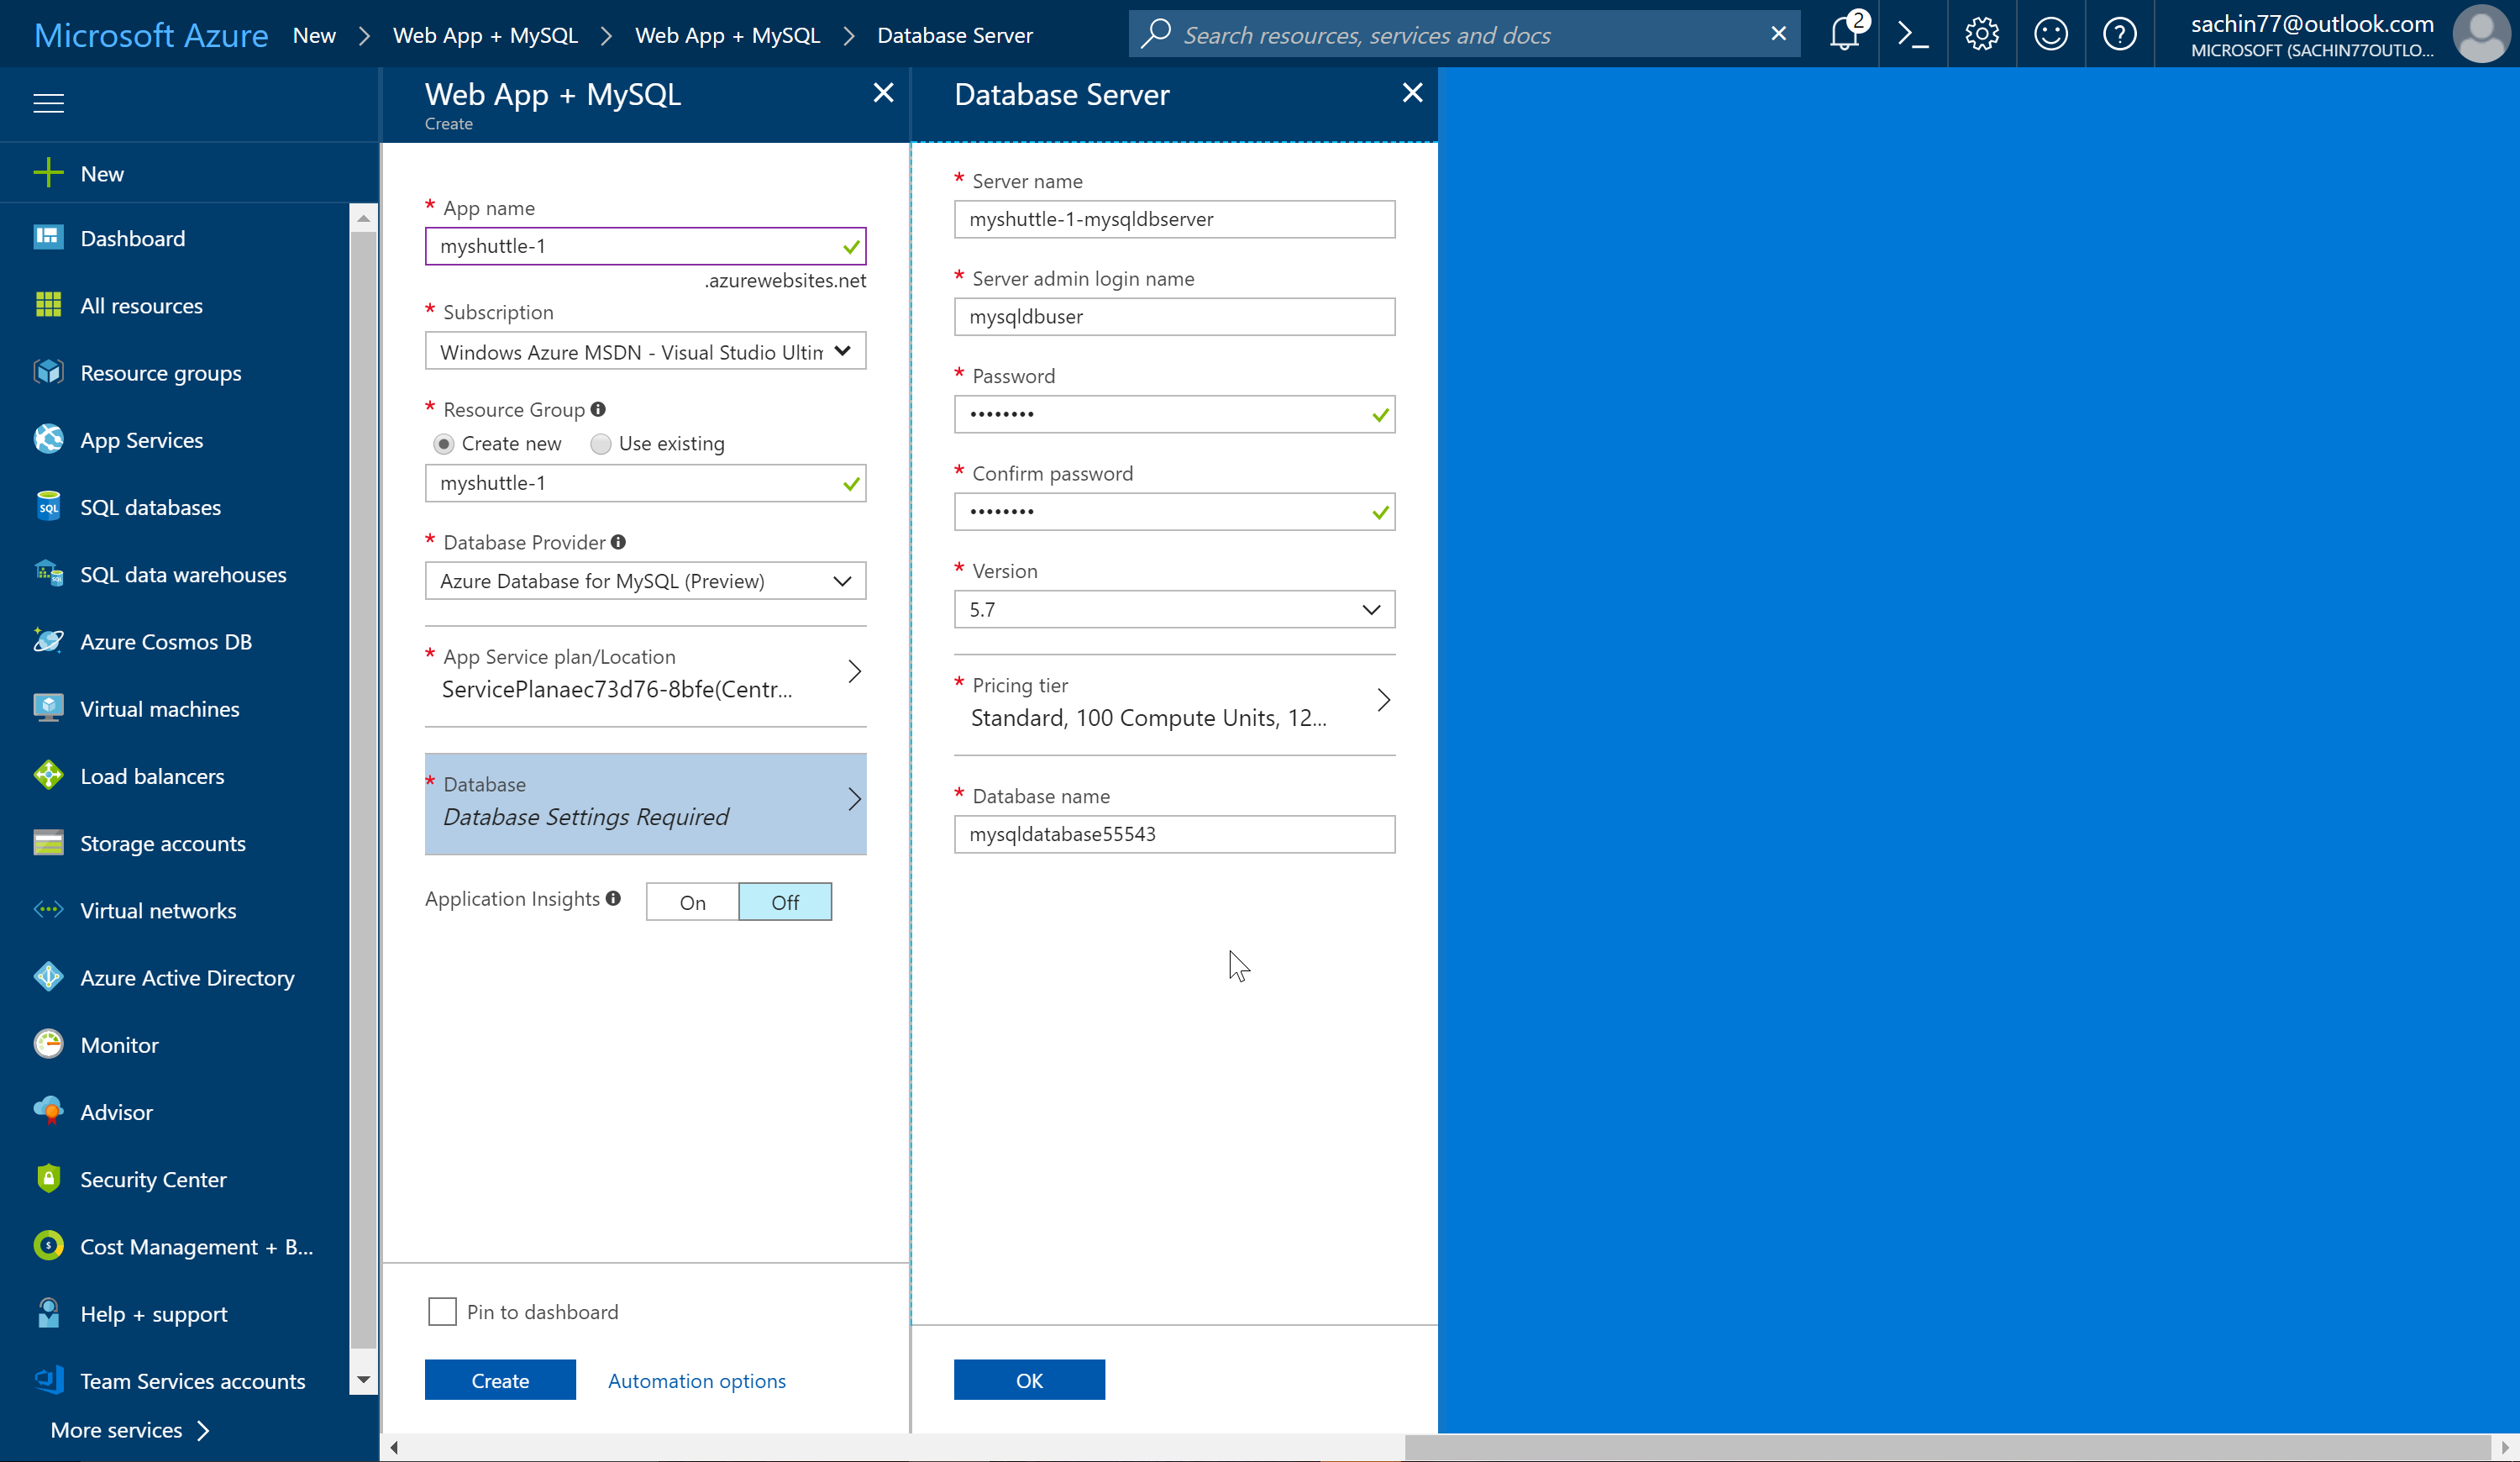
We will use the Web App + MySQL Azure template from the Azure Marketplace to create a Website and MySQL Database together to start developing even faster.

-
This template provides three MySQL options :
- Azure Database for MySQL(Preview) provides a managed database service for app development. We will choose this option
- ClearDB is a Microsoft Partner solution for a fully integrated MySQL service on Azure
- MySQL in-app is an App Service feature where MySQL database is created for your web app. In this scenario,MySQL server is running on the same instance side by side with your web server hosting the site. This is recommended to development purposes and has no additional cost.
-
Wait for the Web App and the database to be provisioned. It should roughly take 3-5 minutes.
Exercise 3: Configuring MySQL database
-
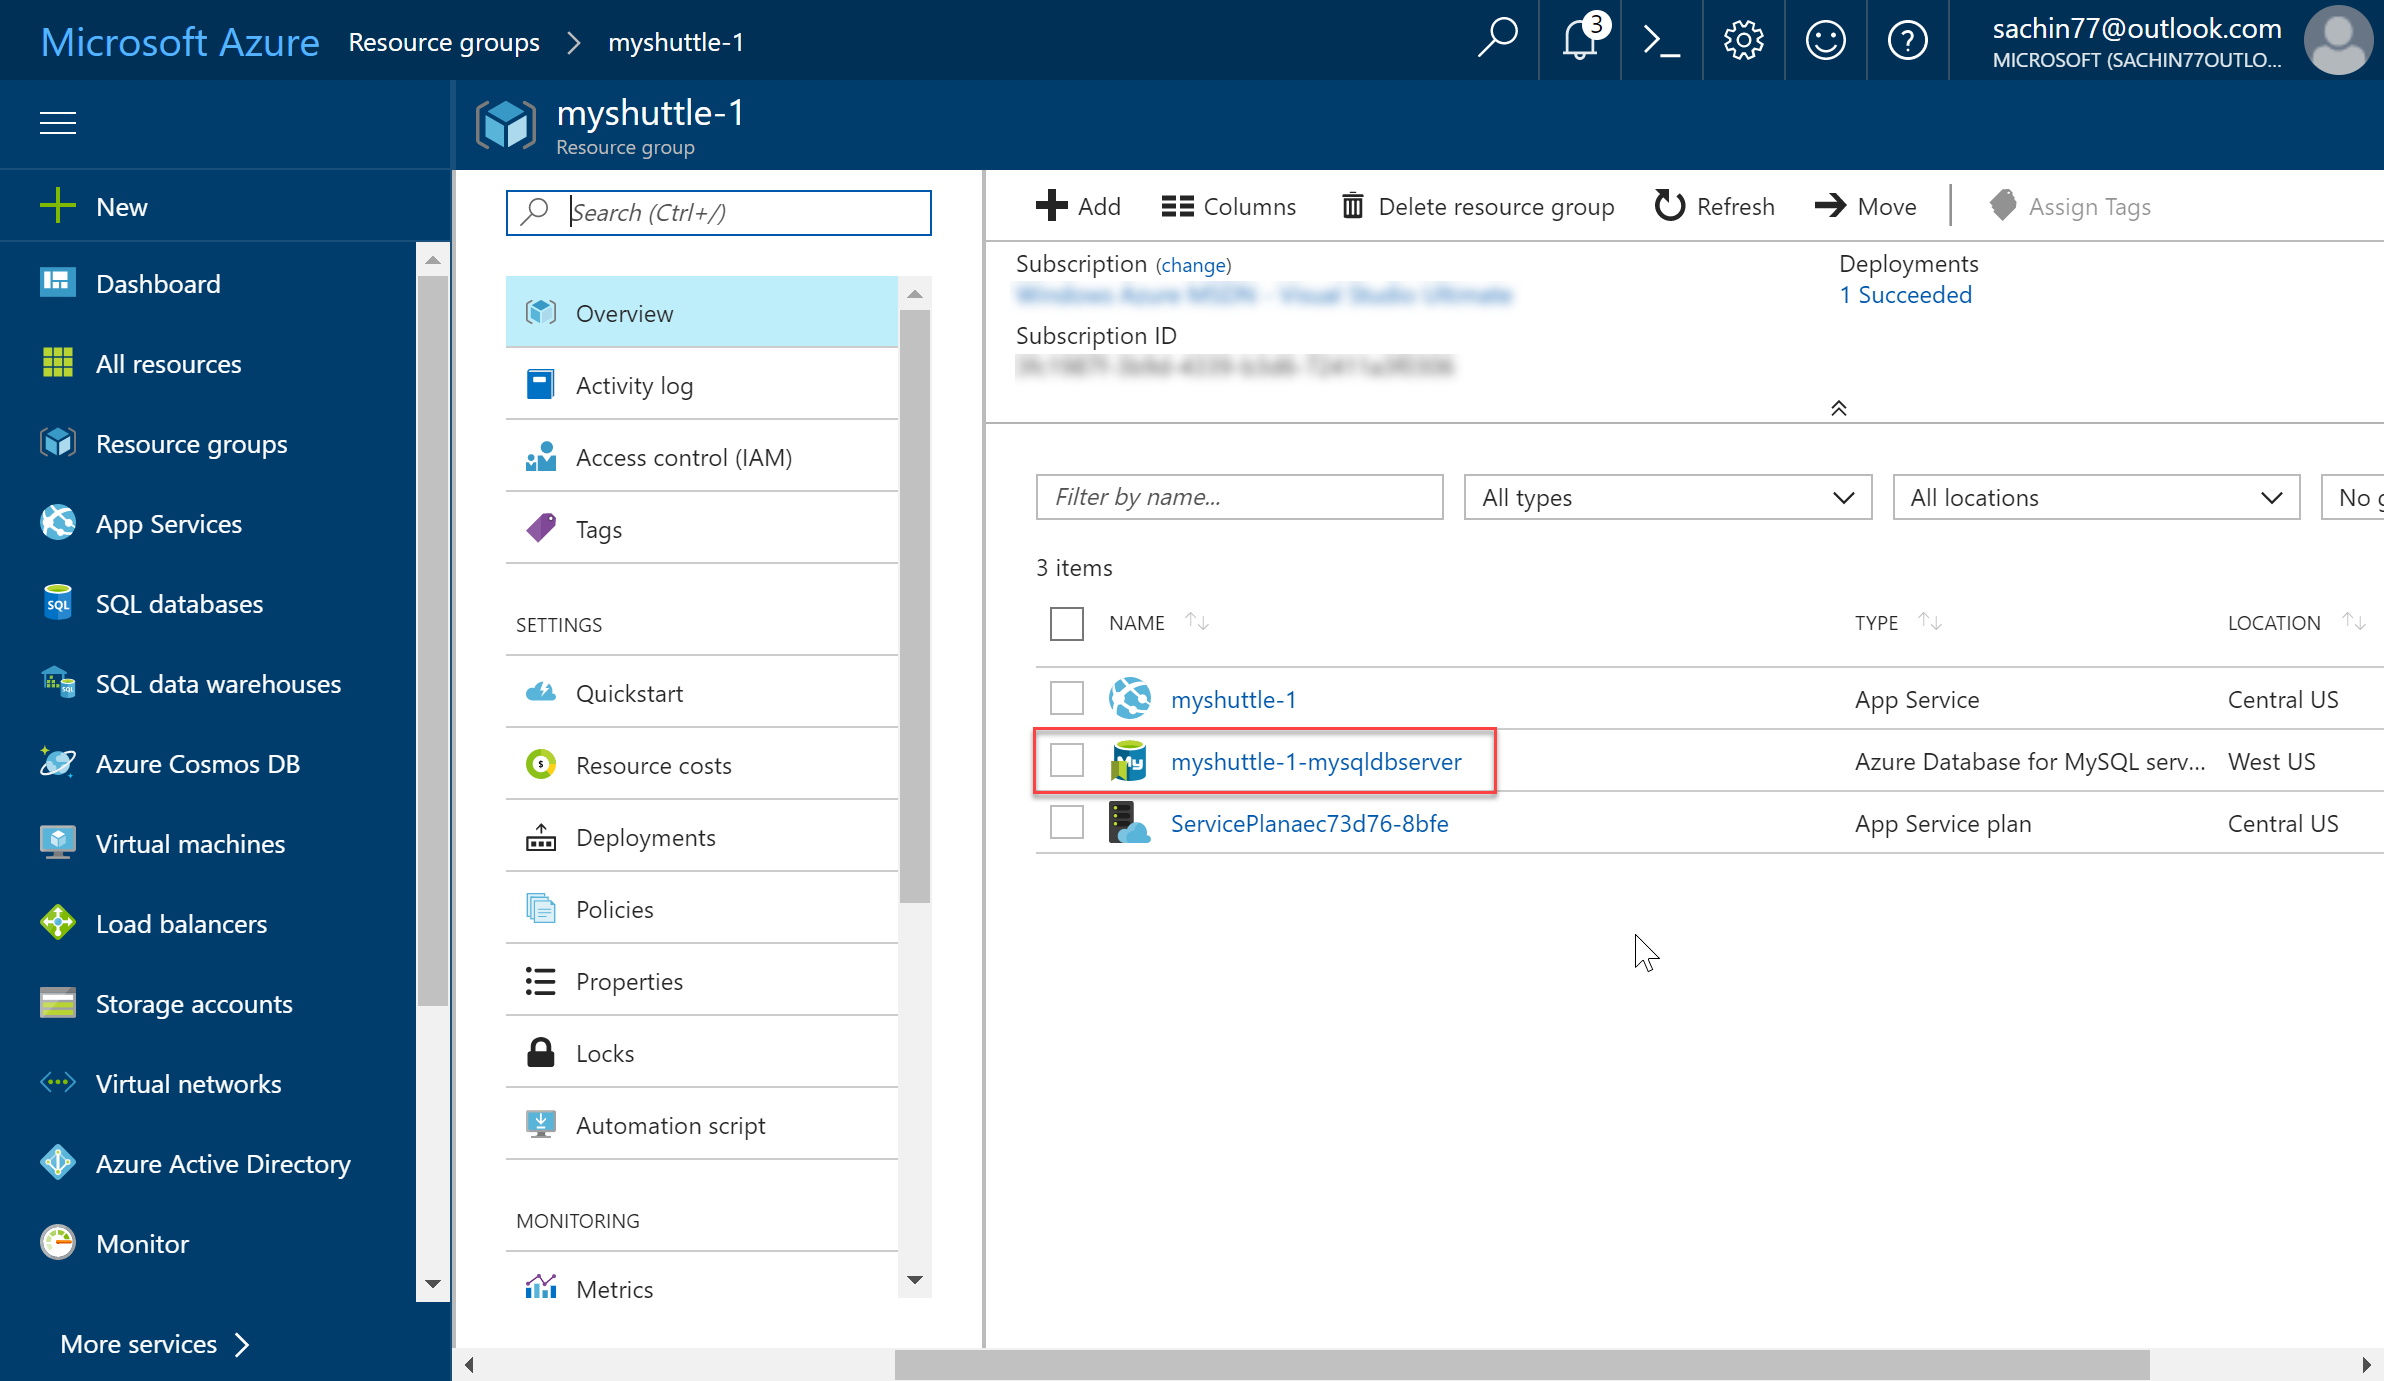
Navigate to the resource group that you have created. You should see a Azure Database for MySQL server provisioned. Select the database server.
-
Select Properties. Note down SERVER NAME and SERVER ADMIN LOGIN NAME.
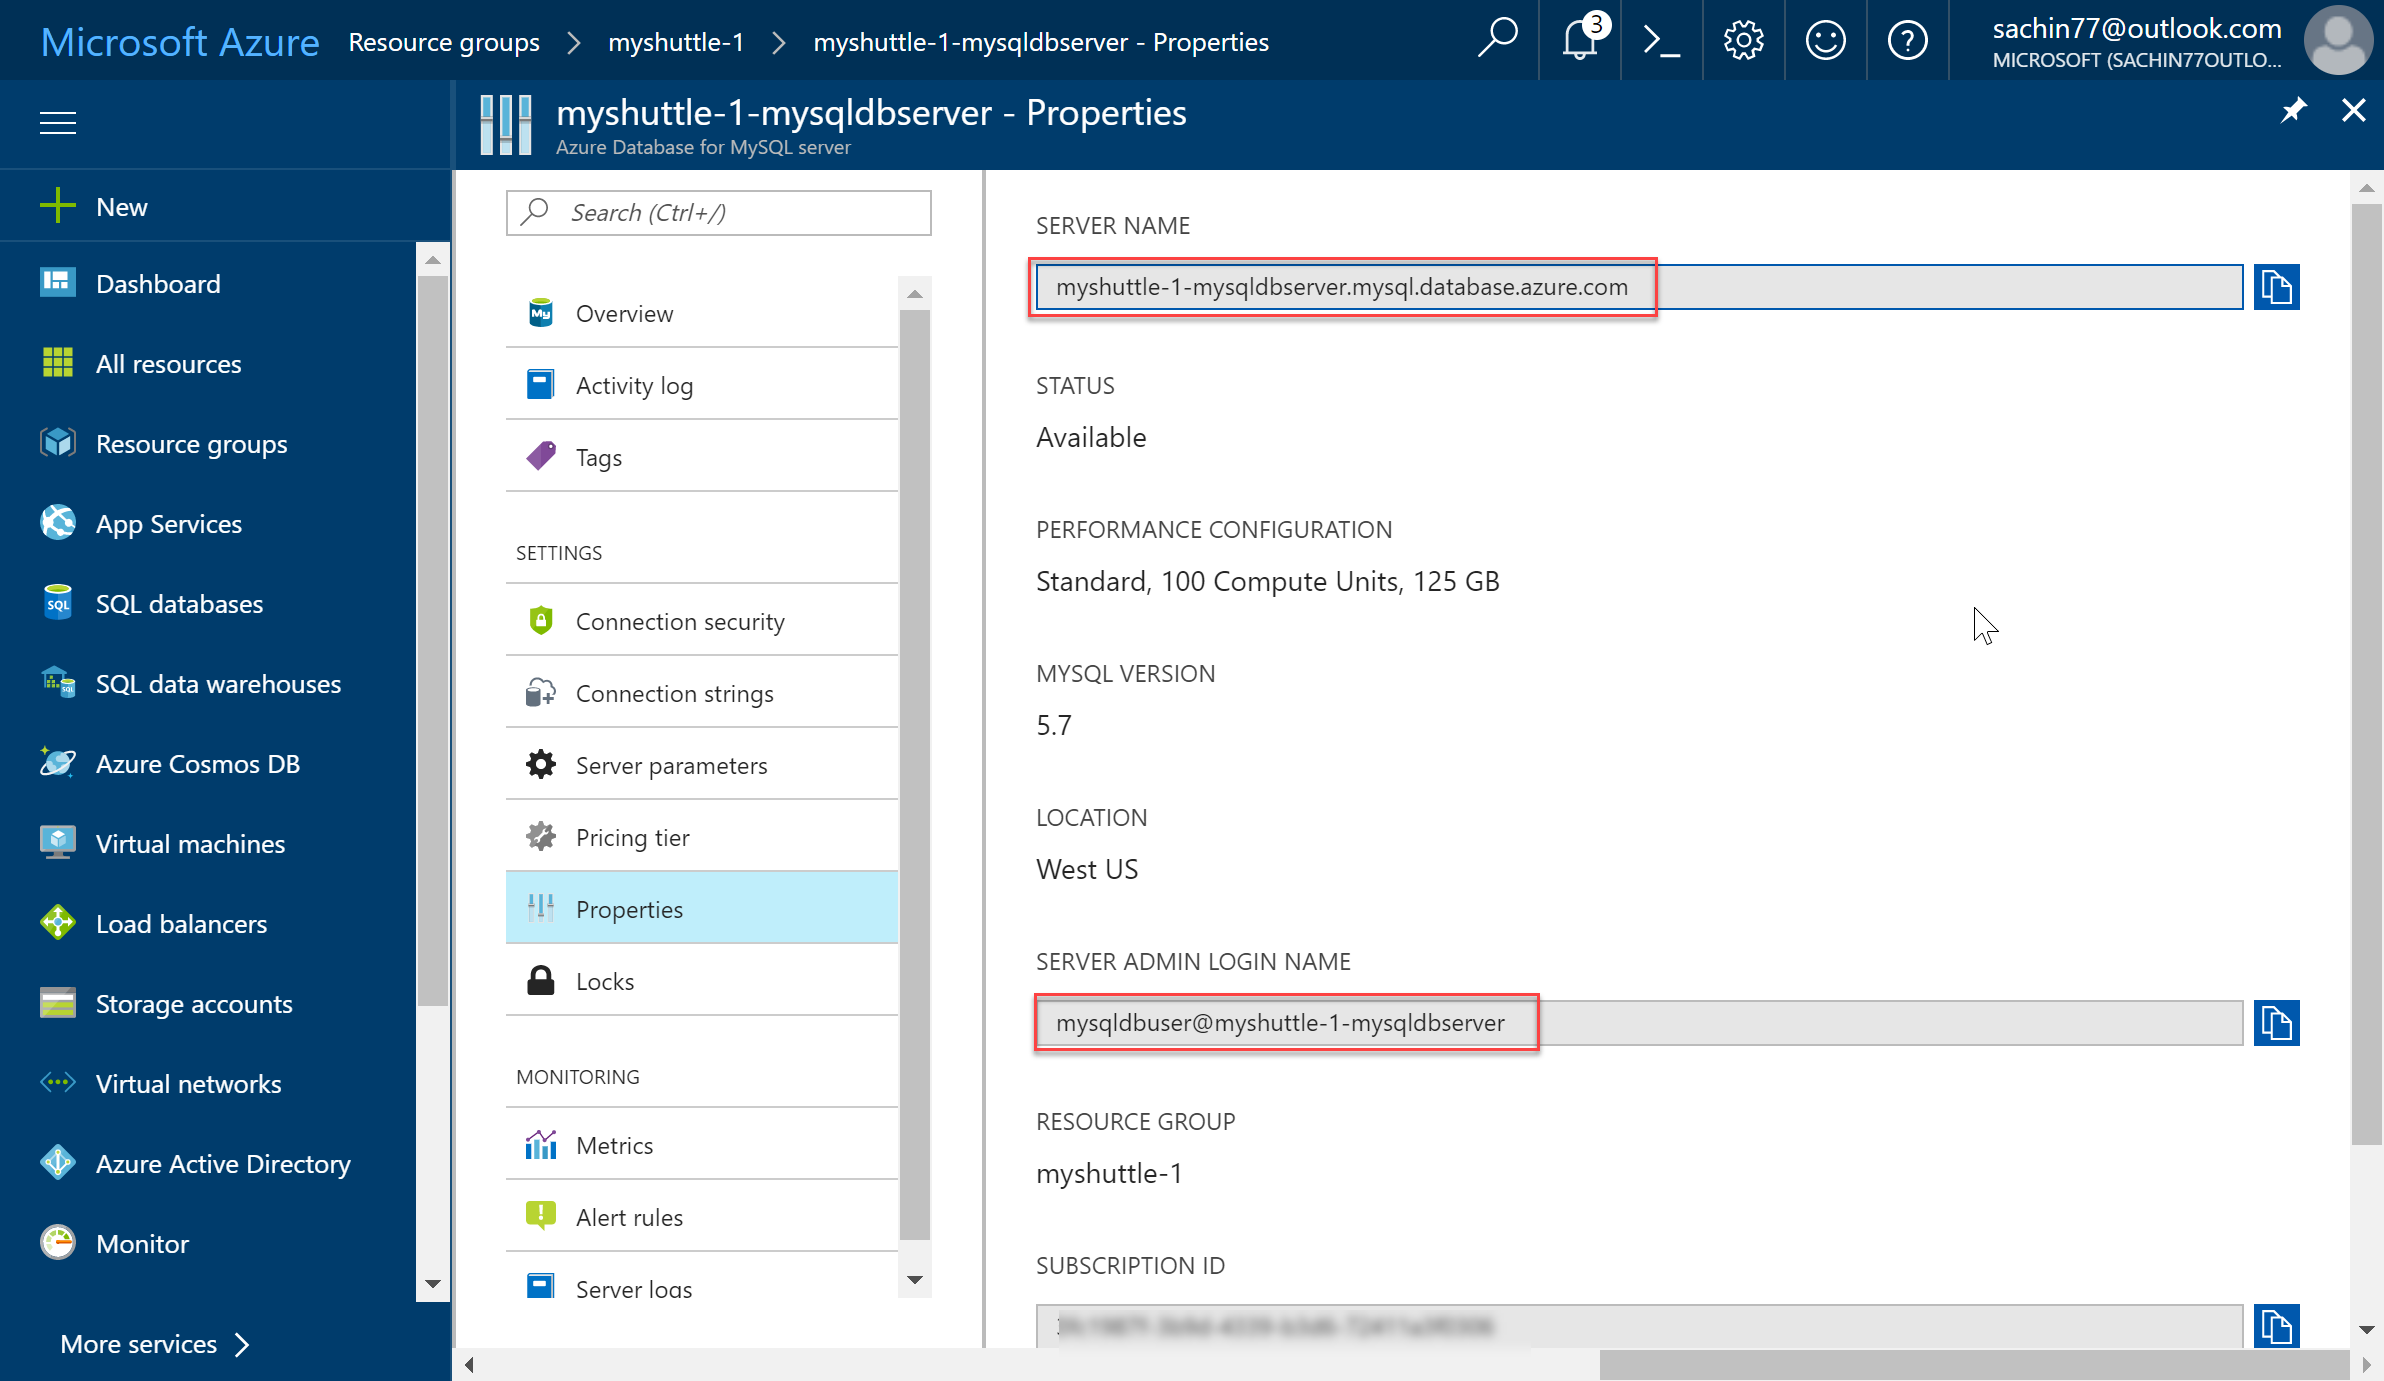
In this example, the server name is myshuttle-1-mysqldbserver.mysql.database.azure.com and the admin user name is mysqldbuser@myshuttle-1-mysqldbserver.
-
We will use the MySQL command-line tool to establish a connection to the Azure Database for MySQL server. We will run the MySQL command-line tool from the Azure Cloud Shell in the browser.To launch the Azure Cloud Shell, click the
>_icon in the top right toolbar.
-
Enter the following command
wget https://raw.githubusercontent.com/hsachinraj/azure-arm-templates/master/vstsazurejl_arm/mydbscript.scriptThis should download the file that we want to execute on the server.
-
Next, we will execute the SQL from the downloaded file on the database server. Enter the following command
mysql -h myshuttle-1-mysqldbserver.mysql.database.azure.com -u mysqldbuser@myshuttle-1-mysqldbserver -p < mydbscript.scriptEnter the password that you specified during provisioning the database
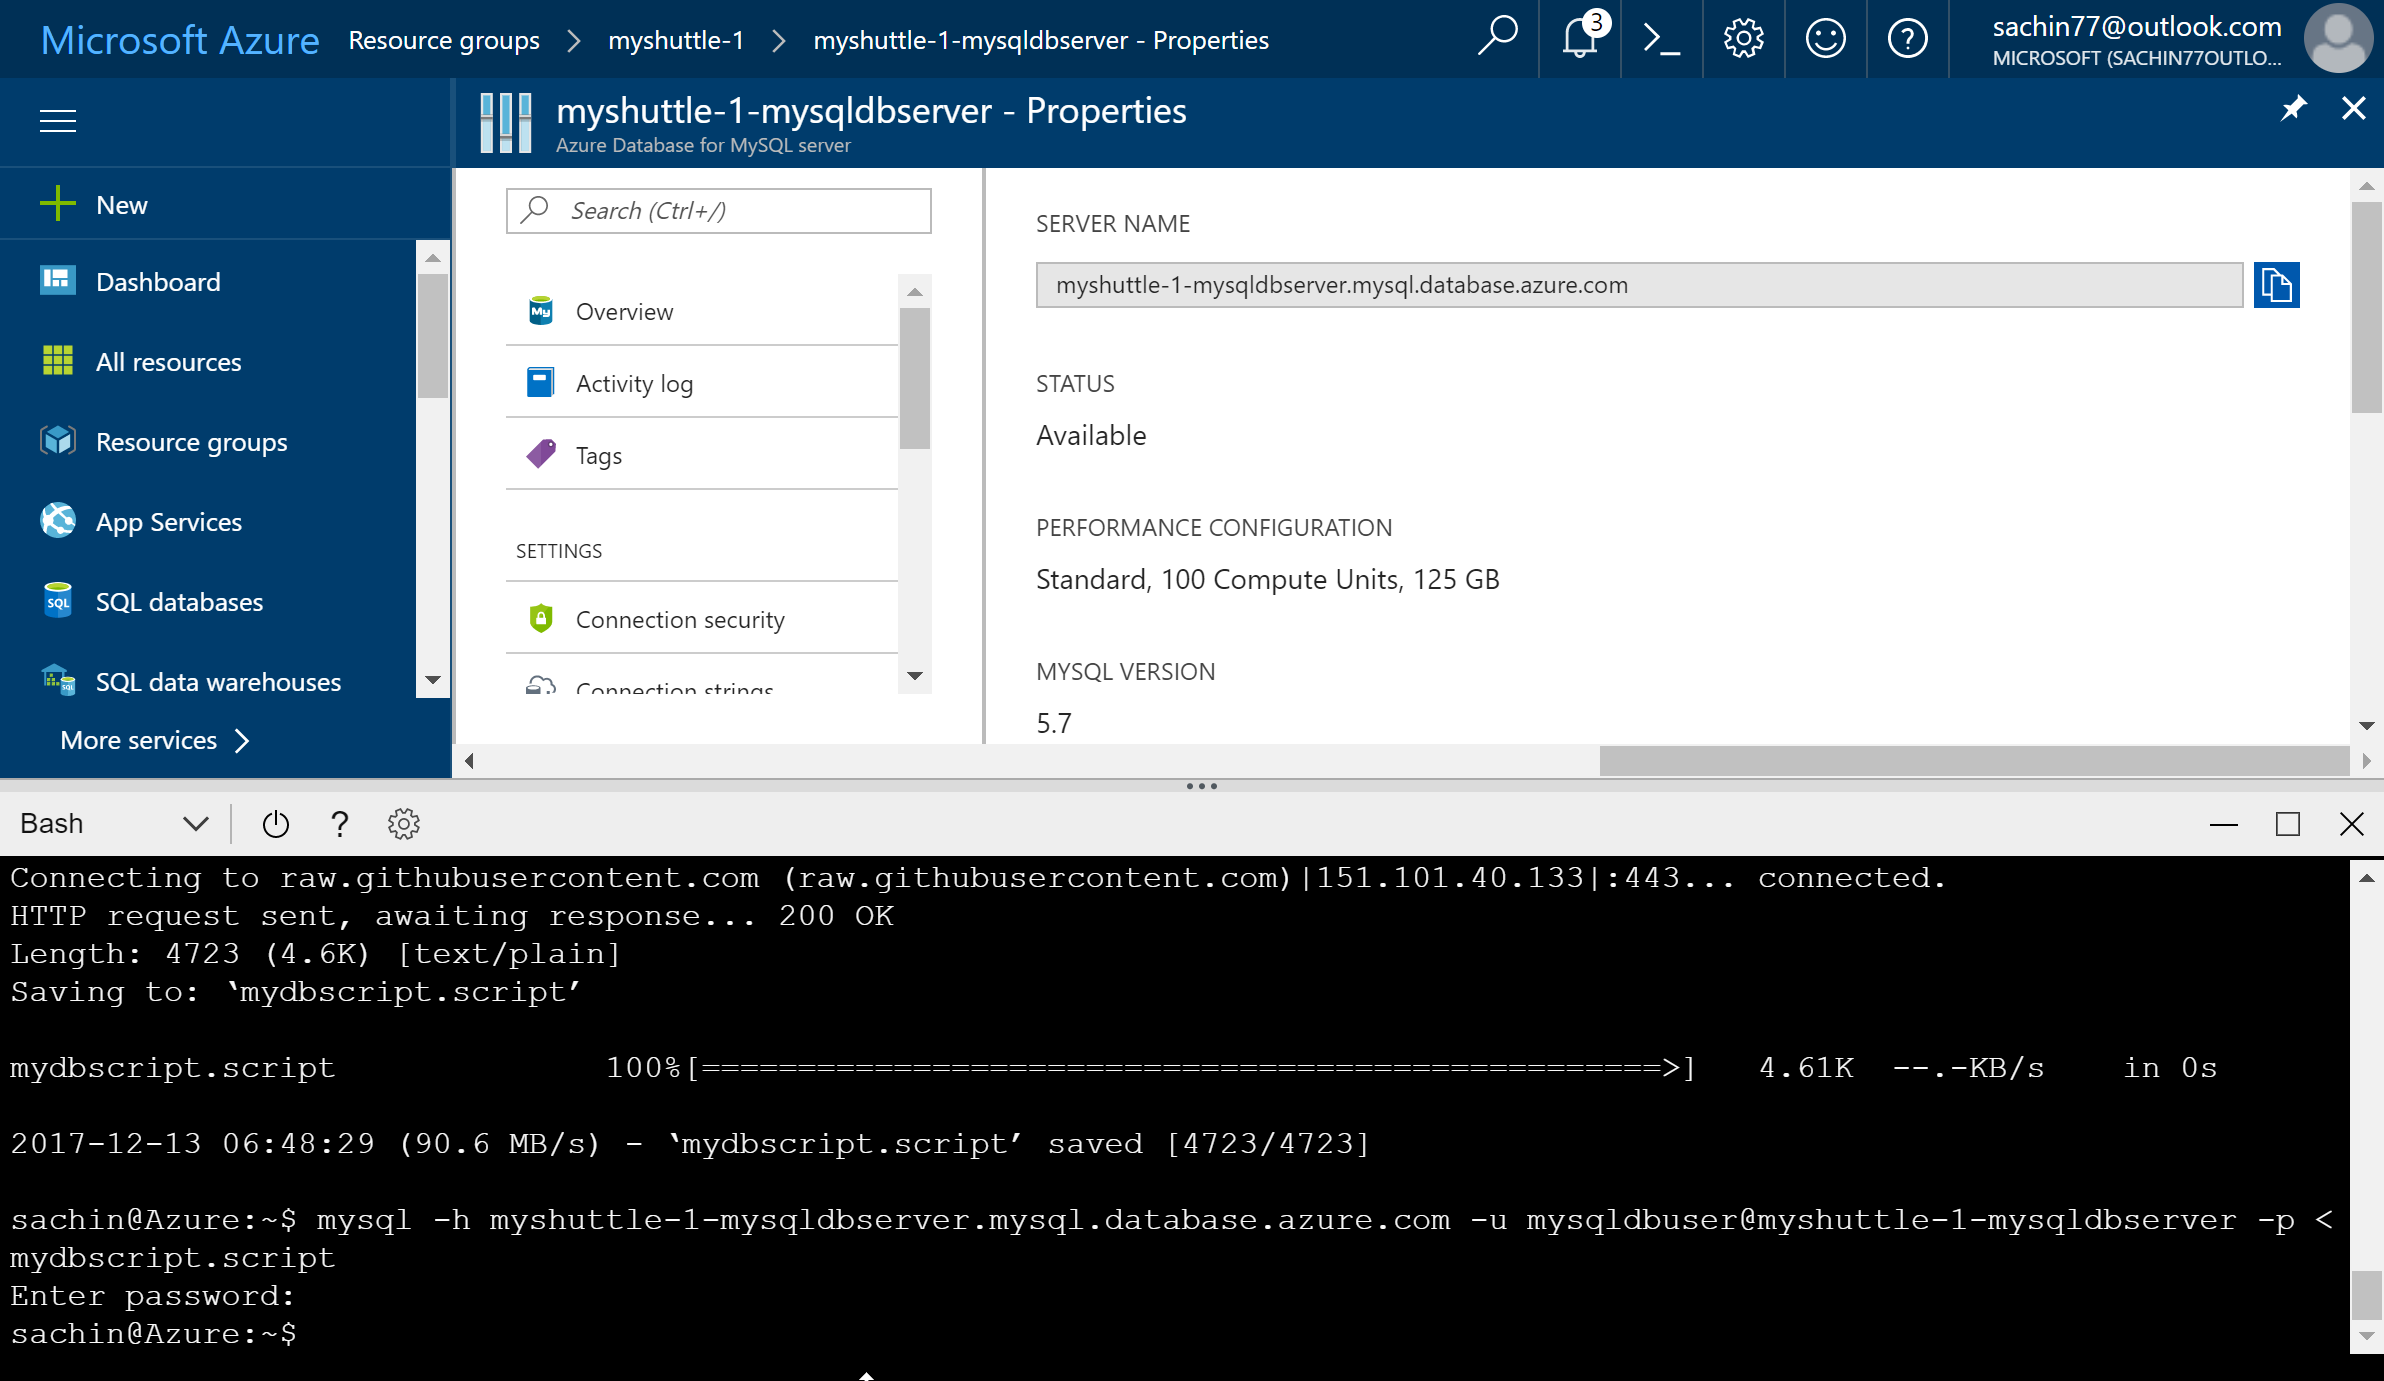 Note: This should create the database, tables and populate records for us.
Exercise 4: Updating the App Settings for the Web App
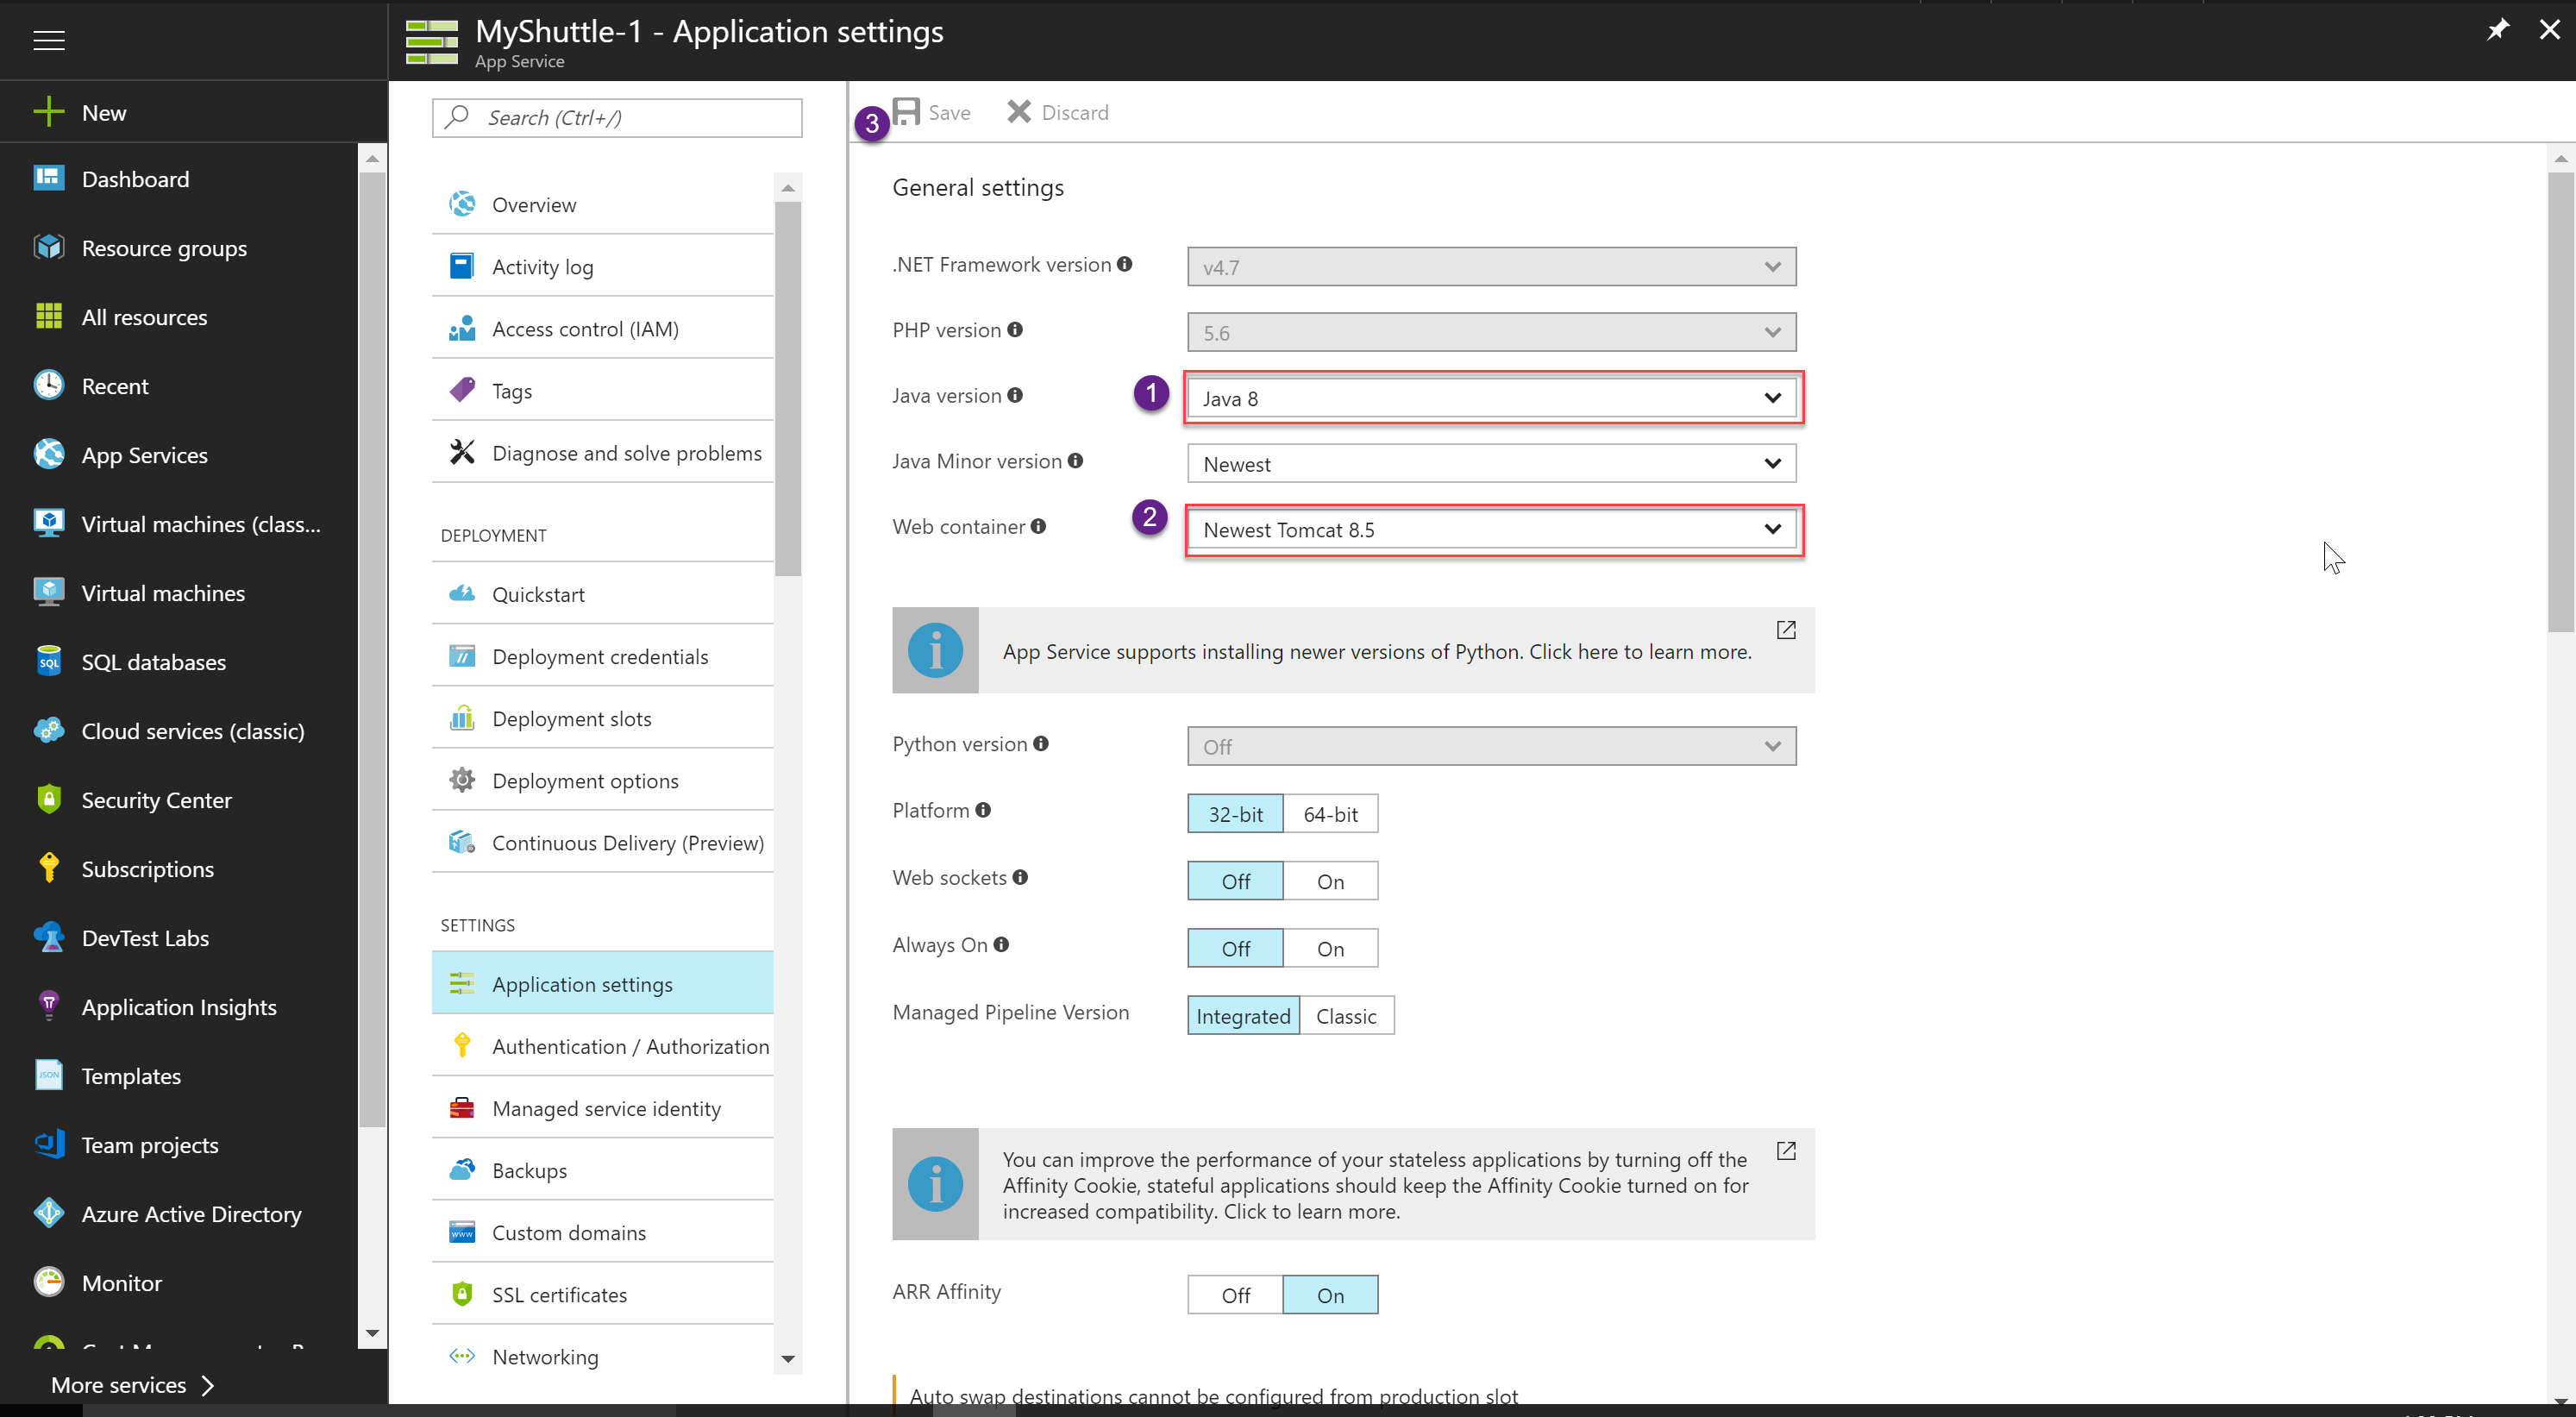
Next, navigate to the Web app that you have created. As we are deploying a Java application, we need to change the web app’s web container to Apache Tomcat.
-
Click Application Settings. To change it to Tomcat, we will first need to install Java. Select a Java Version to install and then change Web container to use Apache Tomcat. For this purpose of the lab, we will choose Java 8 and Apache Tomcat 9.0 though the version number would not matter much for the simple app that we are deploying.
-
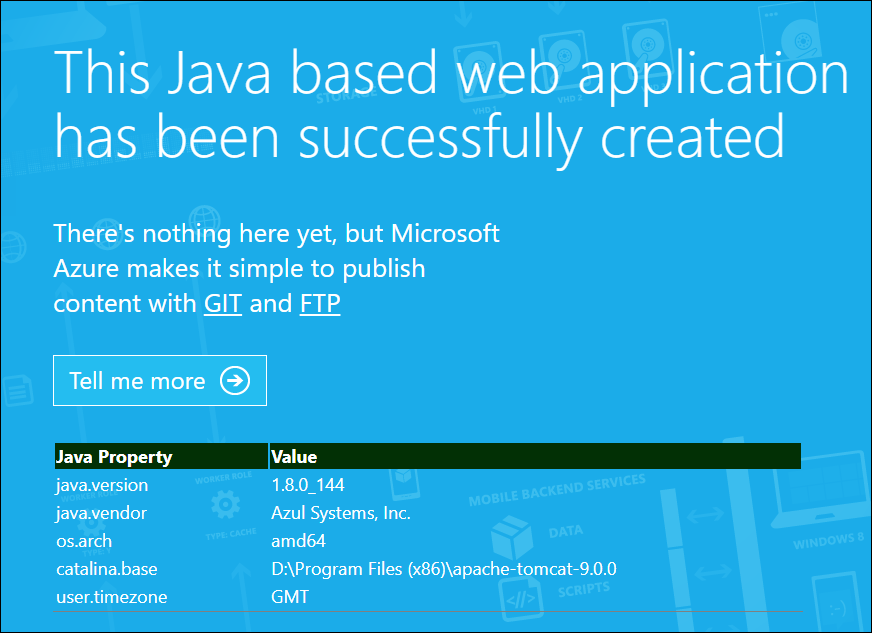
Click Save and wait for the update to be applied. Then navigate to the web app URL again and now you should see a different page.
Next, we need to update the connection strings for the web app to connect to the database correctly. There are multiple ways you can do this - but for the purpose of this lab, we will take a simple approach. We will update it directly on the Azure portal.
-
From the Azure portal, Select the Web app you provisioned. Select Application Settings. Scroll down to the Connection Strings section.
-
Add a new MySQL connection string with MyShuttleDb as the name and the following string for the value -
jdbc:mysql://{MySQL Server Name}:3306/alm?useSSL=true&requireSSL=false&autoReconnect=true&user={your user name}&password={your password} -
Click Save to save the connection string.
Note: Connection Strings configured here will be available as environment variables, prefixed with connection type for Java apps (also for PHP, Python and Node apps). In the DataAccess.java file under src/main/java/com/microsoft/example folder, we retrieve the connection string using the following codeString conStr = System.getenv("MYSQLCONNSTR_MyShuttleDb");
You have now setup and configured all the resources that is needed to deploy and run the MyShuttle application.
Exercise 5: Deploying to App Service from VSTS
-
Navigate to the VSTS project that you provisioned.
-
Select Build and Release and then Releases.
-
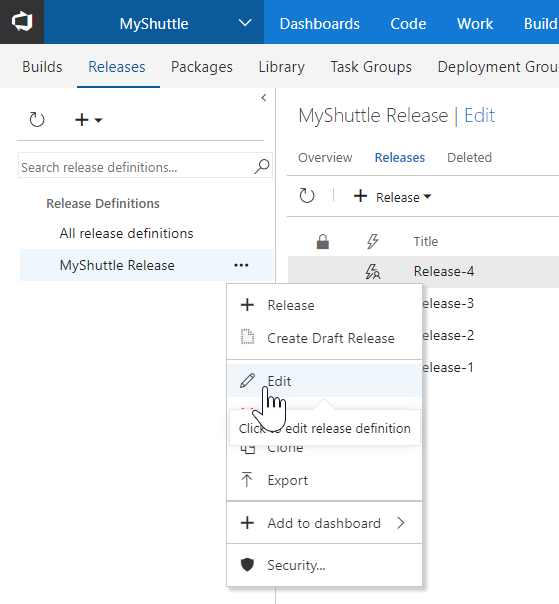
Select MyShuttle Release and click Edit to open the release definition.
-
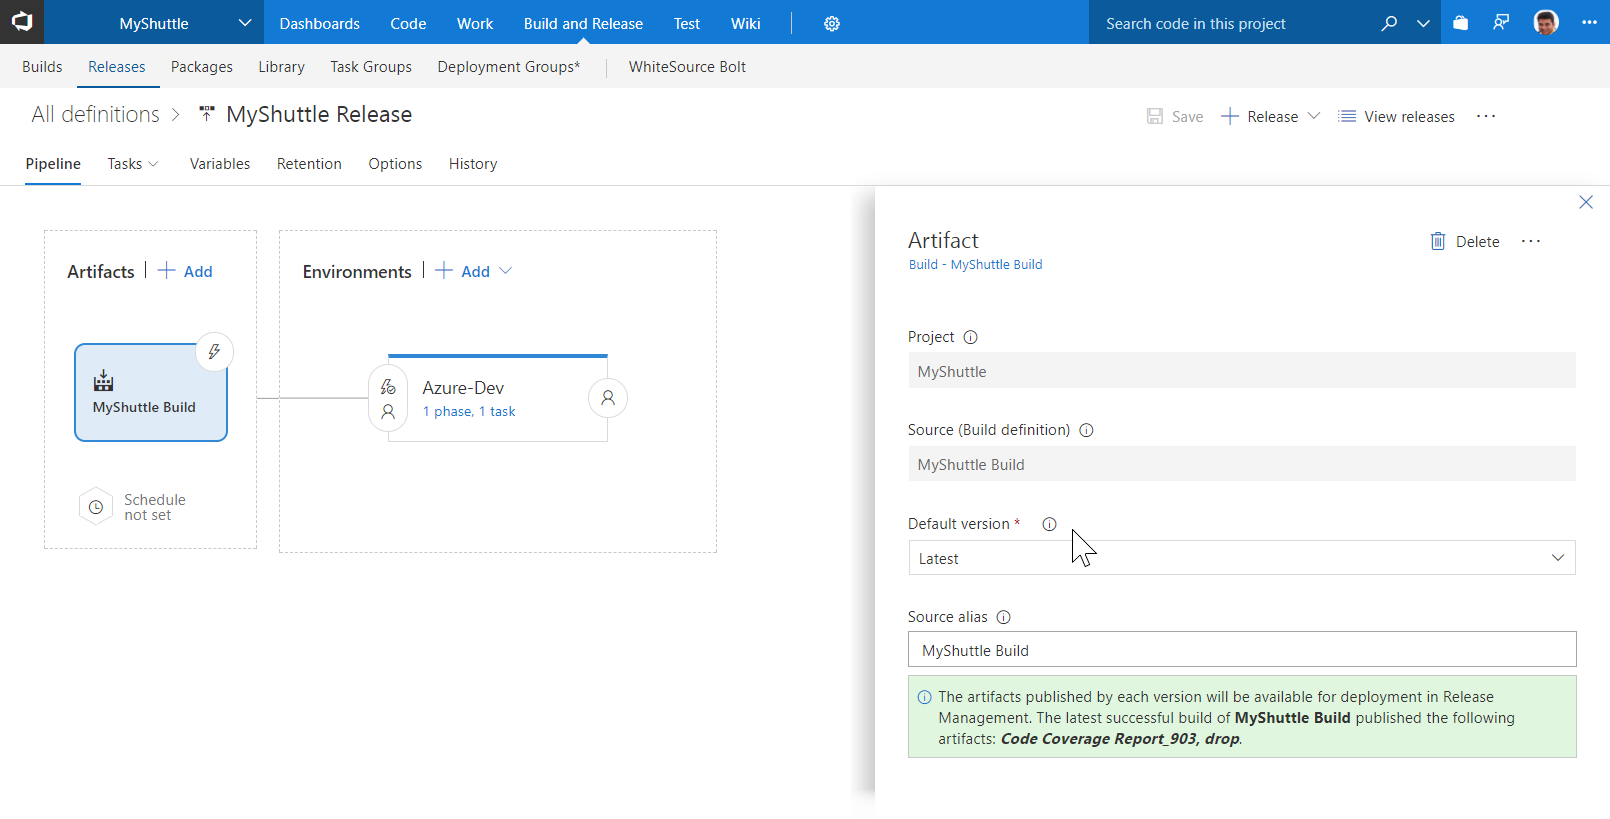
If you following this lab from Jenkins hands-on-lab, make sure the artifact is pointing to Jenkins. Otherwise, it should be pointing to the Team Build artifact as shown below:
-
Select the Azure Dev deployment process and make sure that Azure Subscription and App Service Name fields have the right values.
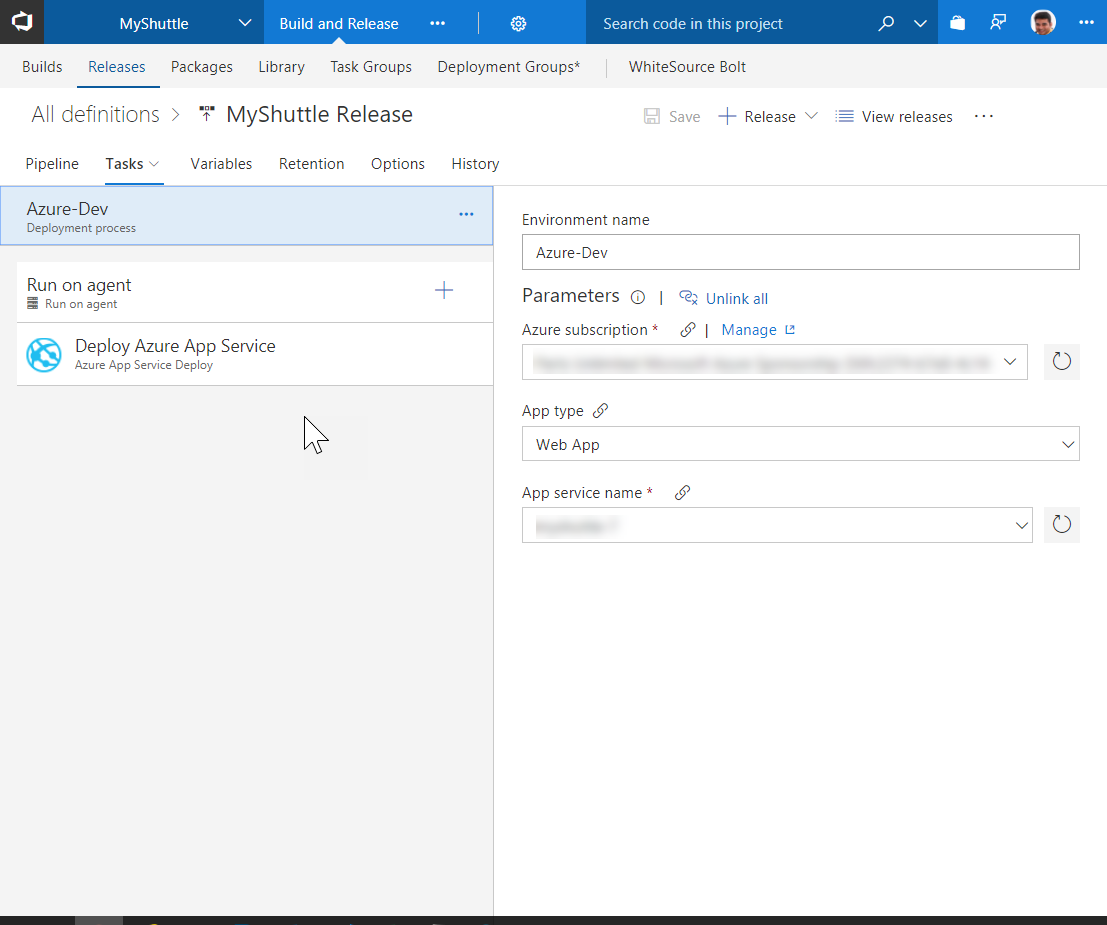
The subscription and the app service selected here will be used throughout the tasks in the process.
-
Select the Deploy Azure App Service and ensure that the subscription and the app service name are reflected correctly.
Note: We are using the Deploy Azure App Service task. This task is used to update Azure App Service to deploy Web Apps and WebJobs to Azure. The task works on cross platform agents running Windows, Linux or Mac and uses the underlying deployment technologies of Web Deploy and Kudu. The task works for ASP.NET, ASP.NET Core 1 and Node.js based web applications. Note that this task works with Azure Resource Manager APIs only. -
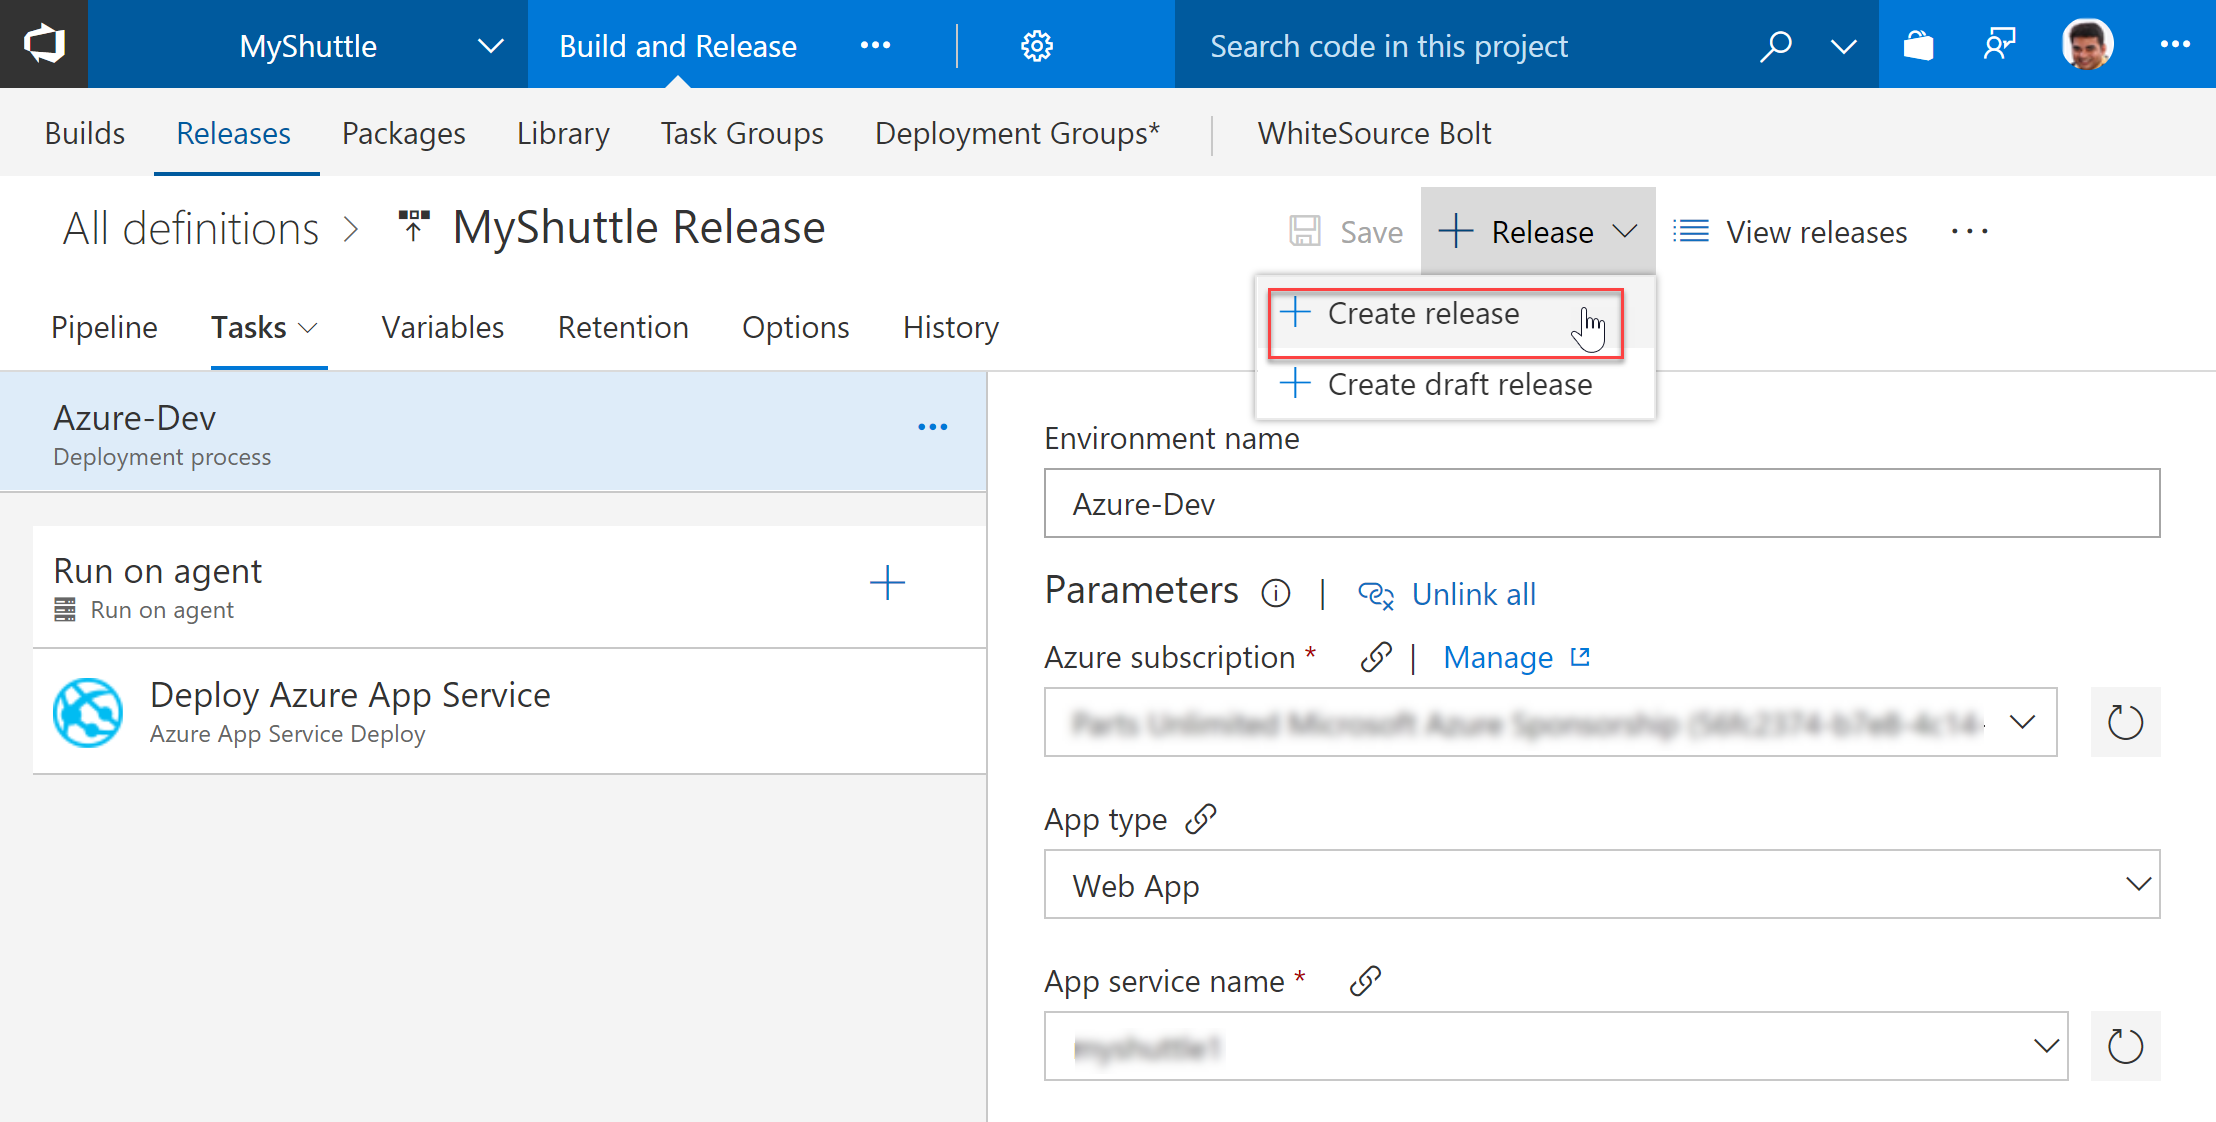
Click Save and then +Release | Create Release to start a new release
-
Wait for the release to complete. Then navigate to the Web App and select the URL from the overview blade. Add /myshuttledev context to the URL. For instance - http://myshuttle1.azurewebsites.net/myshuttledev
-
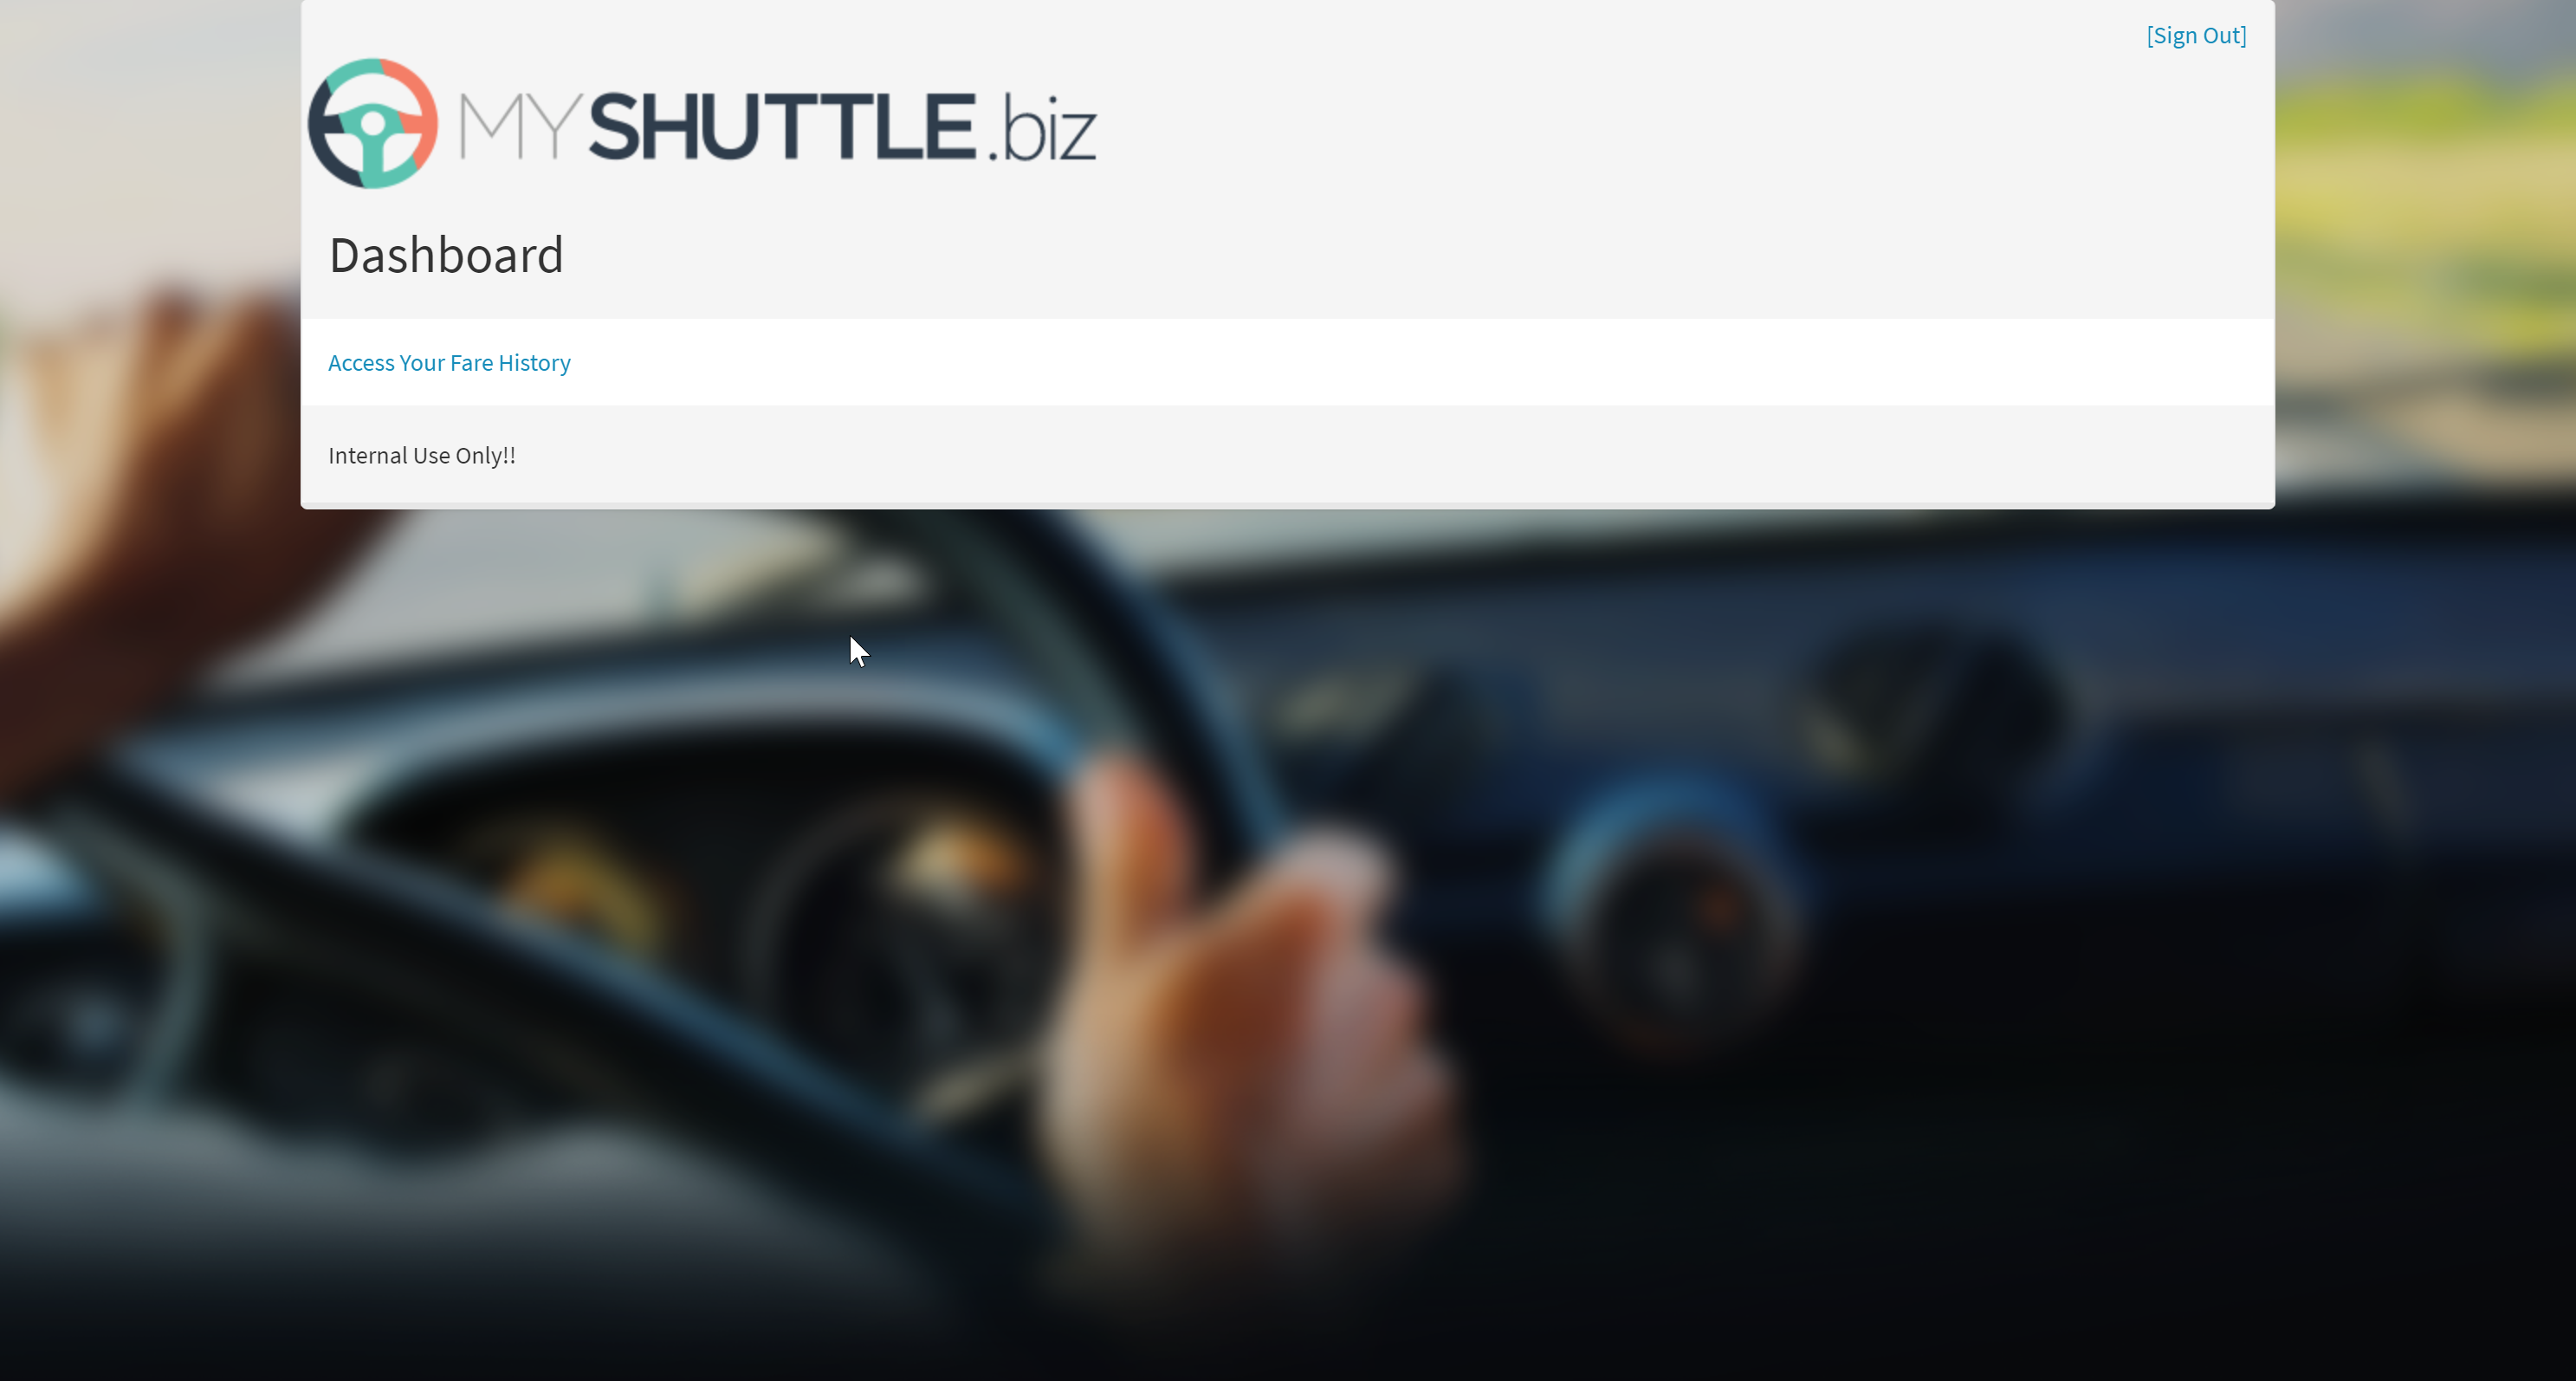
Select Login and try logging in to the site with anyone of the following credentials.
Username Password barney barneypassword fred fredpassword -
If your database was setup correctly and the connection parameters are valid, you should be able to login to the portal.
Warning: If you encounter an error with The specified CGI application encountered an error and the server terminated the process message, check whether you have entered the app settings variables and values (for the database connection) correctly