Last updated : Aug 26,2019
Overview
Jenkins is a very popular Java-based open source continuous integration (CI) server that allows teams to continuously build applications across platforms.
Visual Studio Team Services (VSTS) includes Team Build, a native CI build server that allows compilation of applications on Windows, Linux and Mac platforms. However, it also integrates well with Jenkins for teams who already use or prefer to use Jenkins for CI.
There are two ways to integrate VSTS with Jenkins
-
One way is to completely replace the VSTS Build with Jenkins. This involves the configuration of a CI pipeline in Jenkins and a web hook in VSTS that invokes the CI process when source code is pushed by any member to a repository or a branch. The VSTS Release Management will be configured to connect to the Jenkins server through the configured Service Endpoint to fetch the compiled artifacts for the deployment.
-
The alternate way is to use Jenkins and Team Build together. In this approach, a Jenkins build will be nested within the VSTS build. A build definition will be configured in the VSTS with a Jenkins task to queue a job in Jenkins that downloads the artifacts produced by the job and publish it to the VSTS or any shared folder. The VSTS Release Management will pick these build artifacts for deployment.
While there are pros and cons with both the approaches, the latter approach has multiple benefits:
- End-to-end traceability from work item to source code to build and release
- Triggering of a Continuous Deployment (CD) when the build is completed successfully
- Execution of the build as part of the branching strategy
What’s covered in this lab
This lab covers both the approaches and the following tasks will be performed
- Provision Jenkins on Azure VM using a Jenkins Template available on the Azure Marketplace
- Configure Jenkins to work with Maven and VSTS
- Create a build definition in Jenkins
- Configure VSTS to integrate with Jenkins
- Configure Release Management in VSTS to deploy the build artifacts from Jenkins
Prerequisites for the lab
-
Microsoft Azure Account: You will need a valid and active Azure account for the Azure labs. If you do not have one, you can sign up for a free trial
-
If you are an active Visual Studio Subscriber, you are entitled for a $50-$150 Azure credit per month. You can refer to this link to find out more information about this including how to activate and start using your monthly Azure credit.
-
If you are not a Visual Studio Subscriber, you can sign up for the FREE Visual Studio Dev Essentials program to create a Azure free account (includes 1 year of free services, $200 for 1st month).
-
-
You will need a Visual Studio Team Services Account. If you do not have one, you can sign up for free here
-
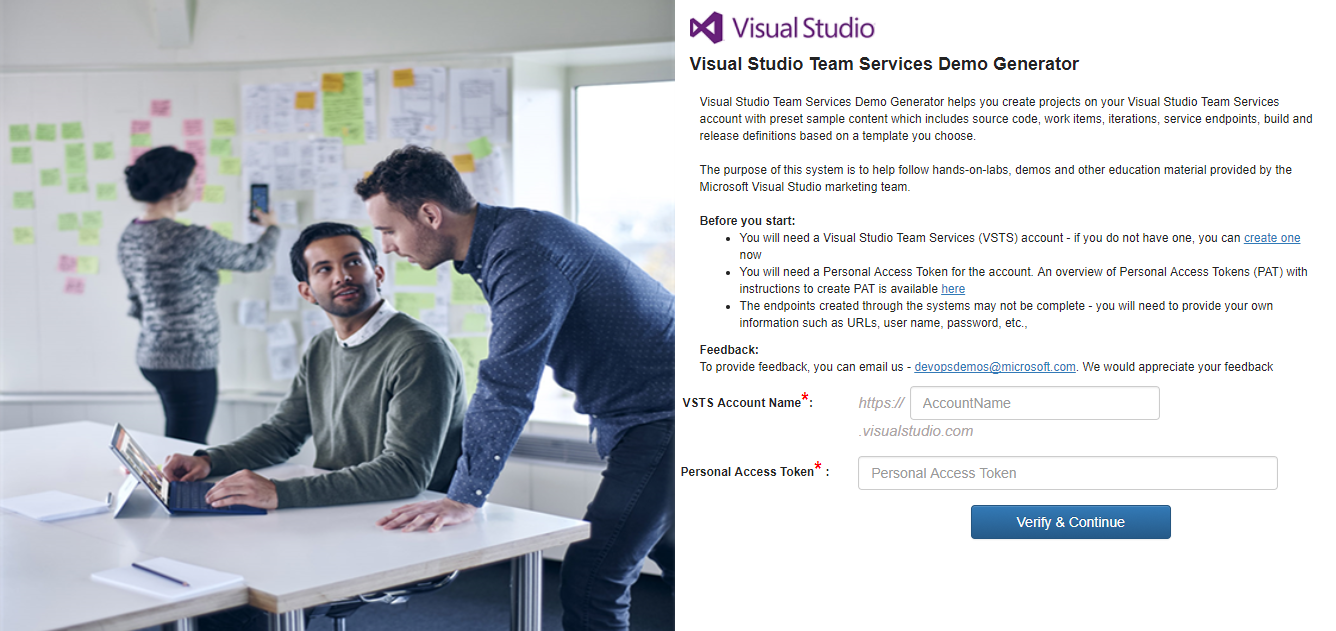
You will need a Personal Access Token to set up your project using the VSTS Demo Generator. Please see this article for instructions to create your token.
Note: You should treat Personal Access Tokens like passwords. It is recommended that you save them somewhere safe so that you can re-use them for future requests. -
Putty, a free SSH and Telnet client
-
Docker Integration extension installed and configured for the VSTS account. This step can be performed later while using the VSTS Demo Generator.
Reference Architecture

Read the complete specifications at https://docs.microsoft.com/en-us/azure/architecture/reference-architectures/jenkins/images/jenkins-server.png
Setting up the VSTS team project
-
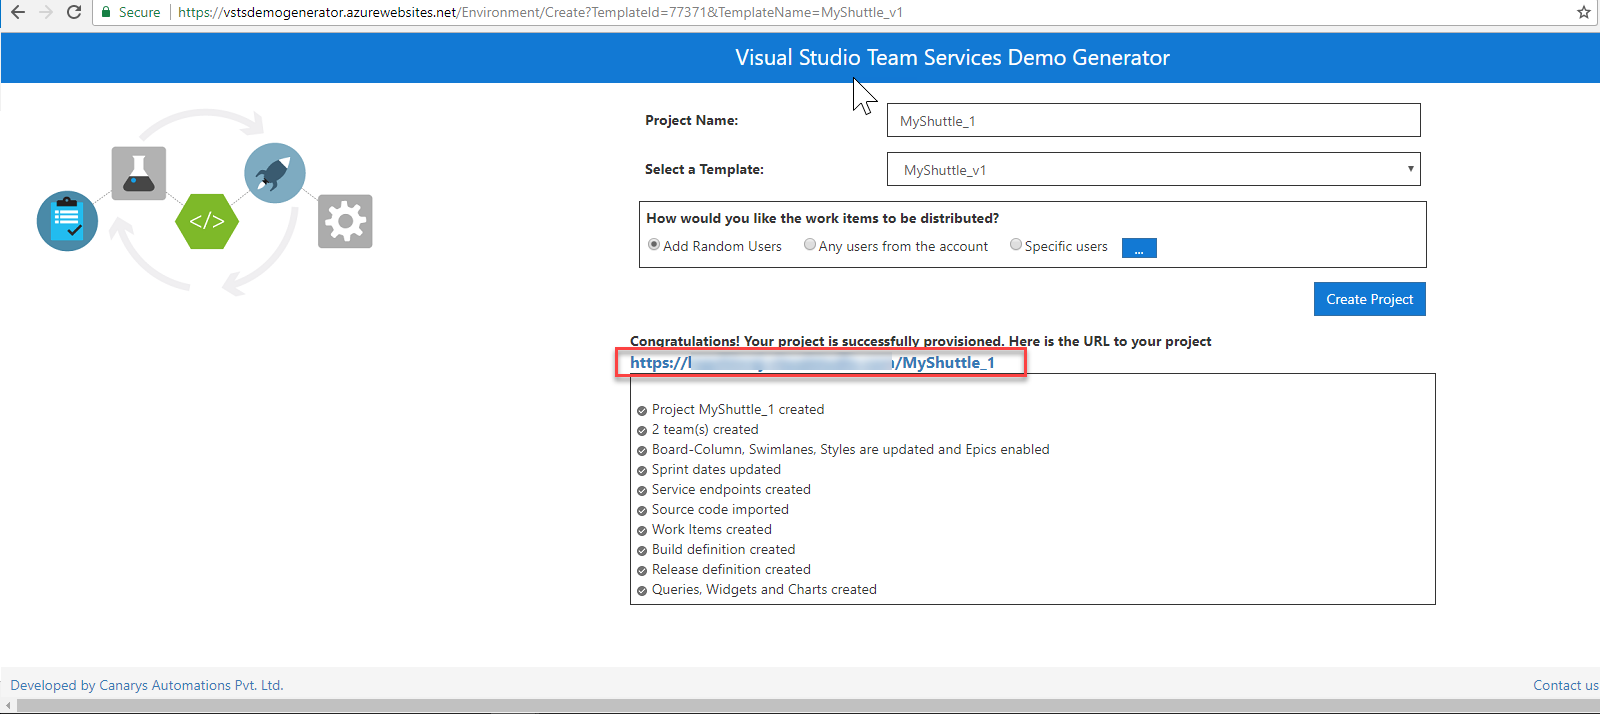
Use the VSTS Demo Generator to provision the MyShuttleDocker sample project on to your VSTS account
VSTS Demo Generator helps you create team projects on your VSTS account with sample content that include source code, work items,iterations, service endpoints, build and release definitions based on the template you choose during the configuration.
-
Provide a project name and click Create Project. If the Docker Integration extension is not installed,the Click Project would not be available until the extension is installed and enabled on the account. Click the on the extension name to install the extension from the marketplace
Using the VSTS Demo Generator link will automatically select the MyShuttleDocker template in the demo generator for the team project creation. To work with other team project templates, use this link instead: https://vstsdemogenerator.azurewebsites.net/
Setting up the Jenkins VM
-
To configure Jenkins, the Jenkins VM image available on the Azure MarketPlace will be used. This will install the latest stable Jenkins version on a Ubuntu Linux VM along with the tools and plugins configured to work with Azure. Click on the Deploy to Azure button below to get started.

-
Once the Jenkins VM is provisioned, click on the Connect button and make a note of the
usernameand theip address. This information will be required to connect to the Jenkins VM from Putty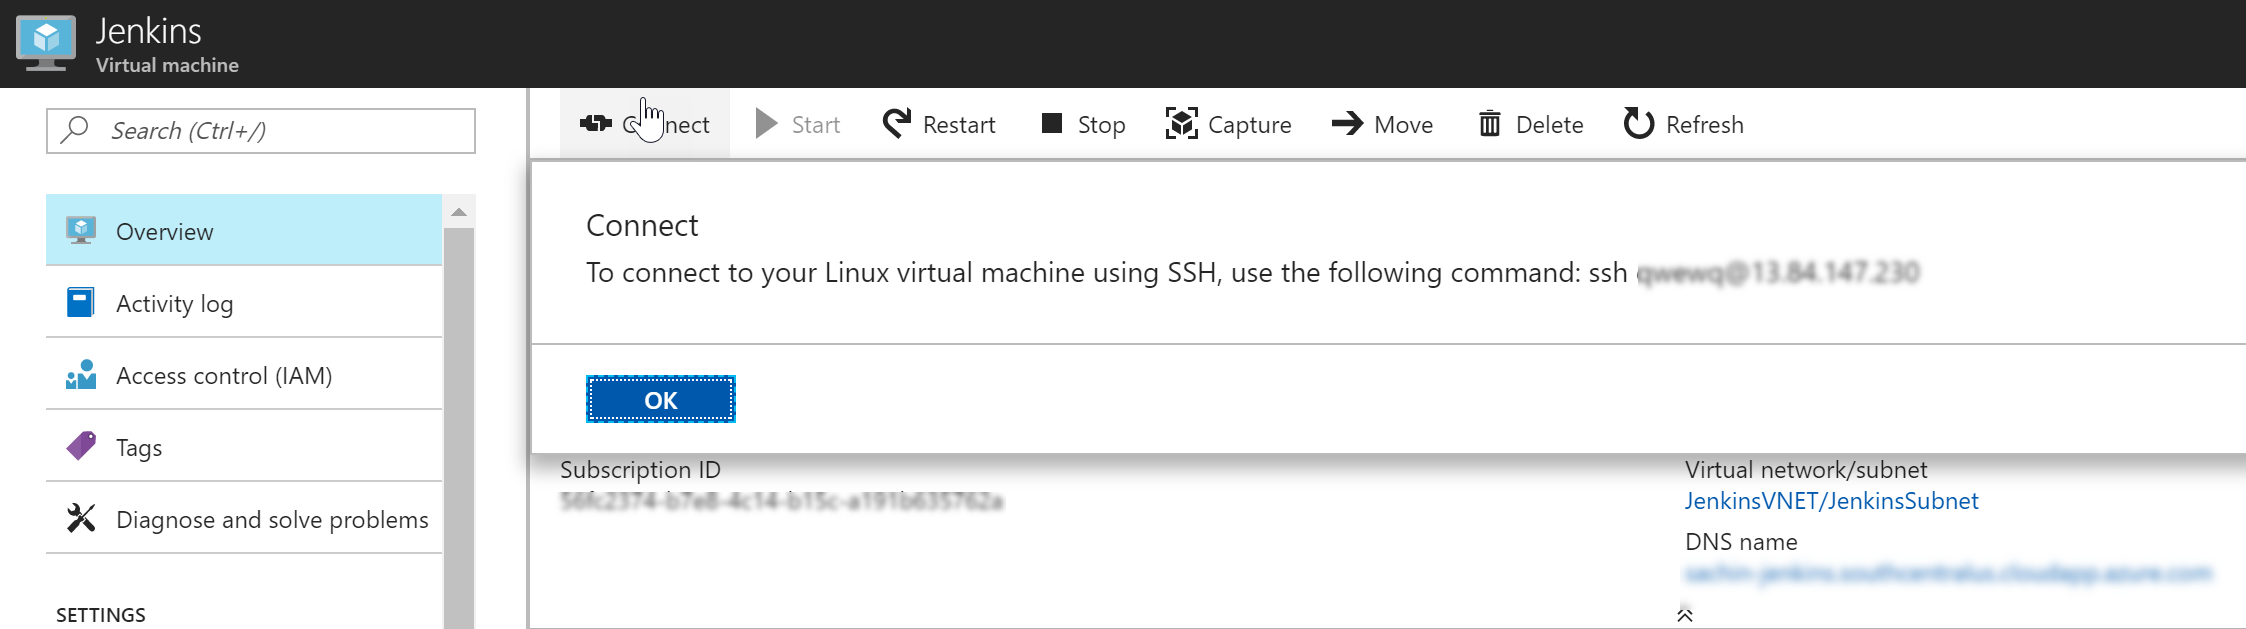 Note: Jenkins, by default, listens on port 8080 using HTTP. To configure a secure HTTPS connection, an SSL certificate will be required. If HTTPS communication is not being configured, the best way to ensure the sign-in credentials are not leaked due to a “Man-in-the-middle” attack is by logging-in using the SSH tunneling. An SSH tunnel is an encrypted tunnel created through a SSH protocol connection, that can be used to transfer unencrypted traffic over an unsecured network.
 -
To initiate a SSH tunnel, the following command needs to be run from a Command Prompt.
putty.exe -ssh -L 8080:localhost:8080 <username>@<ip address>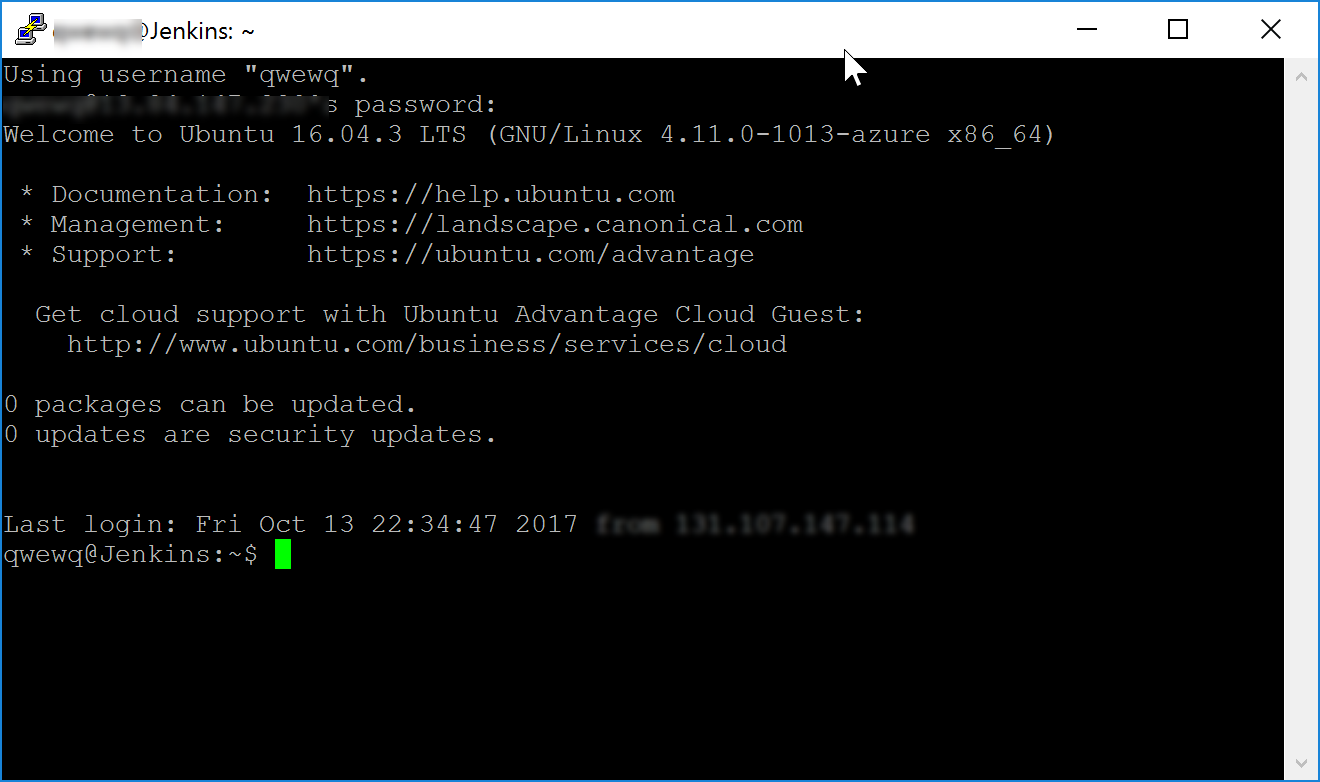
To run the above command, either the Putty.exe needs to be placed in the path selected in the Command Prompt or the full path of the Putty.exe need to be provided in the command.
-
Login with the user name and password that was provided during the provisioning of the Jenkins VM.
-
Once the connection is successful, open a browser on the host machine and navigate to the URL http://localhost:8080. The Getting Started page for Jenkins will be displayed.
-
The initial password needs to be provided in the Getting Started screen to unlock Jenkins. For security reasons, Jenkins will generate a password and save it in a file on the server.
Important: At the time of writing this lab, an open issue in Jenkins was noted where the setup wizard would not resume after restart, skipping some of the steps listed below. If you do not see the screen below, skip the rest of the section and see Logging into Jenkins with the default credentials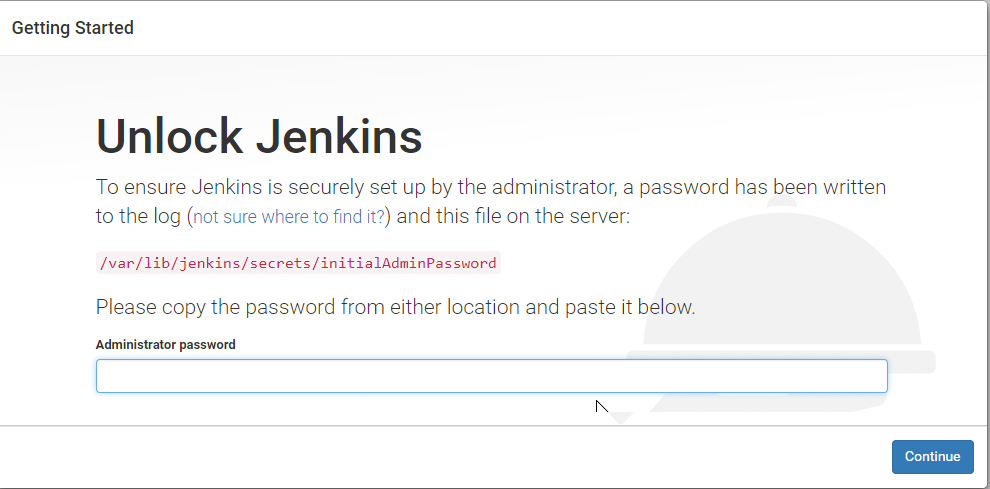
-
Return to the Putty terminal and type the following command to open the password file and copy the password. Press the Esc button and then type :q! at the prompt to exit the vi editor without saving the file.
sudo vi /var/lib/jenkins/secrets/initialAdminPasswordYou can double click on the password text and use CTRL+C to copy the text and place it in the clipboard
-
Return to the browser, paste the copied text in the Administrator password text box and click on the Continue button.

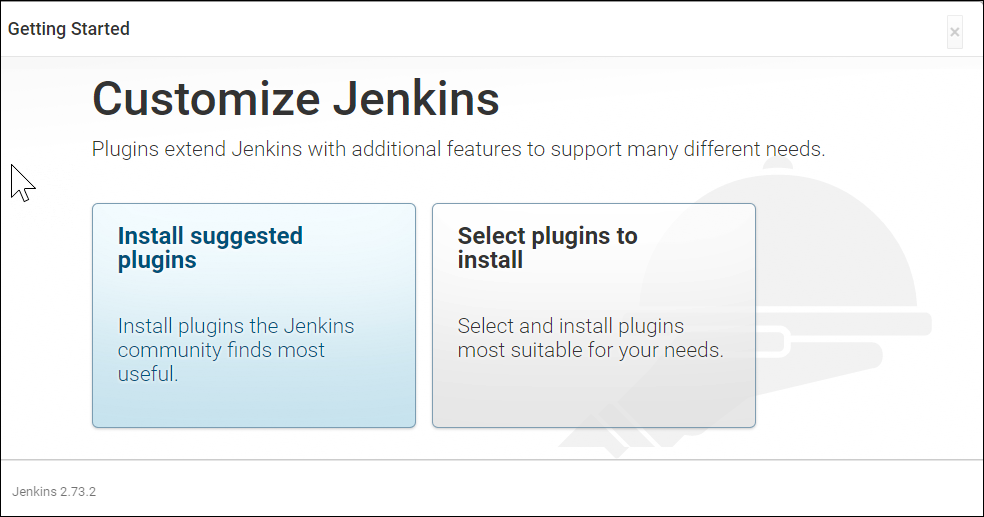
Jenkins has a vast ecosystem with a strong and active open source community users contributing hundreds of useful plugins. While configuring Jenkins, choose between installing the most commonly used plugins or selected plugins.
-
The Maven plugin is also required for the lab but will be installed later. Click on the Install suggested plugins option to initiate the configuration.
-
To work with Jenkins, a new
Adminuser needs to be created. Provide the User name, Password, Full name and Email address in the Getting Started screen and then click on the Save and Finish button.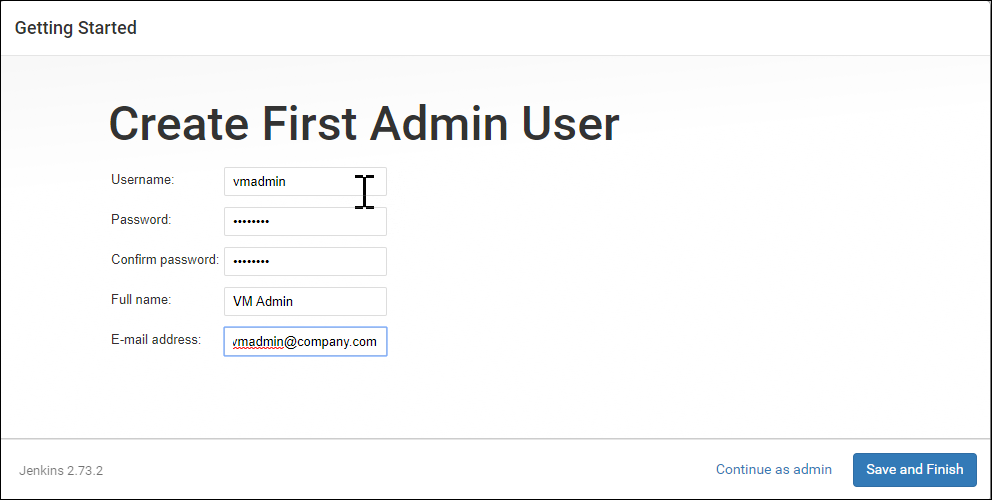
-
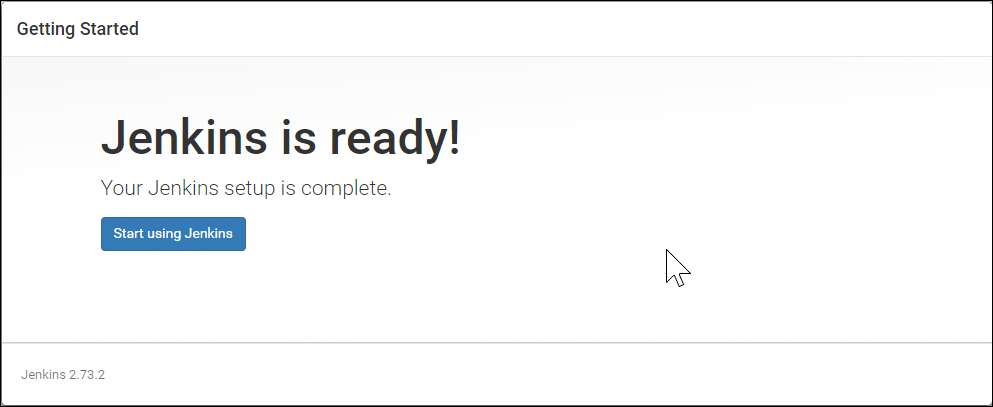
Jenkins will now be ready for use. Click on the Start using Jenkins button to start using it.
Installing and Configuring Maven
-
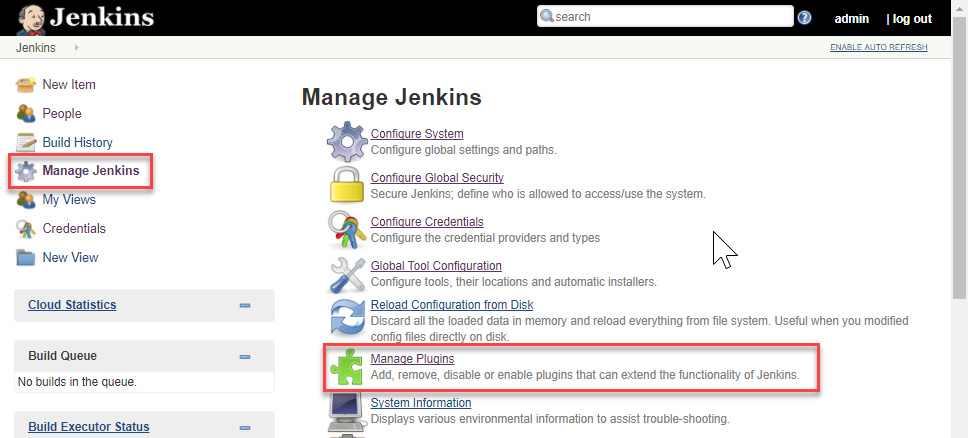
Click the Manage Jenkins option on the Jenkins home page to navigate to the Manage Jenkins screen, the centralized one-stop-shop for all the Jenkins configuration. From this screen, the configuration of the Jenkins server, the installation and upgrades of plugins, keeping track of system load, managing distributed build servers can be managed.
-
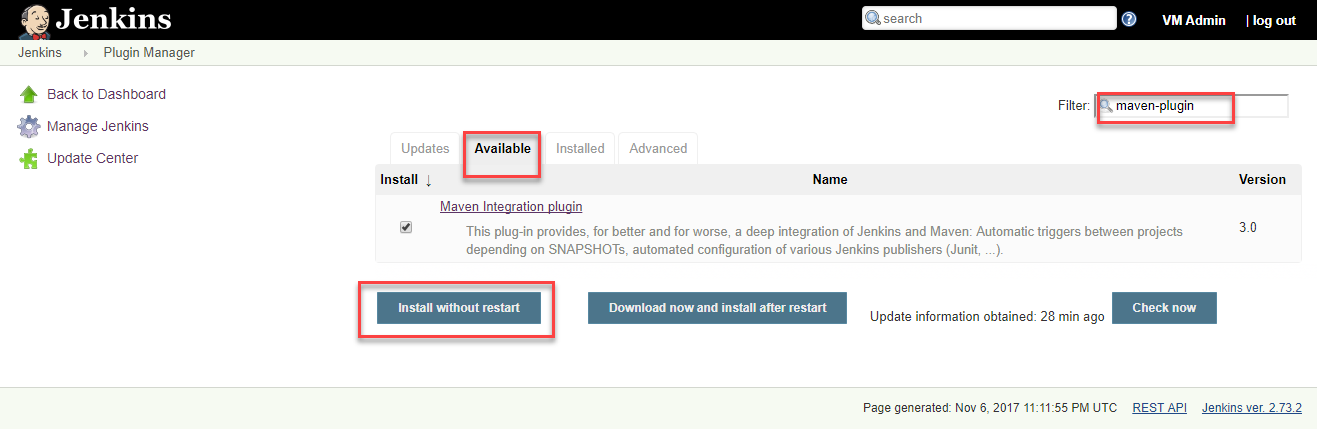
Click on the Manage Plugins option, select the Available tab and search for
maven-pluginin the filter box.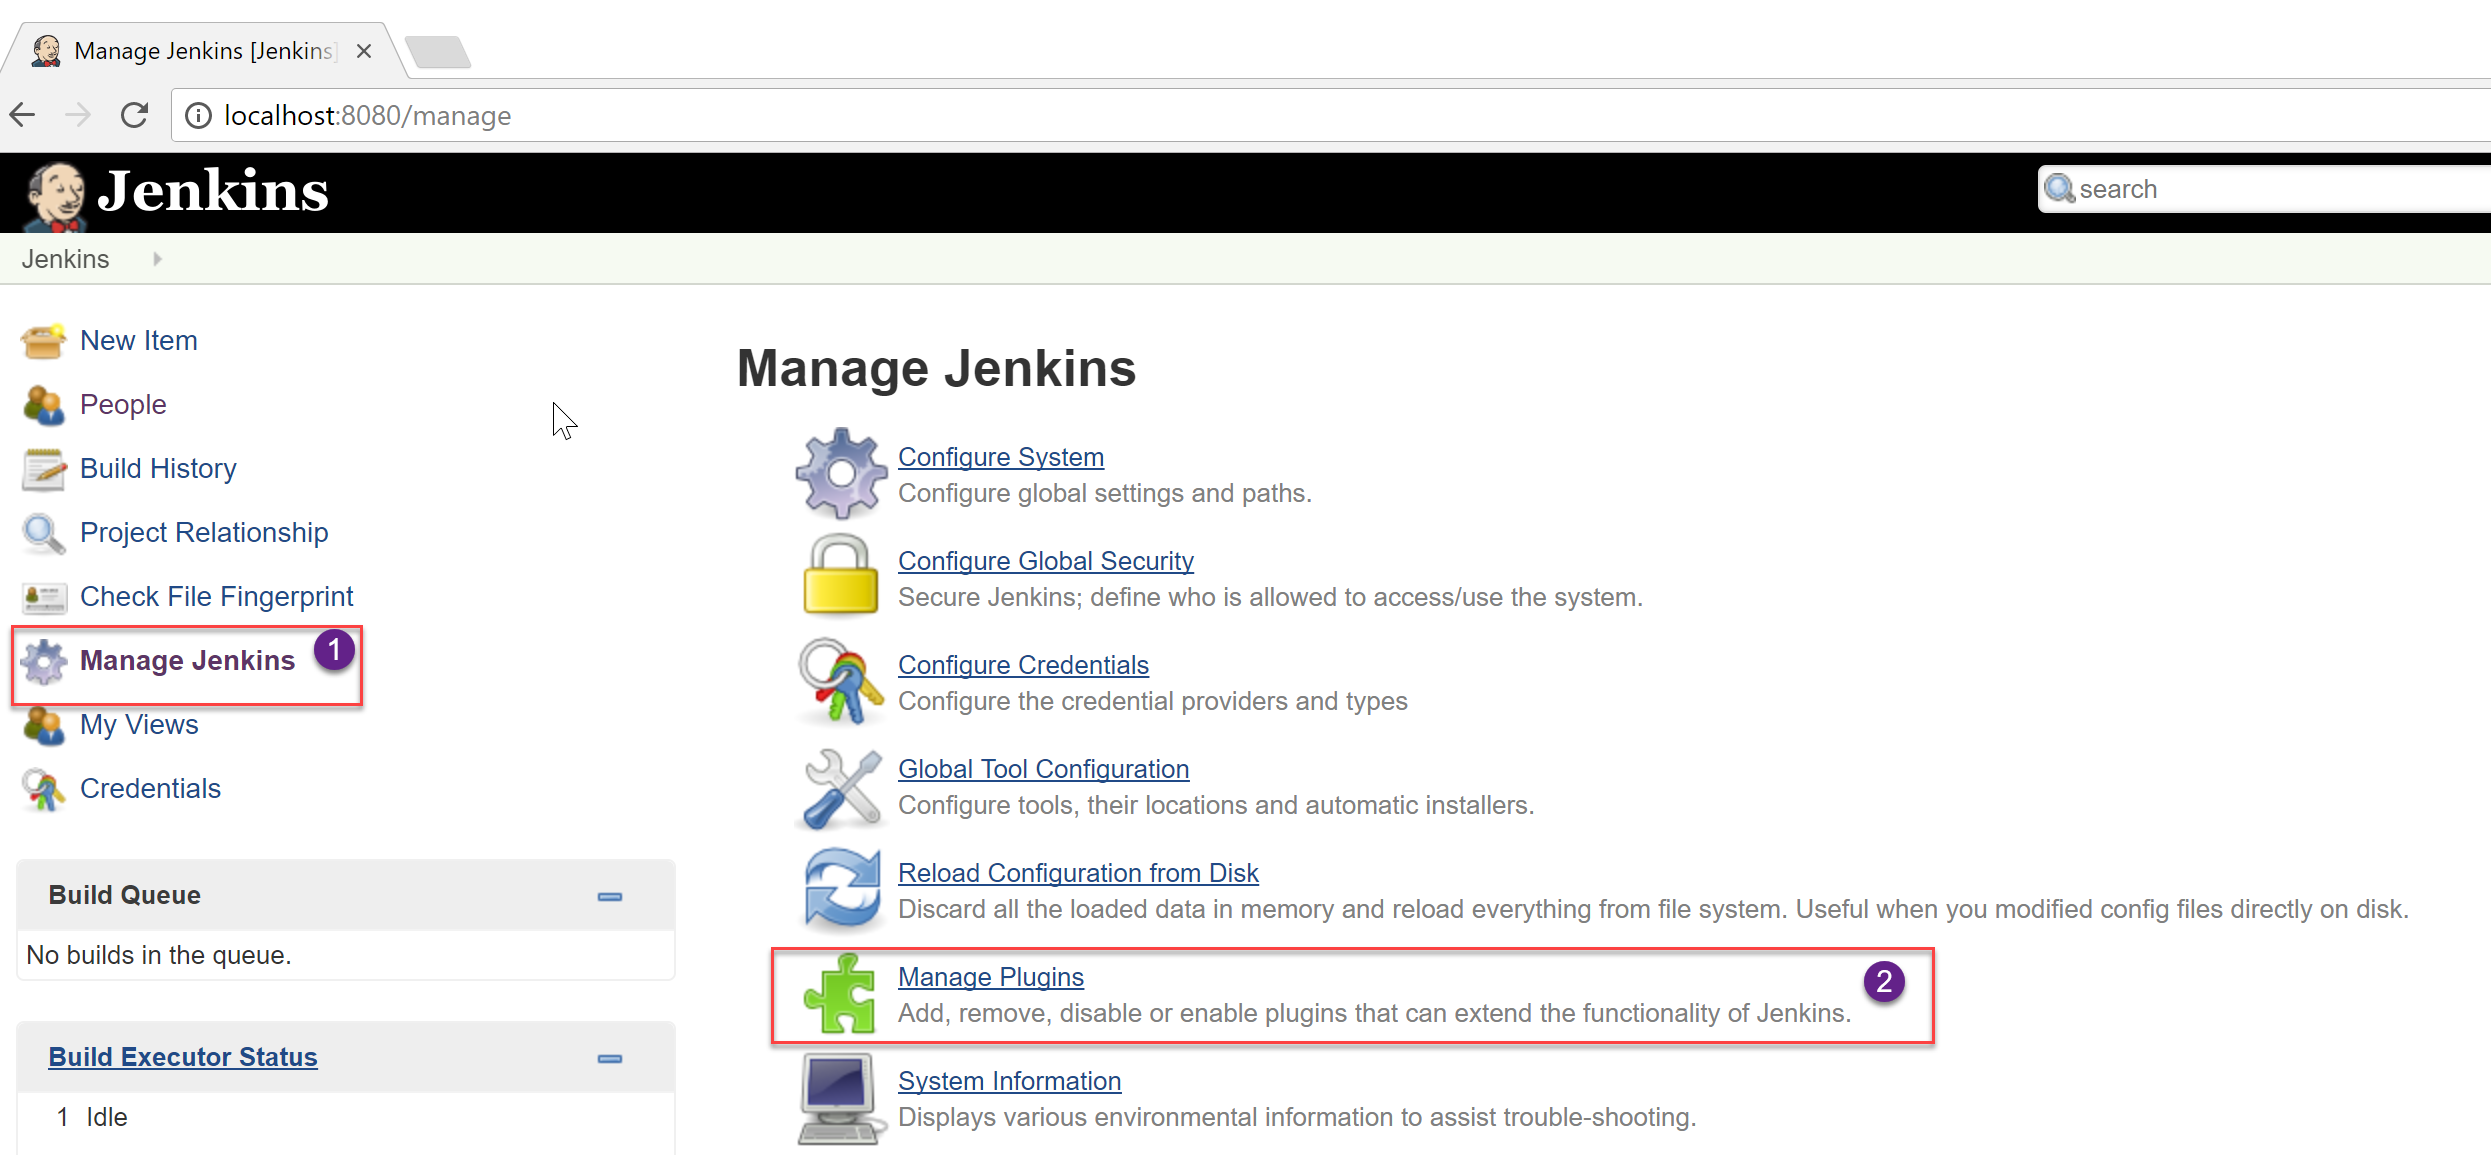
-
Select the Maven Integration Plugin and click on the Install without restart button to install the plugin.
-
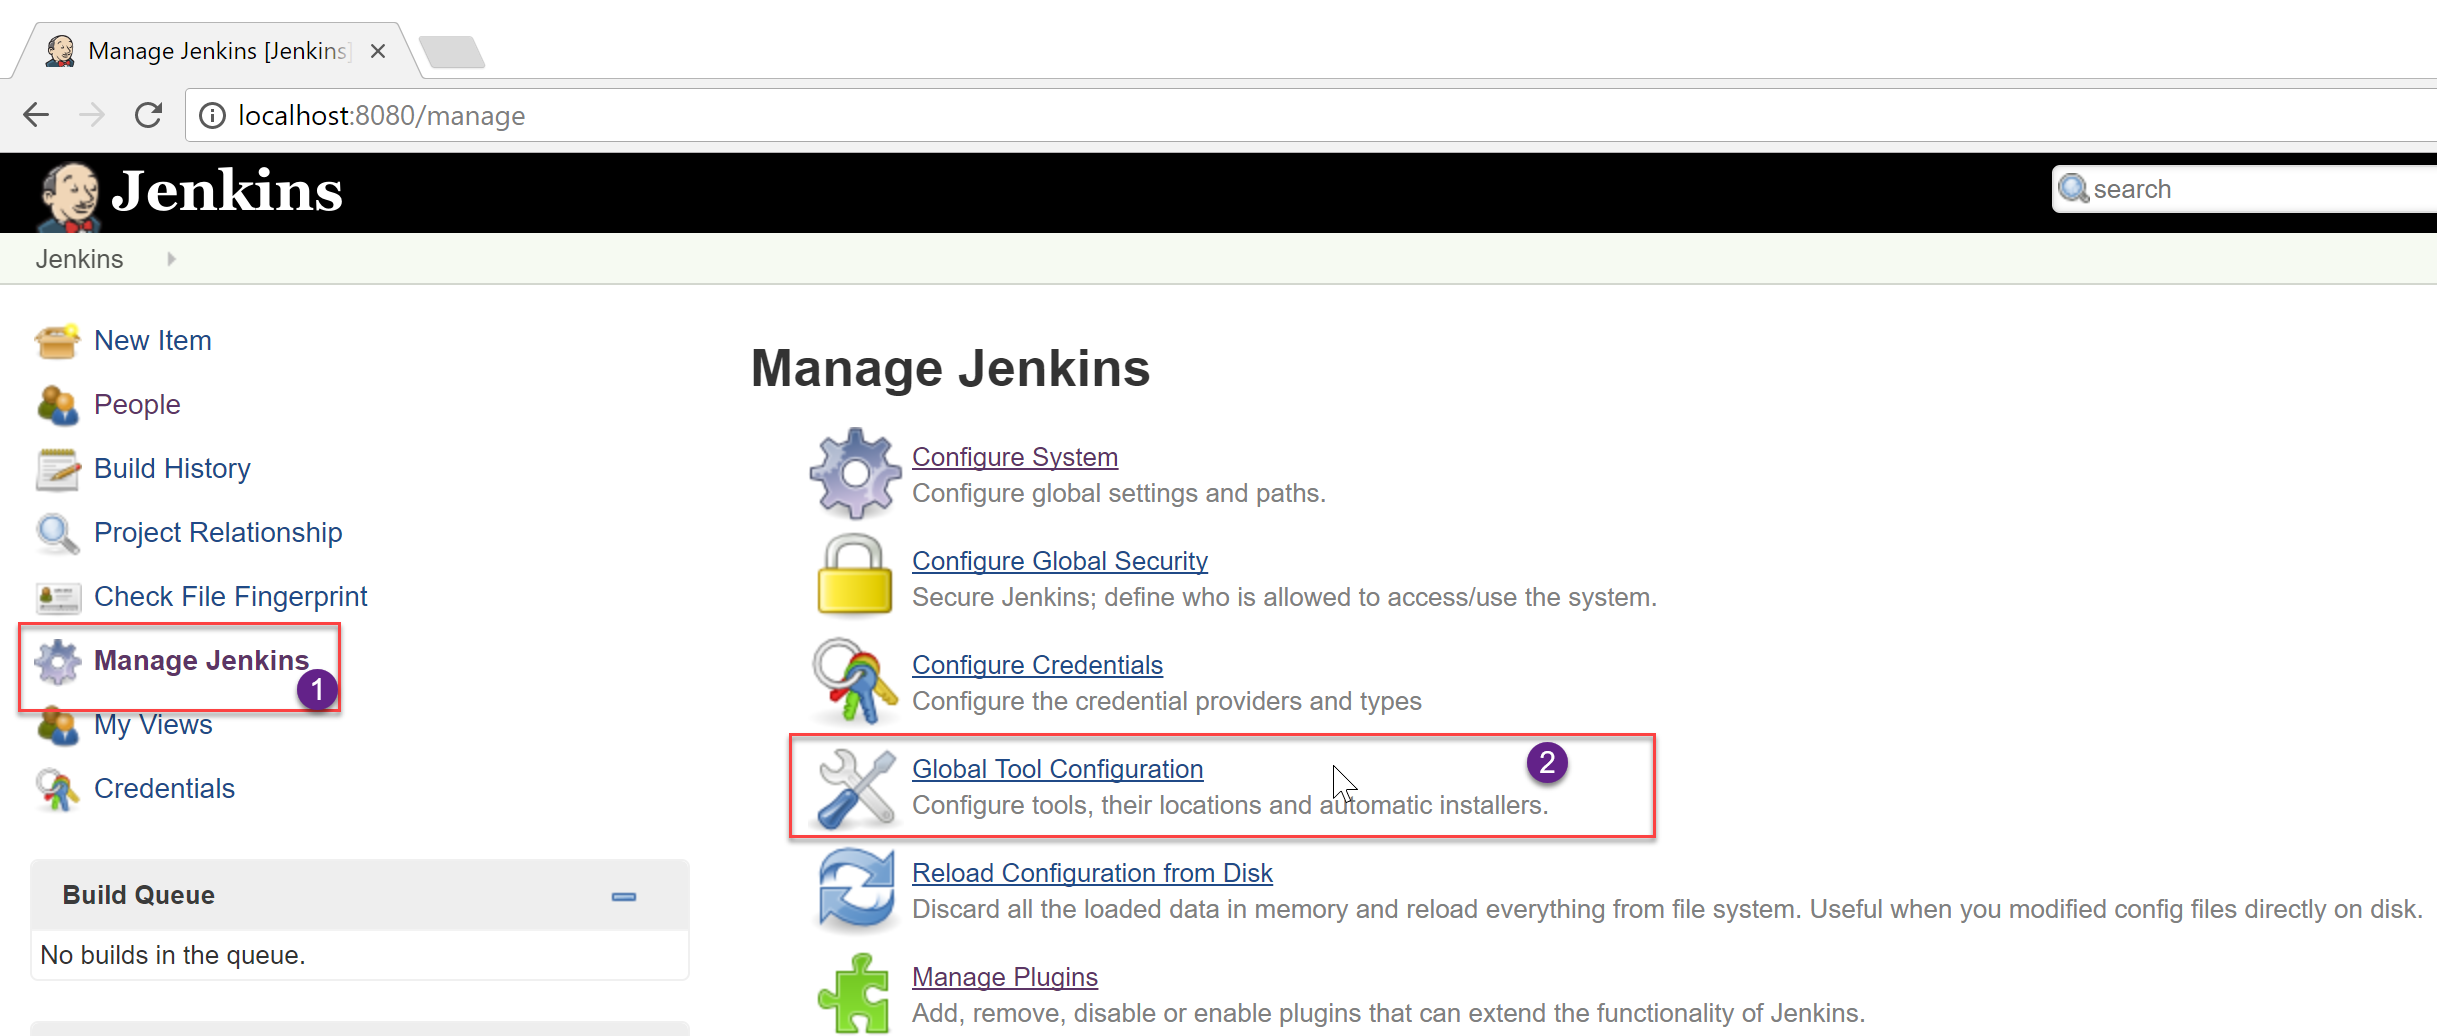
Once the plugin is installed, click on the Global Tool Configuration option.
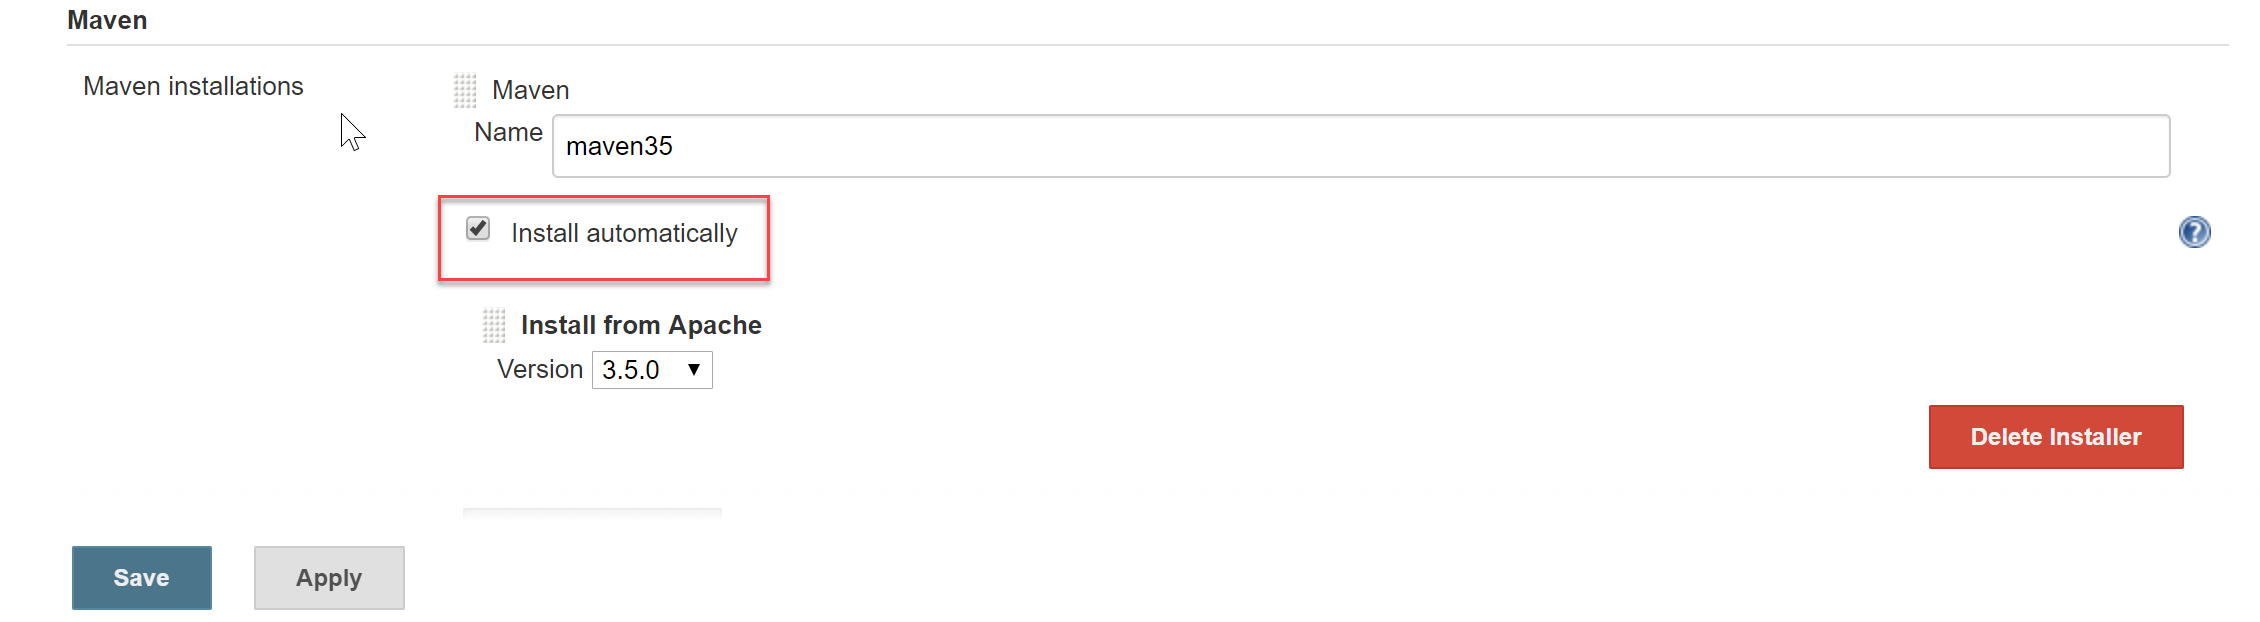
Jenkins provides great out-of-the-box support for Maven. Since the Maven is not yet installed, it can be manually installed by extracting the
tarfile located in a shared folder. Alternatively, when the Install automatically option is selected in the Global Tool Configuration screen, Jenkins will download and install Maven from the Apache website when a build job requires it. -
To install Maven, select the Install automatically option and click on the Apply button.
The latest version of Maven at the time of writing the lab was 3.5
-
Click on the Back to Dashboard button to return to the home page.
Creating a new build job in Jenkins
-
From the Jenkins home page, click on the New Item option. Provide a name for the build definition, select the Maven project and click on the OK button.

-
Now scroll down to the Source code Management section. Select the Git option and provide the clone URL of the VSTS Git repo in the format
http://{your account name}.visualstudio.com/{team project name}/_git/MyShuttleNote: If you do not see Git under Source code management, you will need to install/enable the Git plugin as described here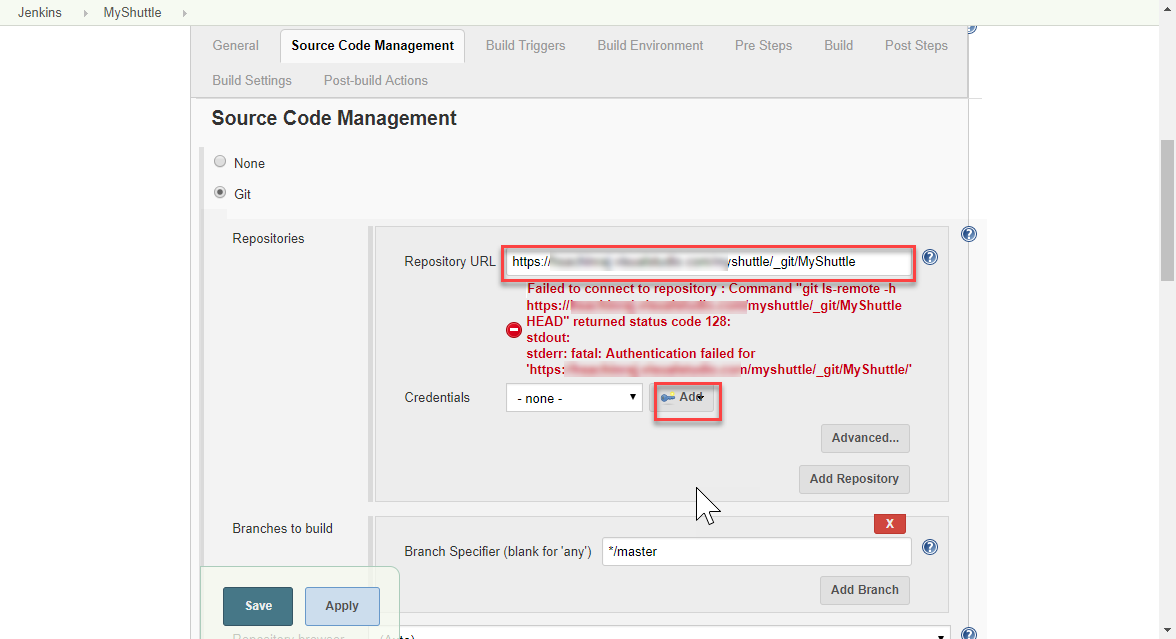
The VSTS Git repos are private and requires user credentials to be provided to access the repository. If the Git credentials is not set already, it can be done from the VSTS.
-
Go to your VSTS project page and select the Clone option, provide the
User nameandPasswordand then click on the OK button.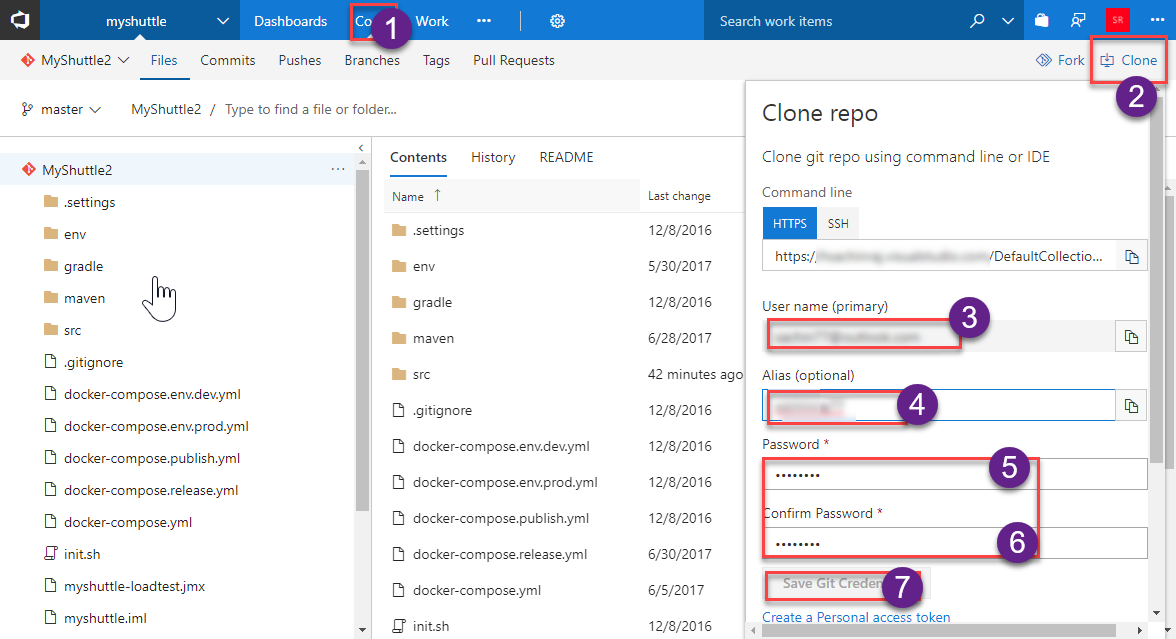
-
Click on the Add | Jenkins option to add a new credential. Provide the
User nameandPasswordcreated earlier and click the Add button to close the wizard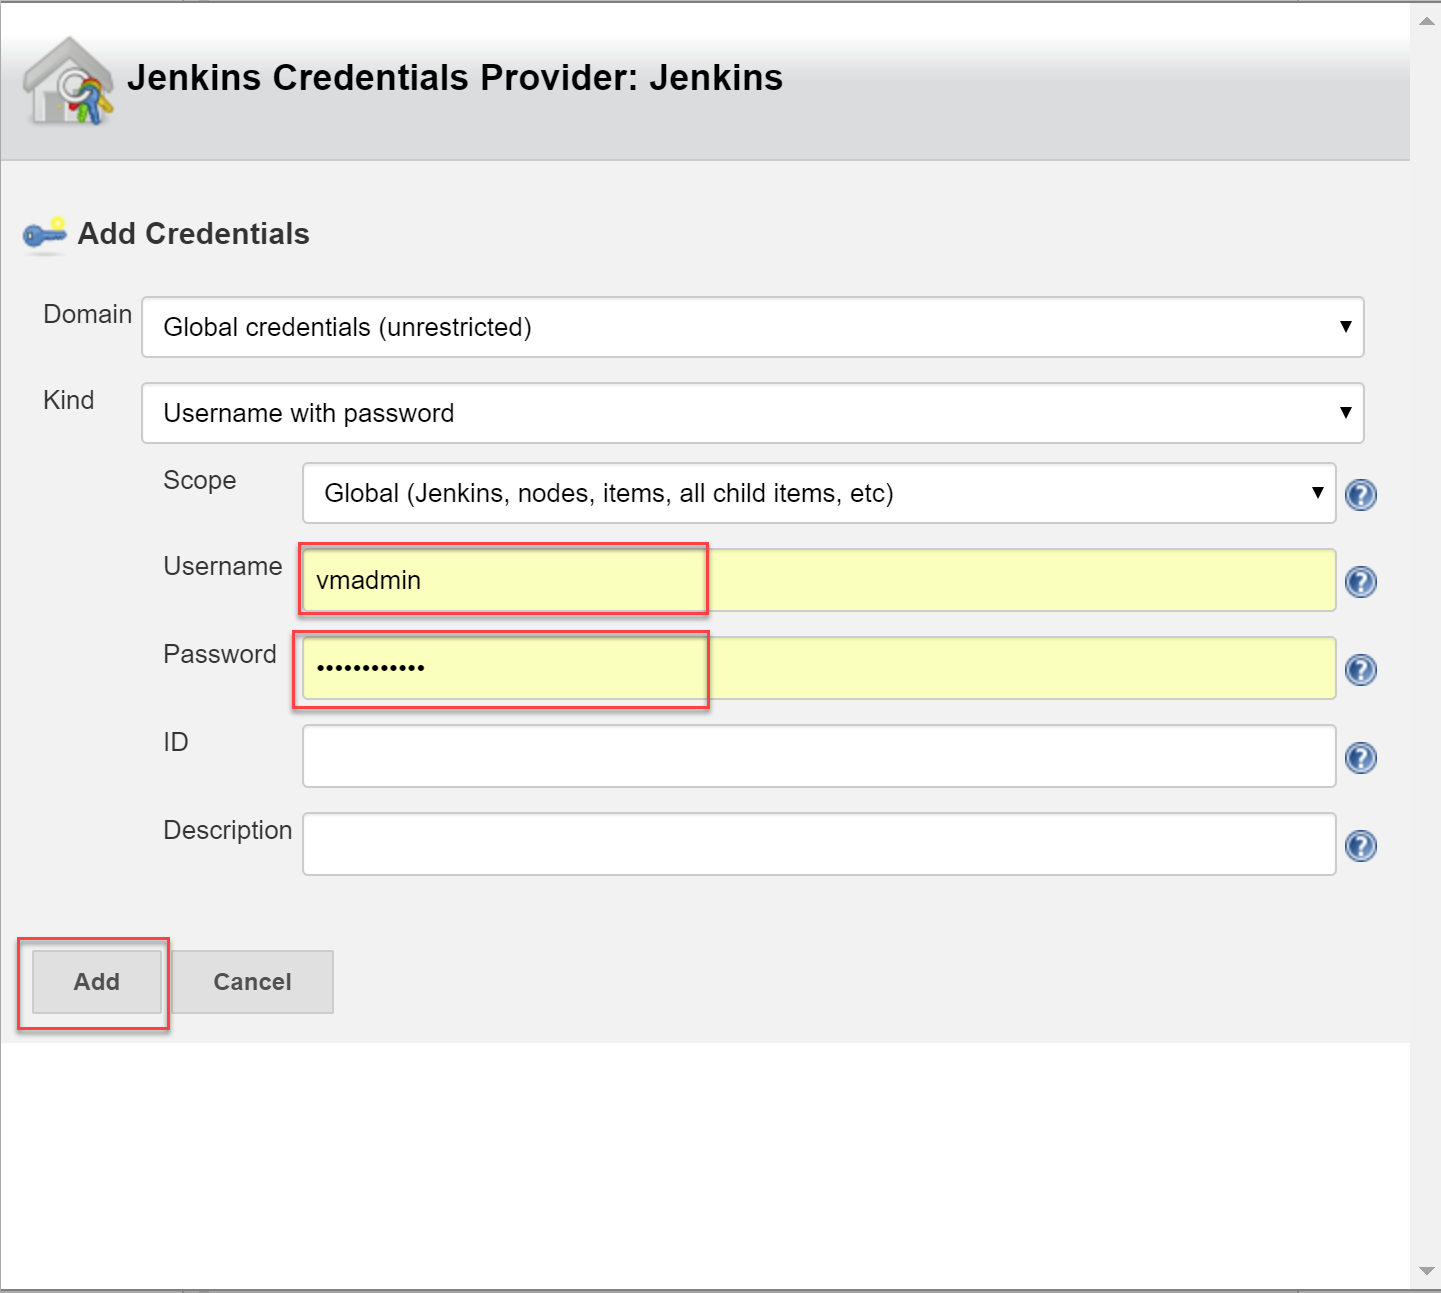
-
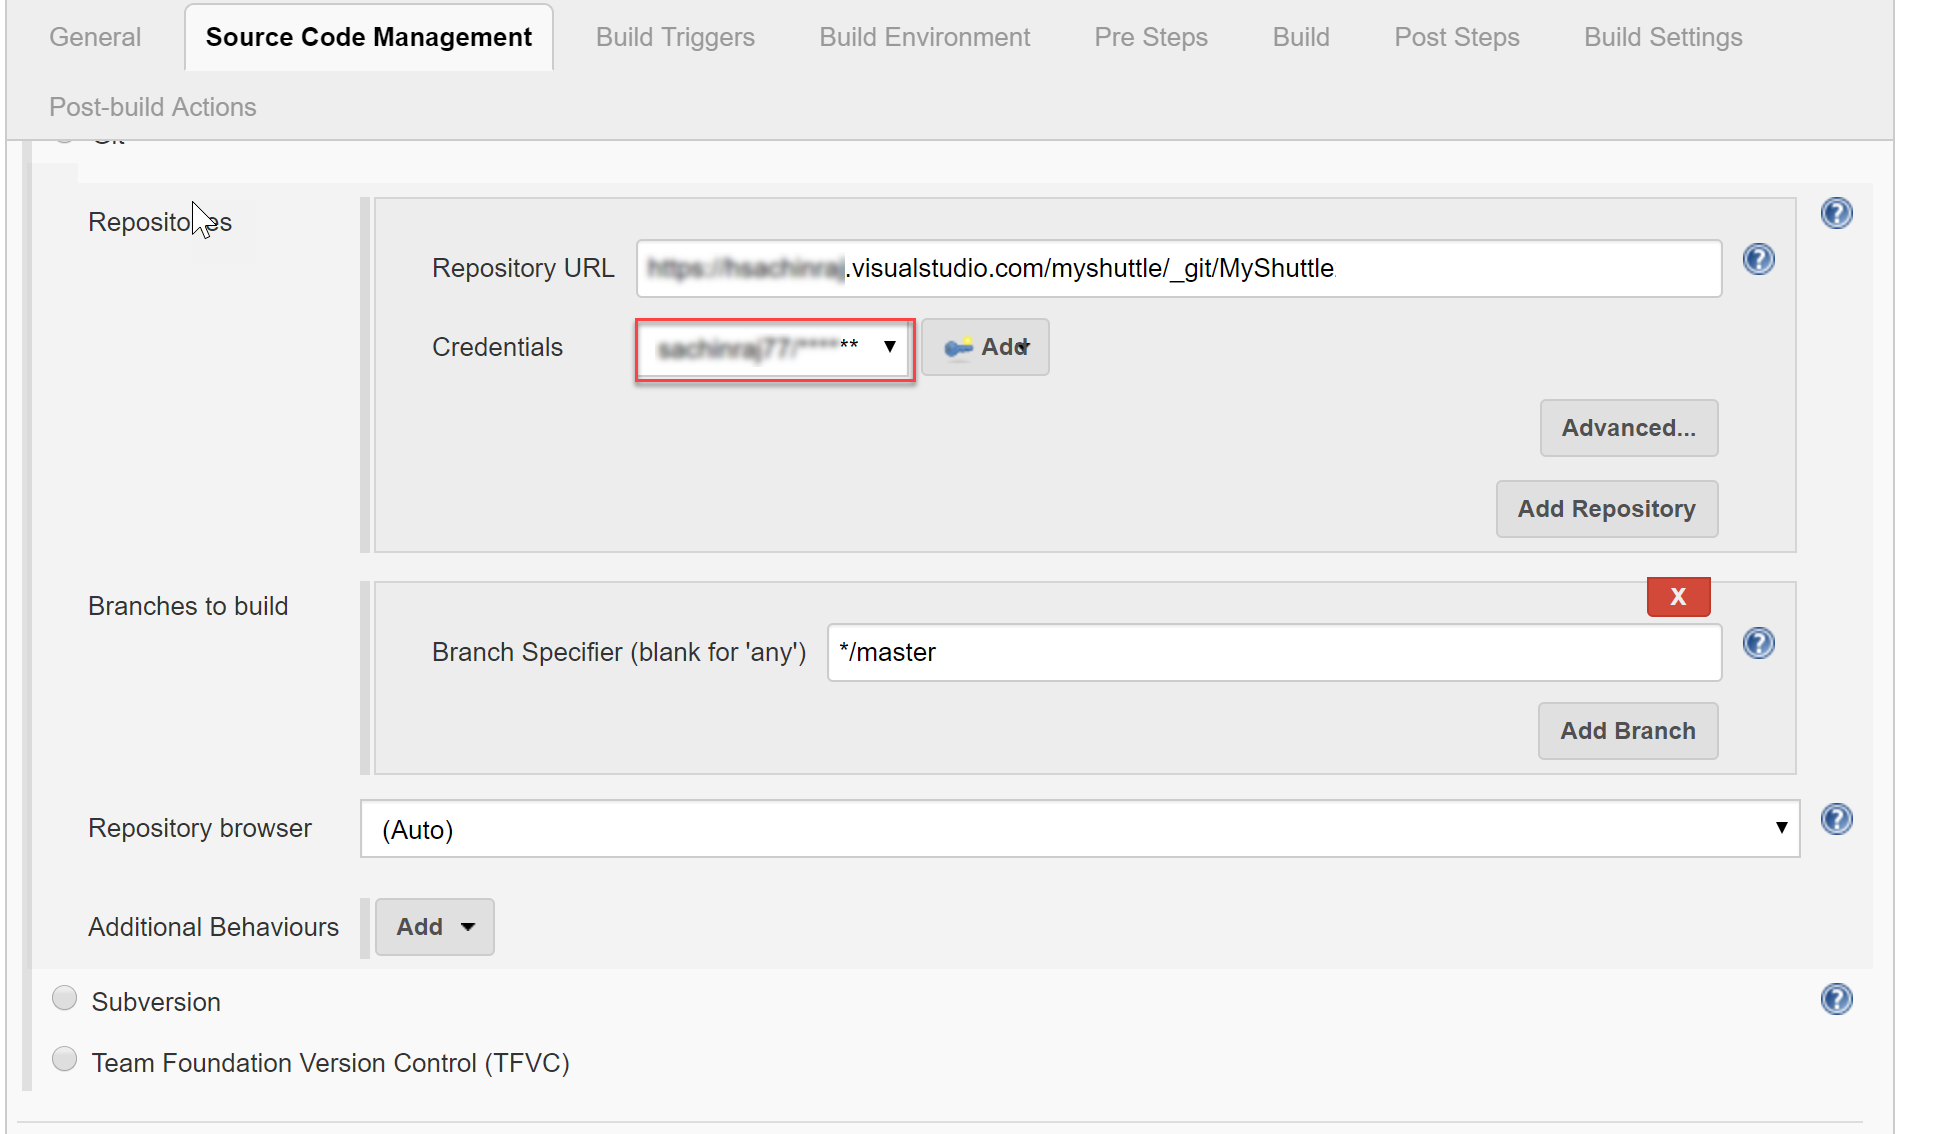
Select the credential created in the previous step from the drop-down. The error message should disappear now.
The source code for this application has both unit tests and UI tests. Only the unit tests will be included in this lab.
-
Scroll down to the Build section and provide the text
package -Dtest=FaresTest,SimpleTestin the Goals and options field. Click on the Save button to navigate to the home page of the project.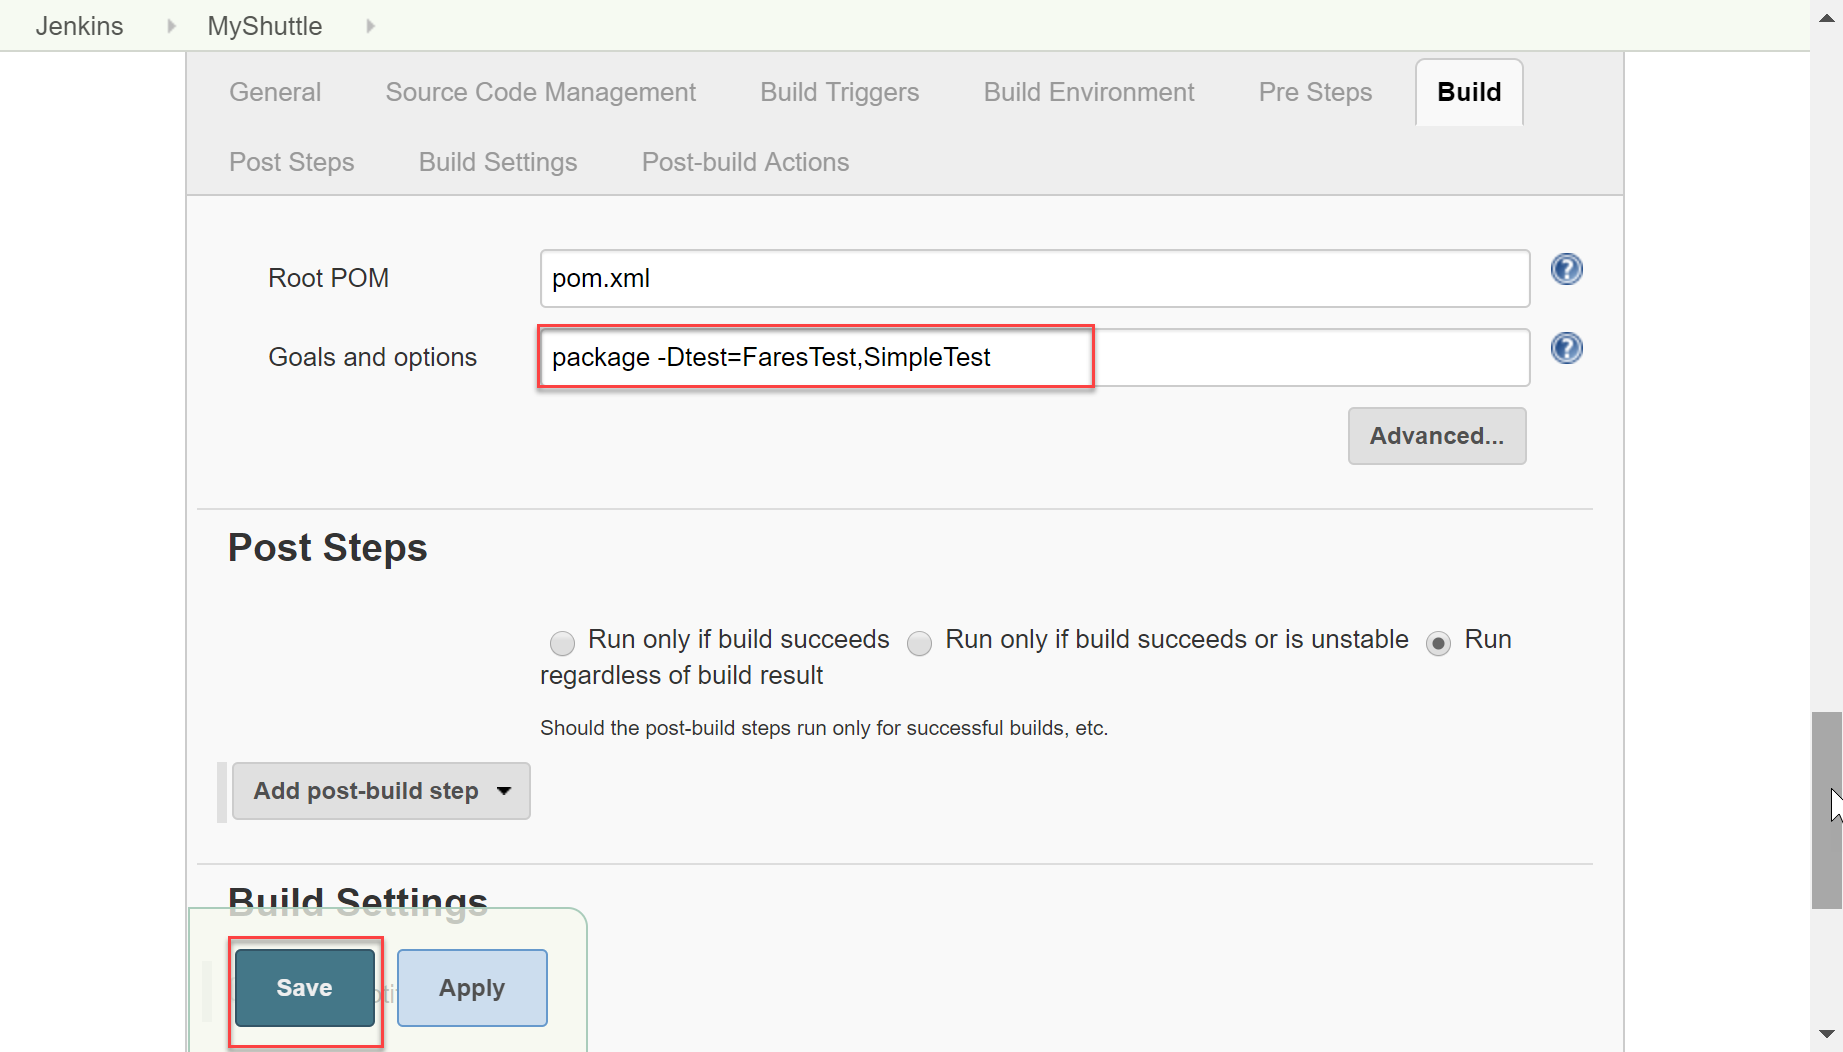
-
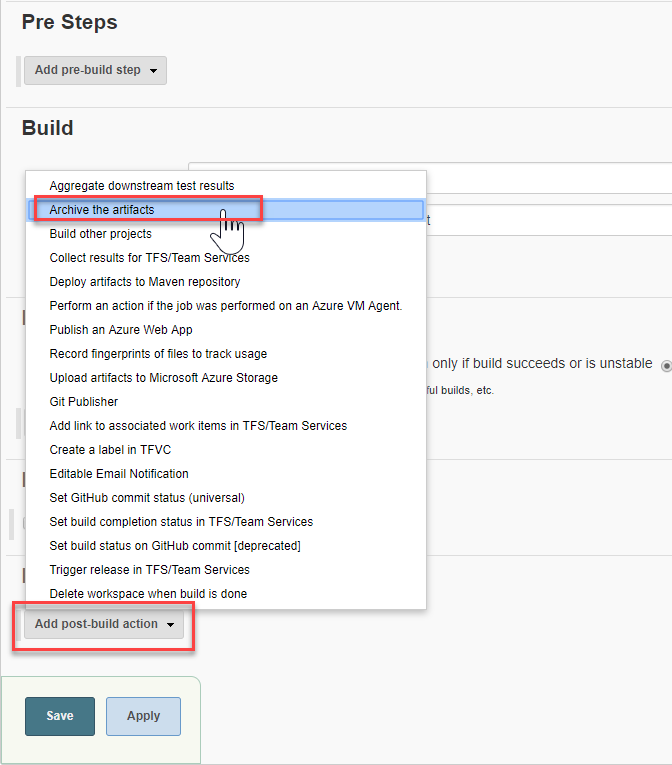
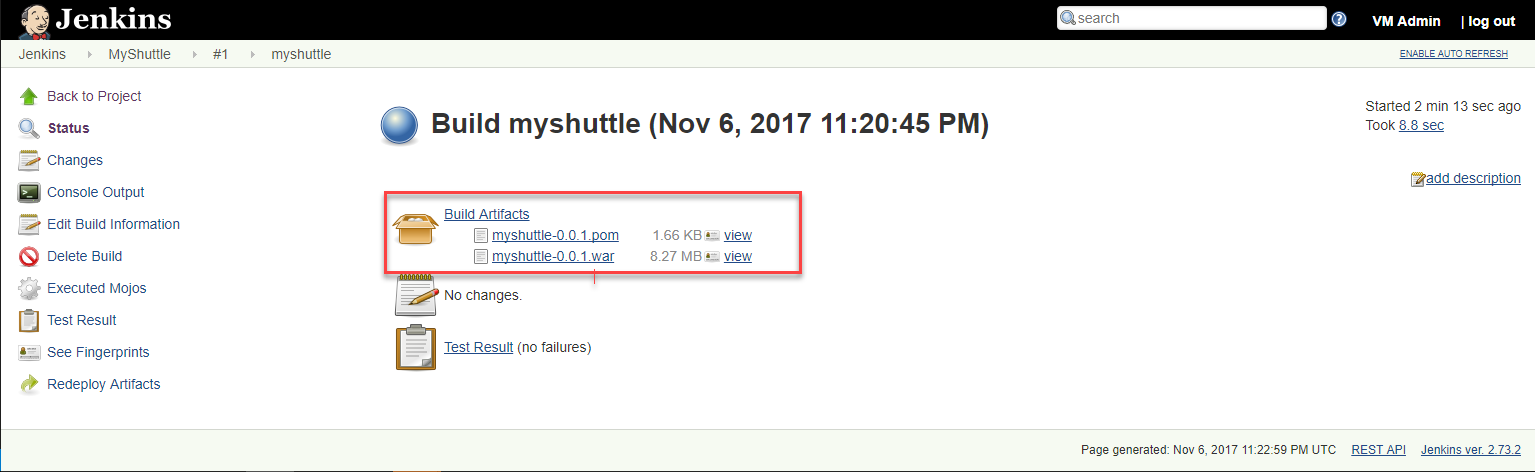
To configure the Post build actions in the Post-Build Actions section, click on the Add post-build action button and choose the Archive the artifacts option.
-
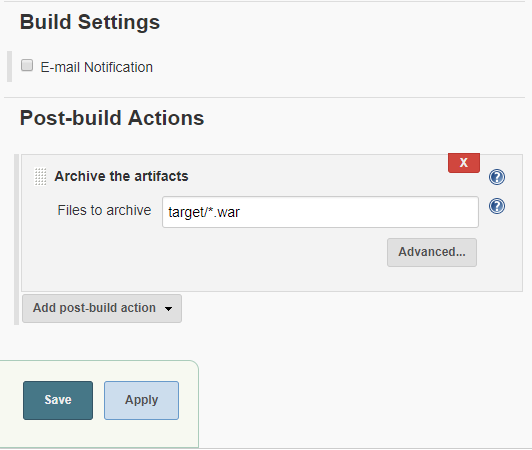
Enter target/*.war in the Files to archive text box. Click on the Save button to save the settings and return to the project page.
-
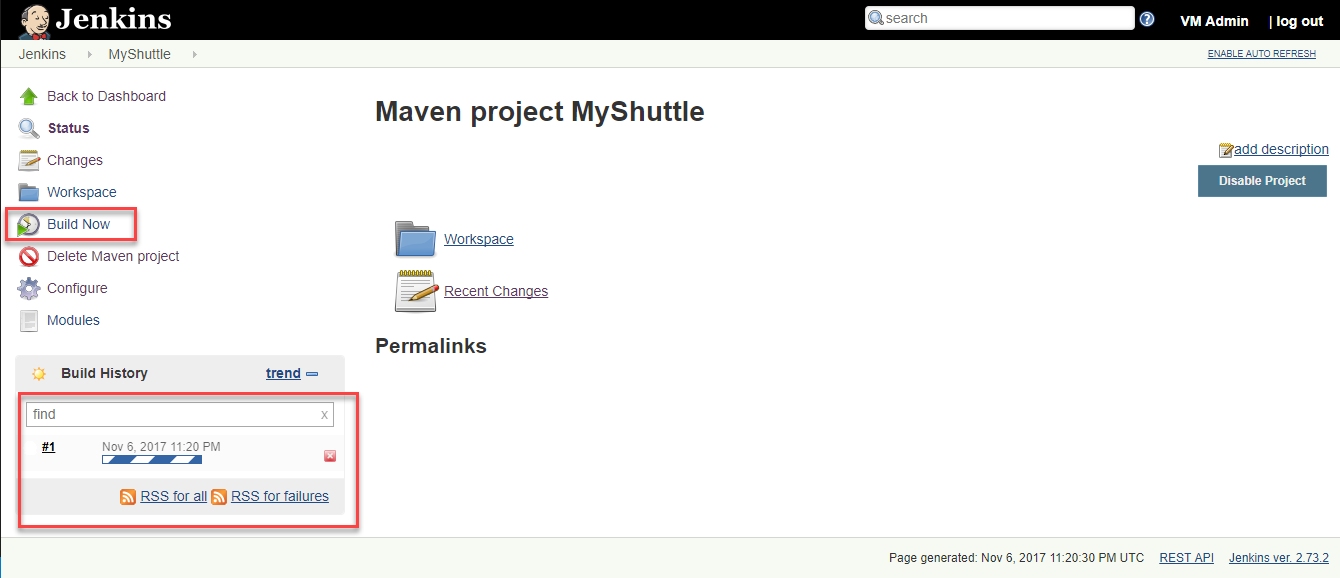
Since the configuration is now completed, click on the Build Now option to initiate an Ad-hoc build.
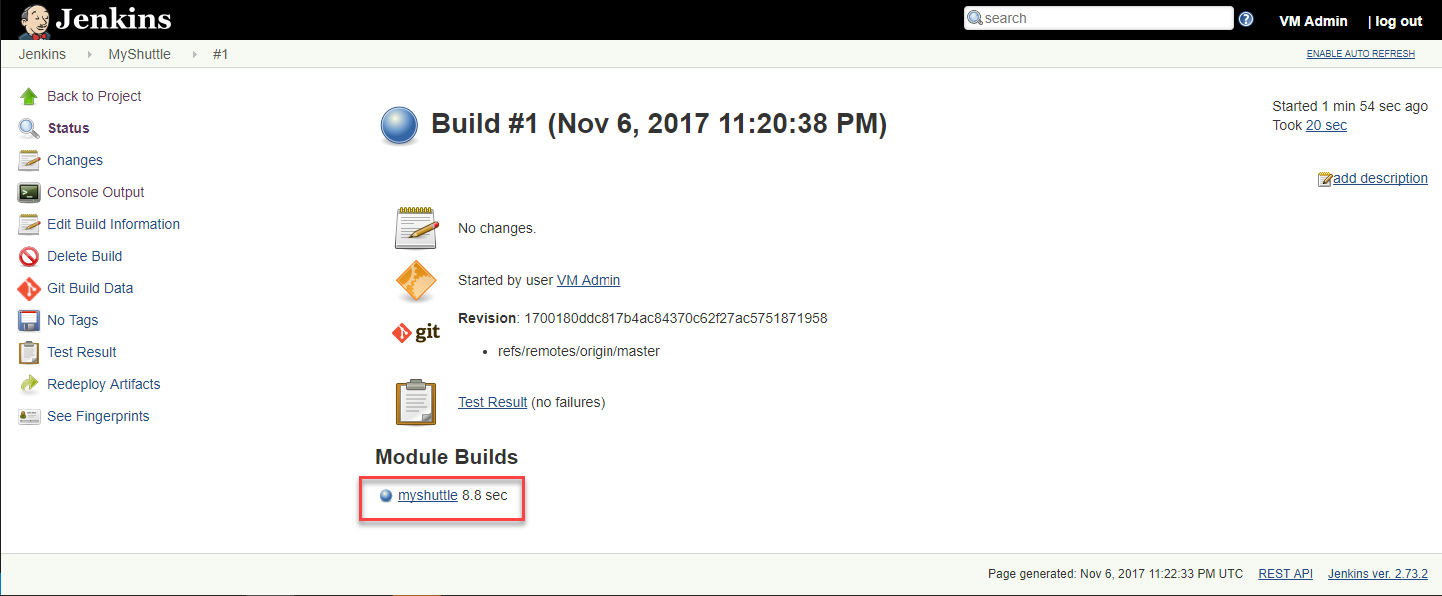
The build progress will be displayed on the left pane in the Build History section
-
To view the build details and the list of build artifacts, click on the build number displayed in the Module Builds section.
-
Click on the Test Results option to view the results of the unit tests that were included in the build definition.
Approach 1: Using Jenkins without the VSTS Build
In this section, the Jenkins will be configured to run separately. A service hook will be configured in VSTS to trigger a Jenkins build whenever source code changes are pushed to a particular branch.
-
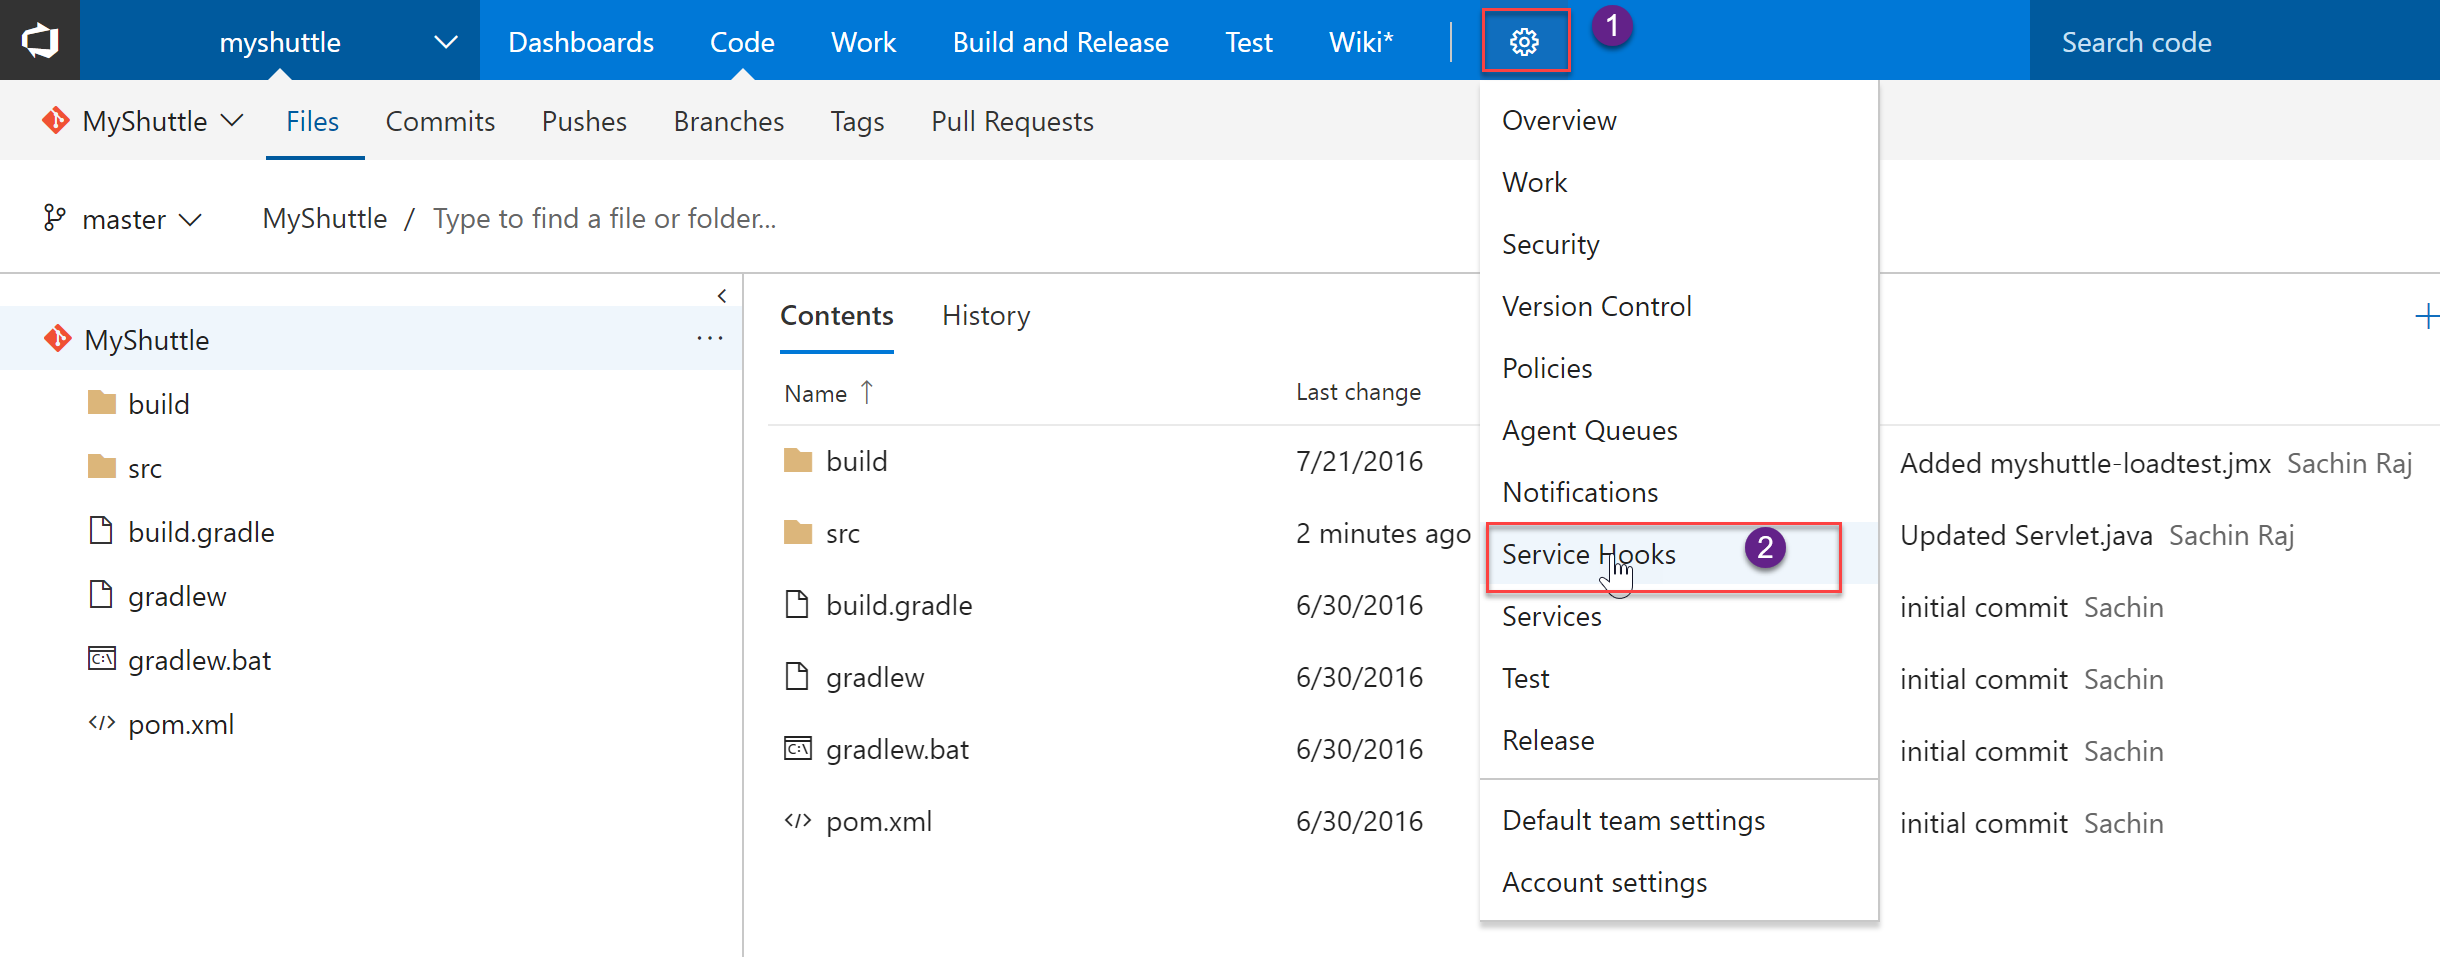
To configure the service hook, navigate to the VSTS team project page, click on the Settings icon and choose the Service Hooks option
-
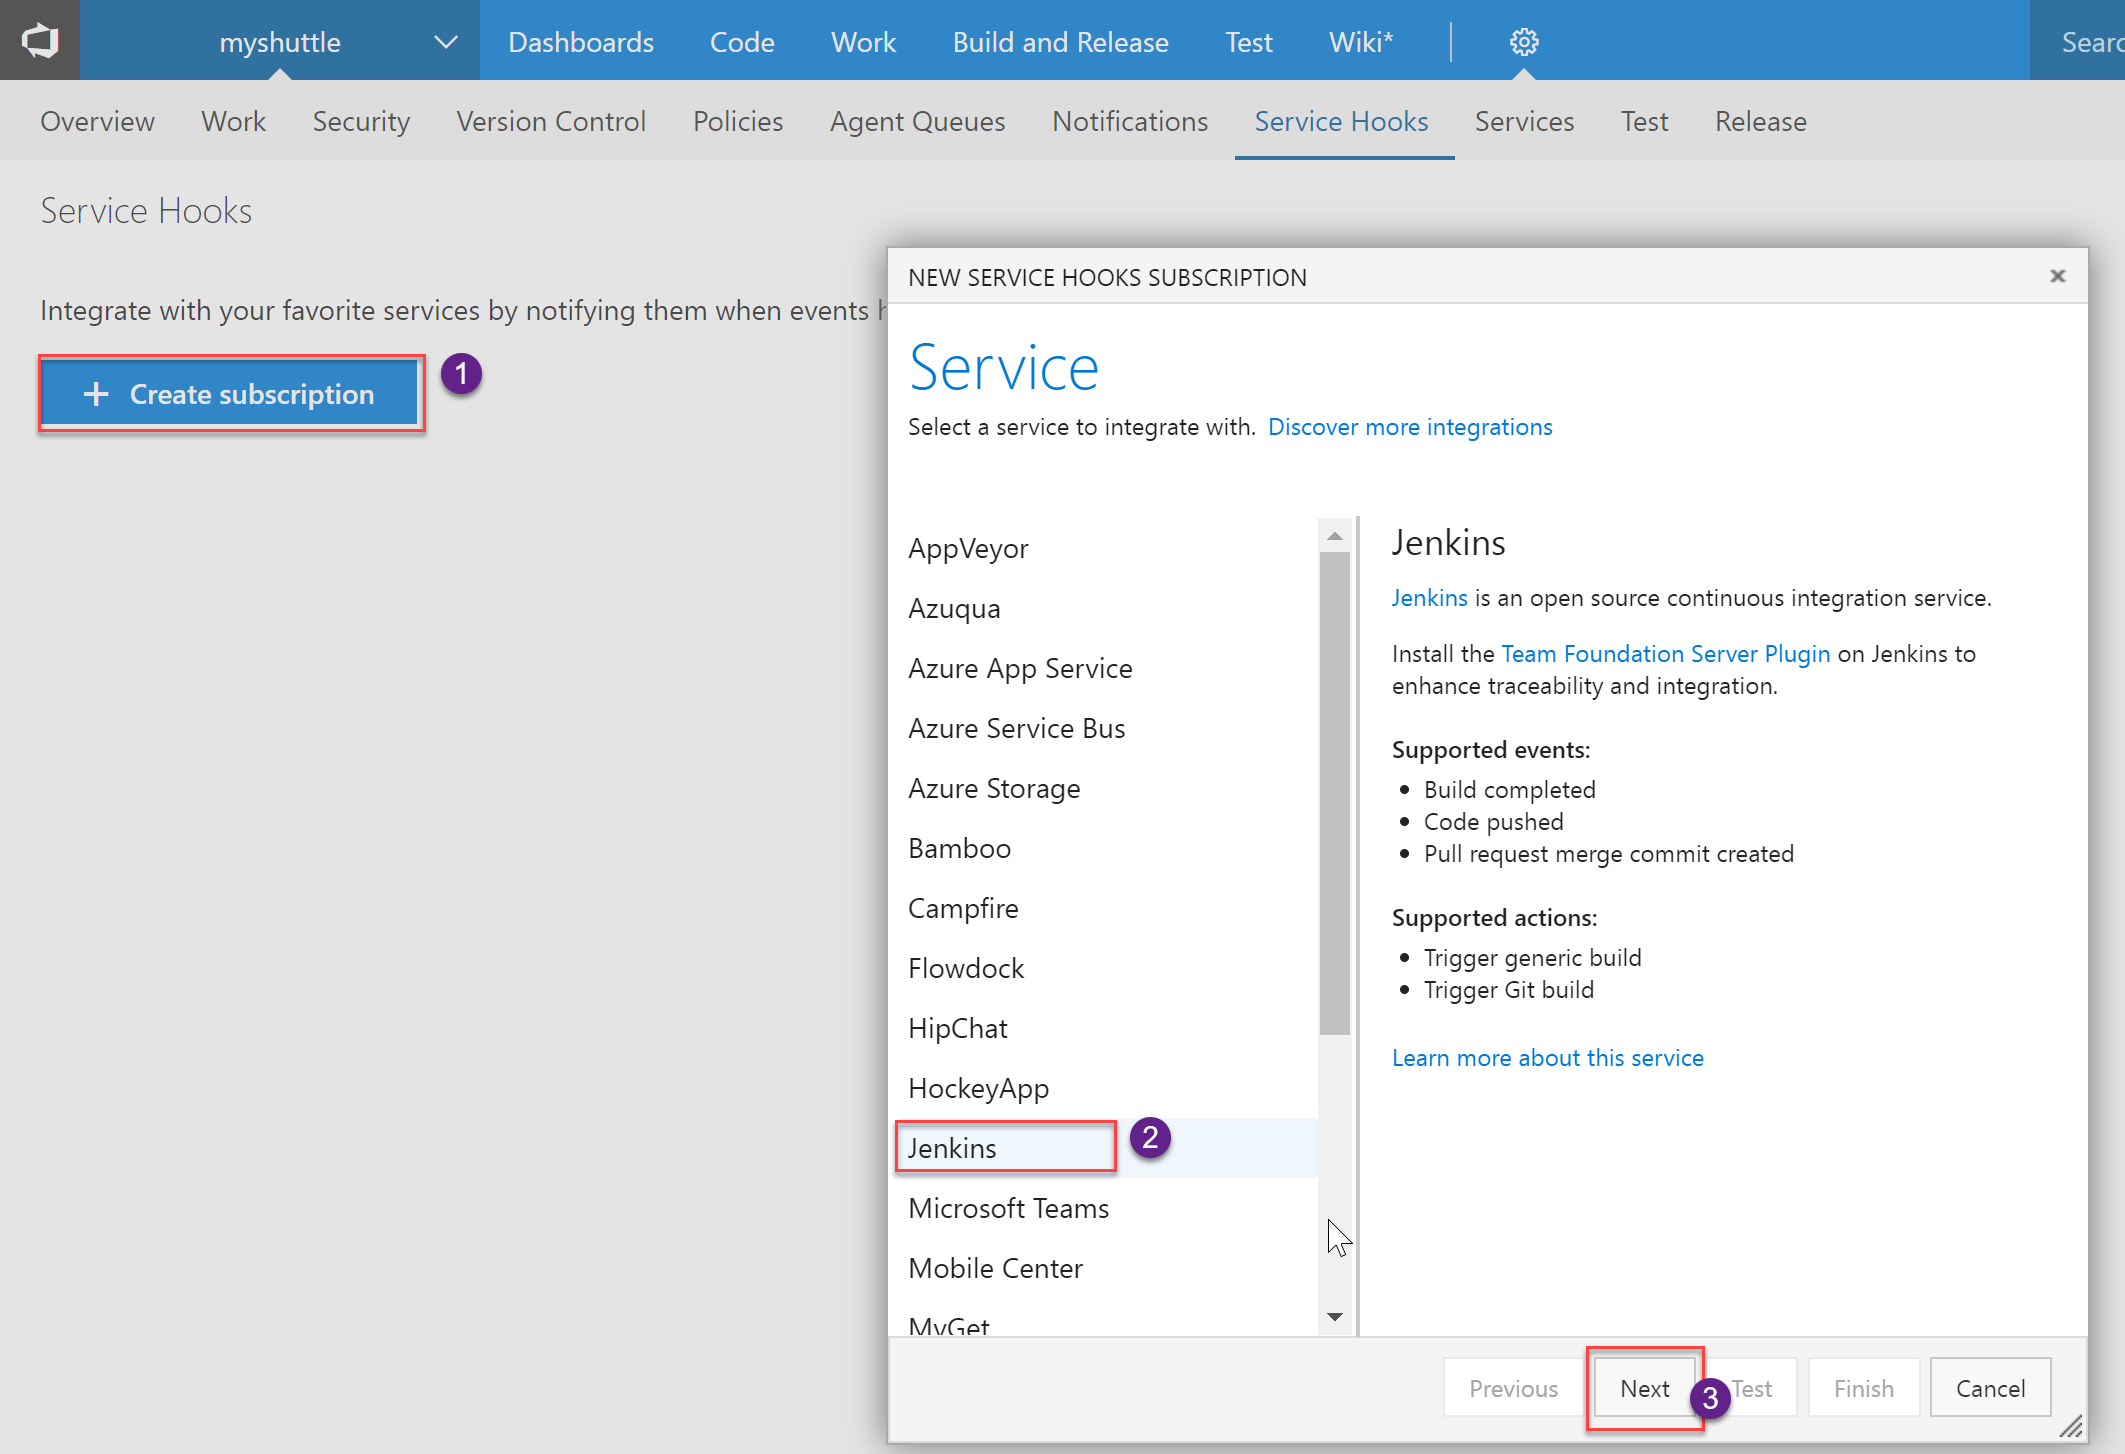
On the Service Hooks screen, click on the Create subscription button. In the New Service Hook Subscriptions screen, click on the Jenkins option and then click on the Next button.
-
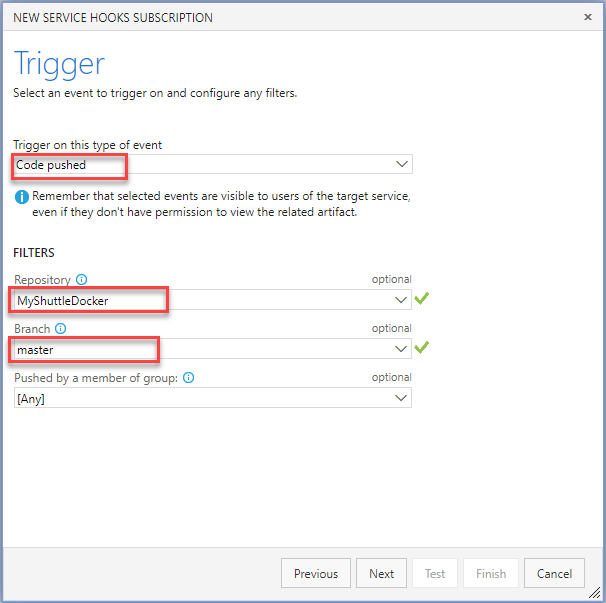
Select the Code pushed option for the Trigger on this type of event field, select the MyShuttleDocker as the Repository, master as Branch and then click on the Next button.
- Provide the following details in the Select and configure the action to perform screen
-
In the Perform this action field, select the Trigger generic build option
-
In the Jenkins base URL field, Provide the URL of the Jenkins server in the format
http://{ip address or the host name} -
In the User name and User API token (or password) fields, provide the user name and password already configured for Jenkins
-
-
Click on the Test button to validate the configuration and then click on the Finish button to complete the subscription.

The VSTS will now automatically notify Jenkins to initiate a new build whenever any source code changes are committed on the repository.
Approach 2: Wrapping Jenkins Job within the VSTS Build
In this section, Jenkins will be included as a job within a VSTS Team Build. The key benefit of this approach is the end-to-end traceability from the work items to the source code to the build and release provided by the VSTS.
To begin, an endpoint to the Jenkins Server for communication with VSTS will be configured.
-
In the Admin | Services section, click on the New Service Endpoint | Jenkins option to create a new endpoint.
-
In the Add new Jenkins Connection screen, provide a connection name, Jenkins server URL in the format
http://[server IP address or DNS name]and Jenkins user name with password. Click on the Verify Connection button to validate the configuration and then click on the Ok button.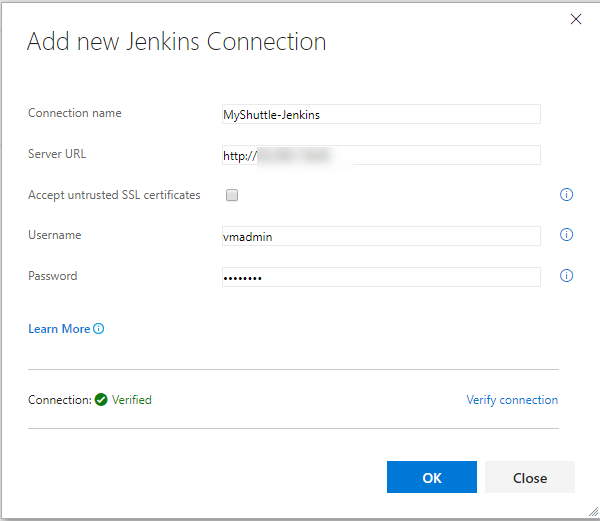
The next step would be to configure the build definition.
-
Click on the Build and Release hub, select the Builds section and click on the +New button to create a new build Definition
-
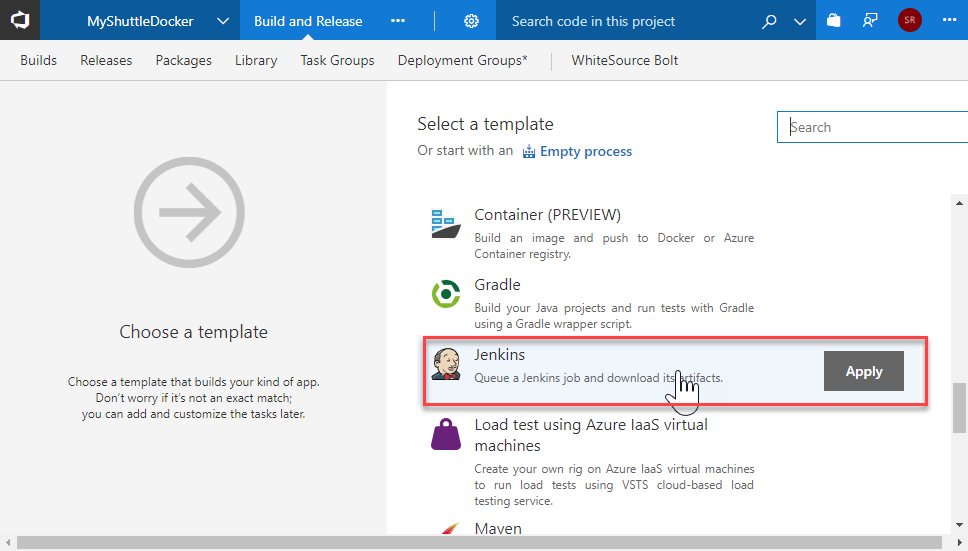
In the Choose a template window, select the out-of-the-box Jenkins template and click on the Apply button
-
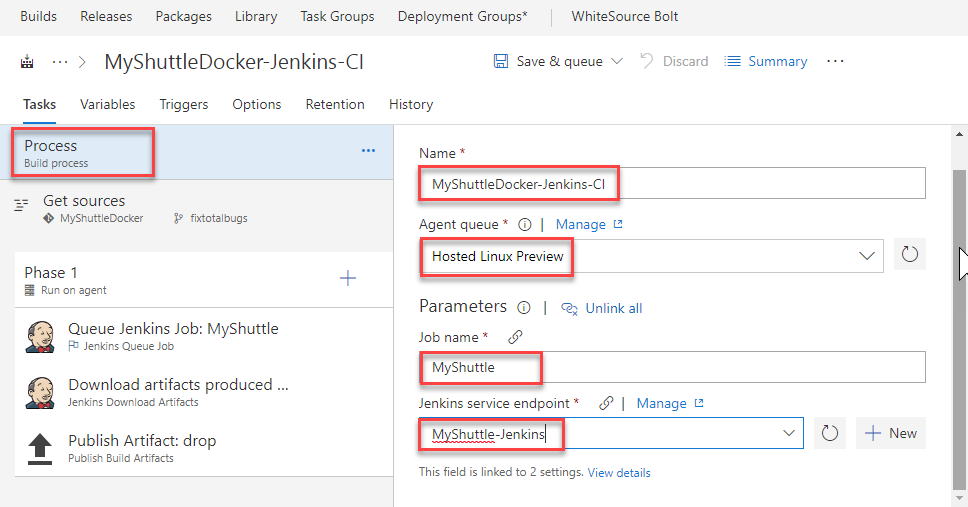
In the Process step, provide a name for the definition, select Hosted Linux Preview as the Agent Queue, provide MyShuttle as the Job name and then select the Jenkins service endpoint created earlier.
-
Next, select the Get Sources step. Since Jenkins is being used for the build, there is no need to download the source code to the VSTS build agent. Enable the Advanced settings option and select the Don’t sync sources option.
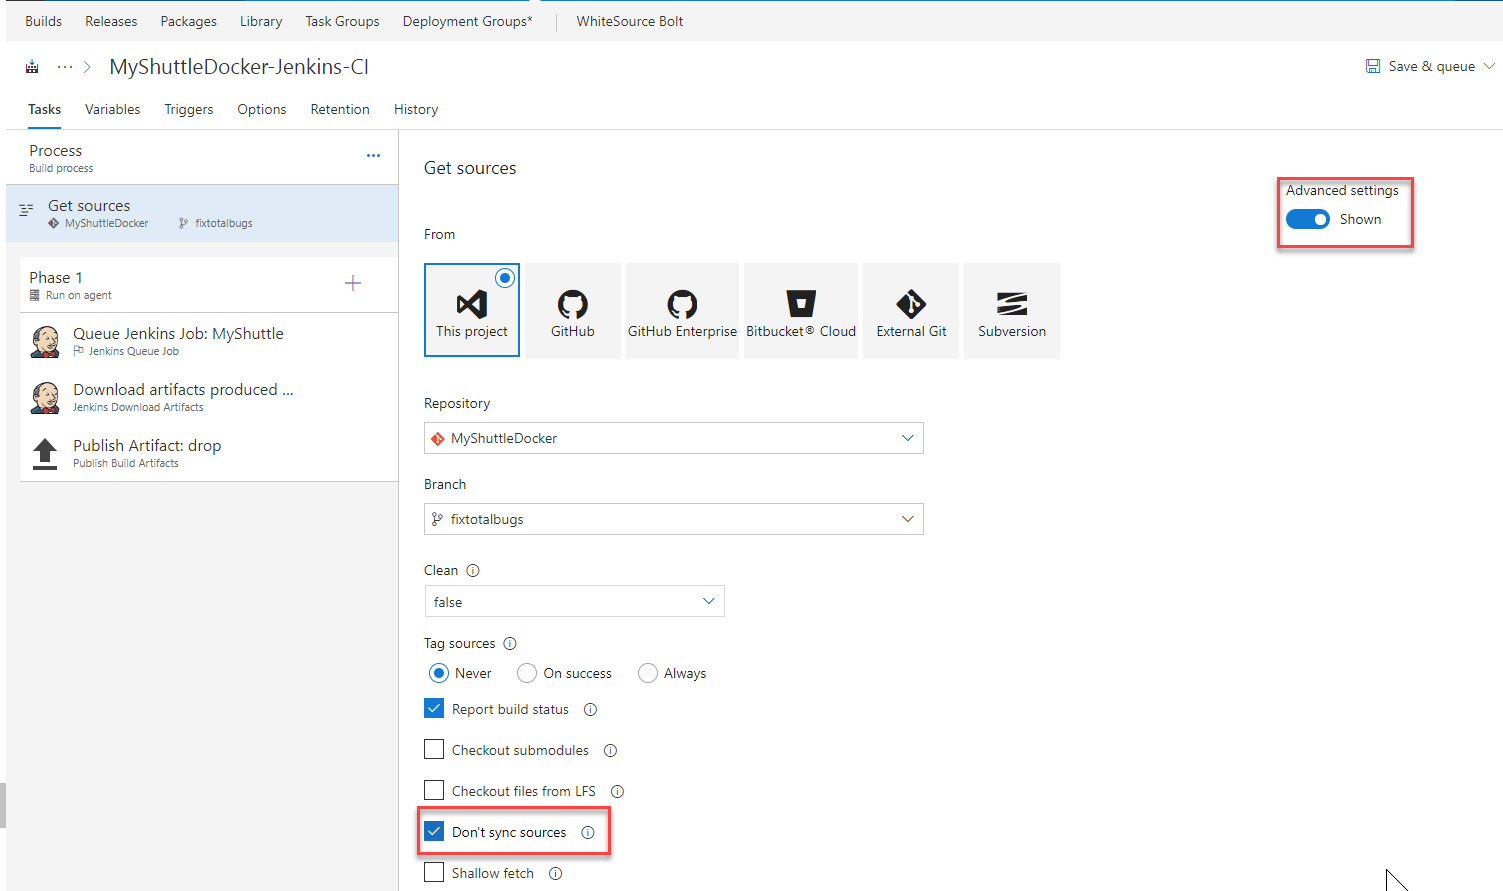
-
Next, select the Queue Jenkins Job step. This task queues the job on the Jenkins server. Make sure that the services endpoint and the job name are correct. The Capture console output and the Capture pipeline output options available at this step will be selected.
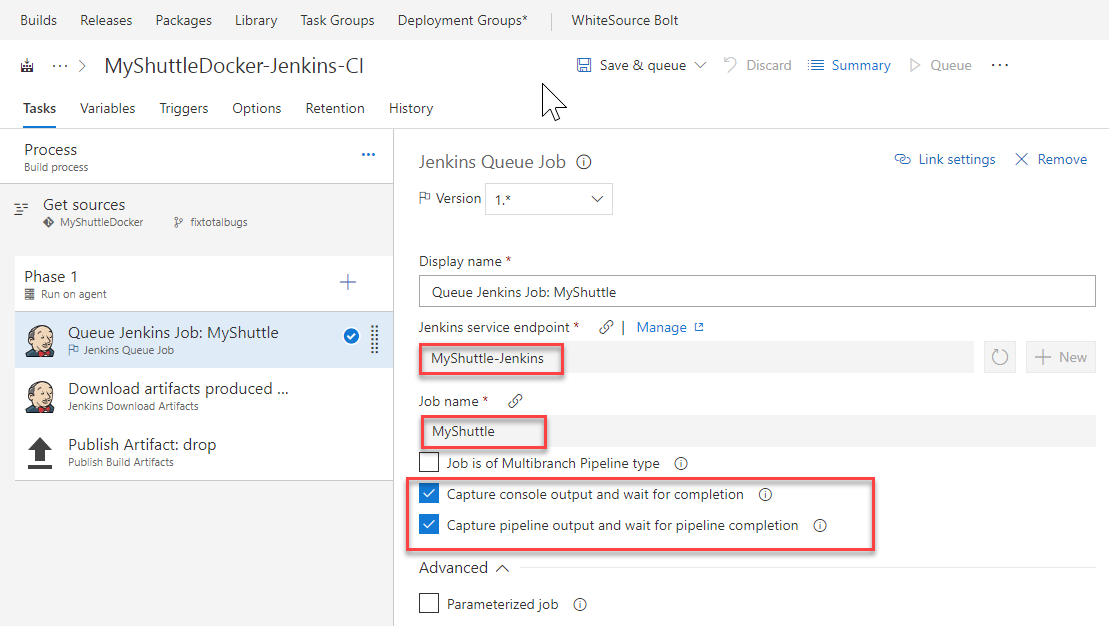
The Capture console output and wait for completion option, when selected, will capture the output of the Jenkins build console when the VSTS build runs. The build will wait until the Jenkins Job is completed. The Capture pipeline output and wait for pipeline completion option is very similar but applies to Jenkins pipelines (a build that has more than one job nested together).
-
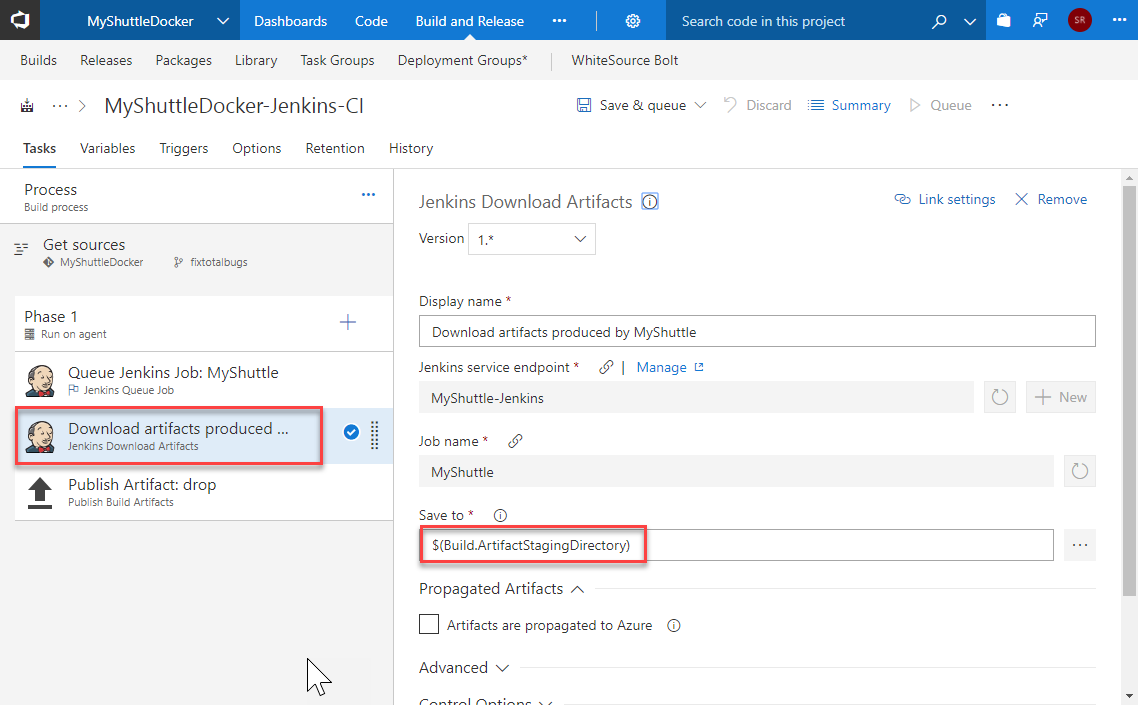
The Jenkins Download Artifacts task will download the build artifacts from the Jenkins job to the staging directory
-
The Publish Artifact drop will publish to the VSTS.
-
Click on the Save & queue button to complete the build definition configuration and initiate a new build.
Deploying Jenkins Artifacts with Release Management
The next step is to configure the VSTS Release Management to fetch and deploy the artifacts produced by the build.
-
Since the deployment is being done to Azure, an endpoint to Azure will be configured. An endpoint to Jenkins server will also be configured, if not configured earlier.
-
After the endpoint creation, click on the Build & Release hub and then select the Releases section. Click on the + Create a new Release definition button to initiate a new release definition
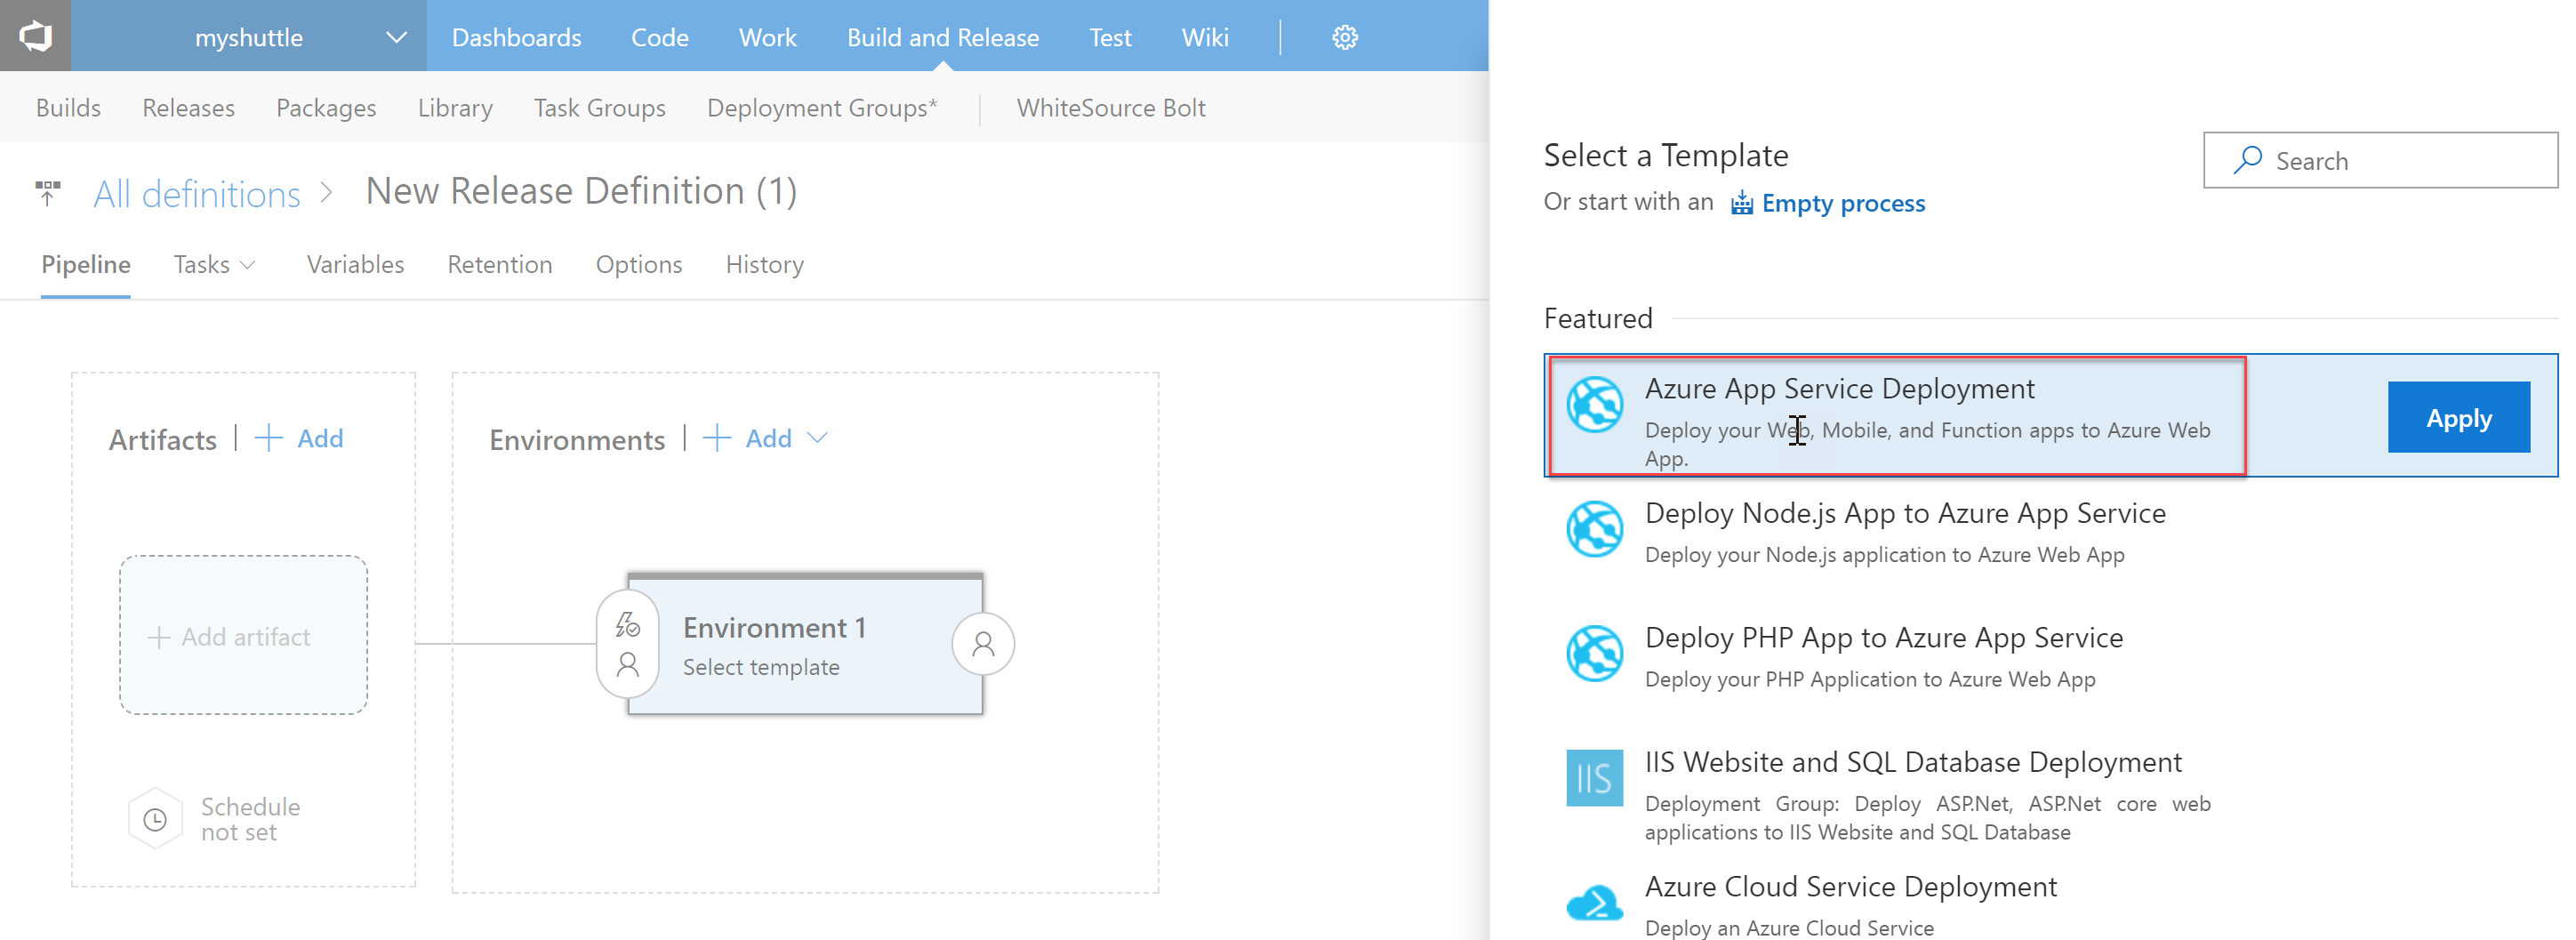
-
Since a web application will be published to Azure, the Azure App Service Deployment template will be used for the configuration.
-
The default environment for deployment will be named as Dev

-
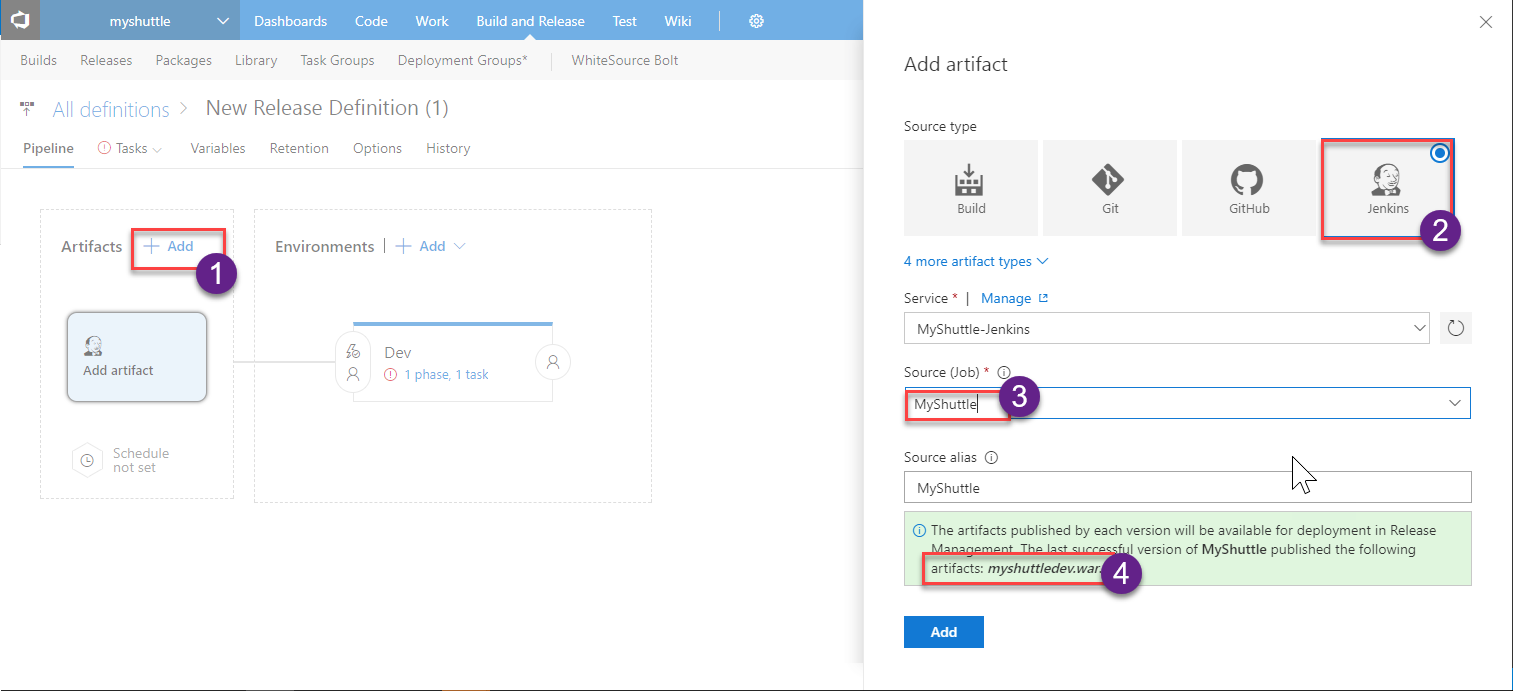
To link the release definition with the MyShuttle build on Jenkins, click on the +Add button to add an artifact
-
In the Add artifact screen, Select Jenkins as the Source type, select the Jenkins endpoint configured earlier and provide MyShuttle for the Source(Job)
The Source(Job) should map to the project name configured in Jenkins
-
If the Jenkins server and the source location is configured correctly, once the publishing of the artifacts is completed, a message with the output file name myshuttledev.war will be displayed.
-
The output .war file can now be deployed on Azure. For details on the deployment, refer to the Deploying a MySQL Backed Tomcat app on Azure Web App
Additional Tasks
Logging into Jenkins with the default credentials
-
In case the initial admin was not configured for Jenkins during the setup, the default user admin can be used to login to Jenkins.
-
The admin password will be the content from the password file created automatically by Jenkins stored in the path
\var\lib\jenkins\secrets\initialAdminPassword -
From a terminal window, type
sudo vi /var/lib/jenkins/secrets/initialAdminPasswordto open the file. You can double click on the password text and use CTRL+C to copy the text and place it in the clipboard. To close the file without saving, press ESC and then :q! -
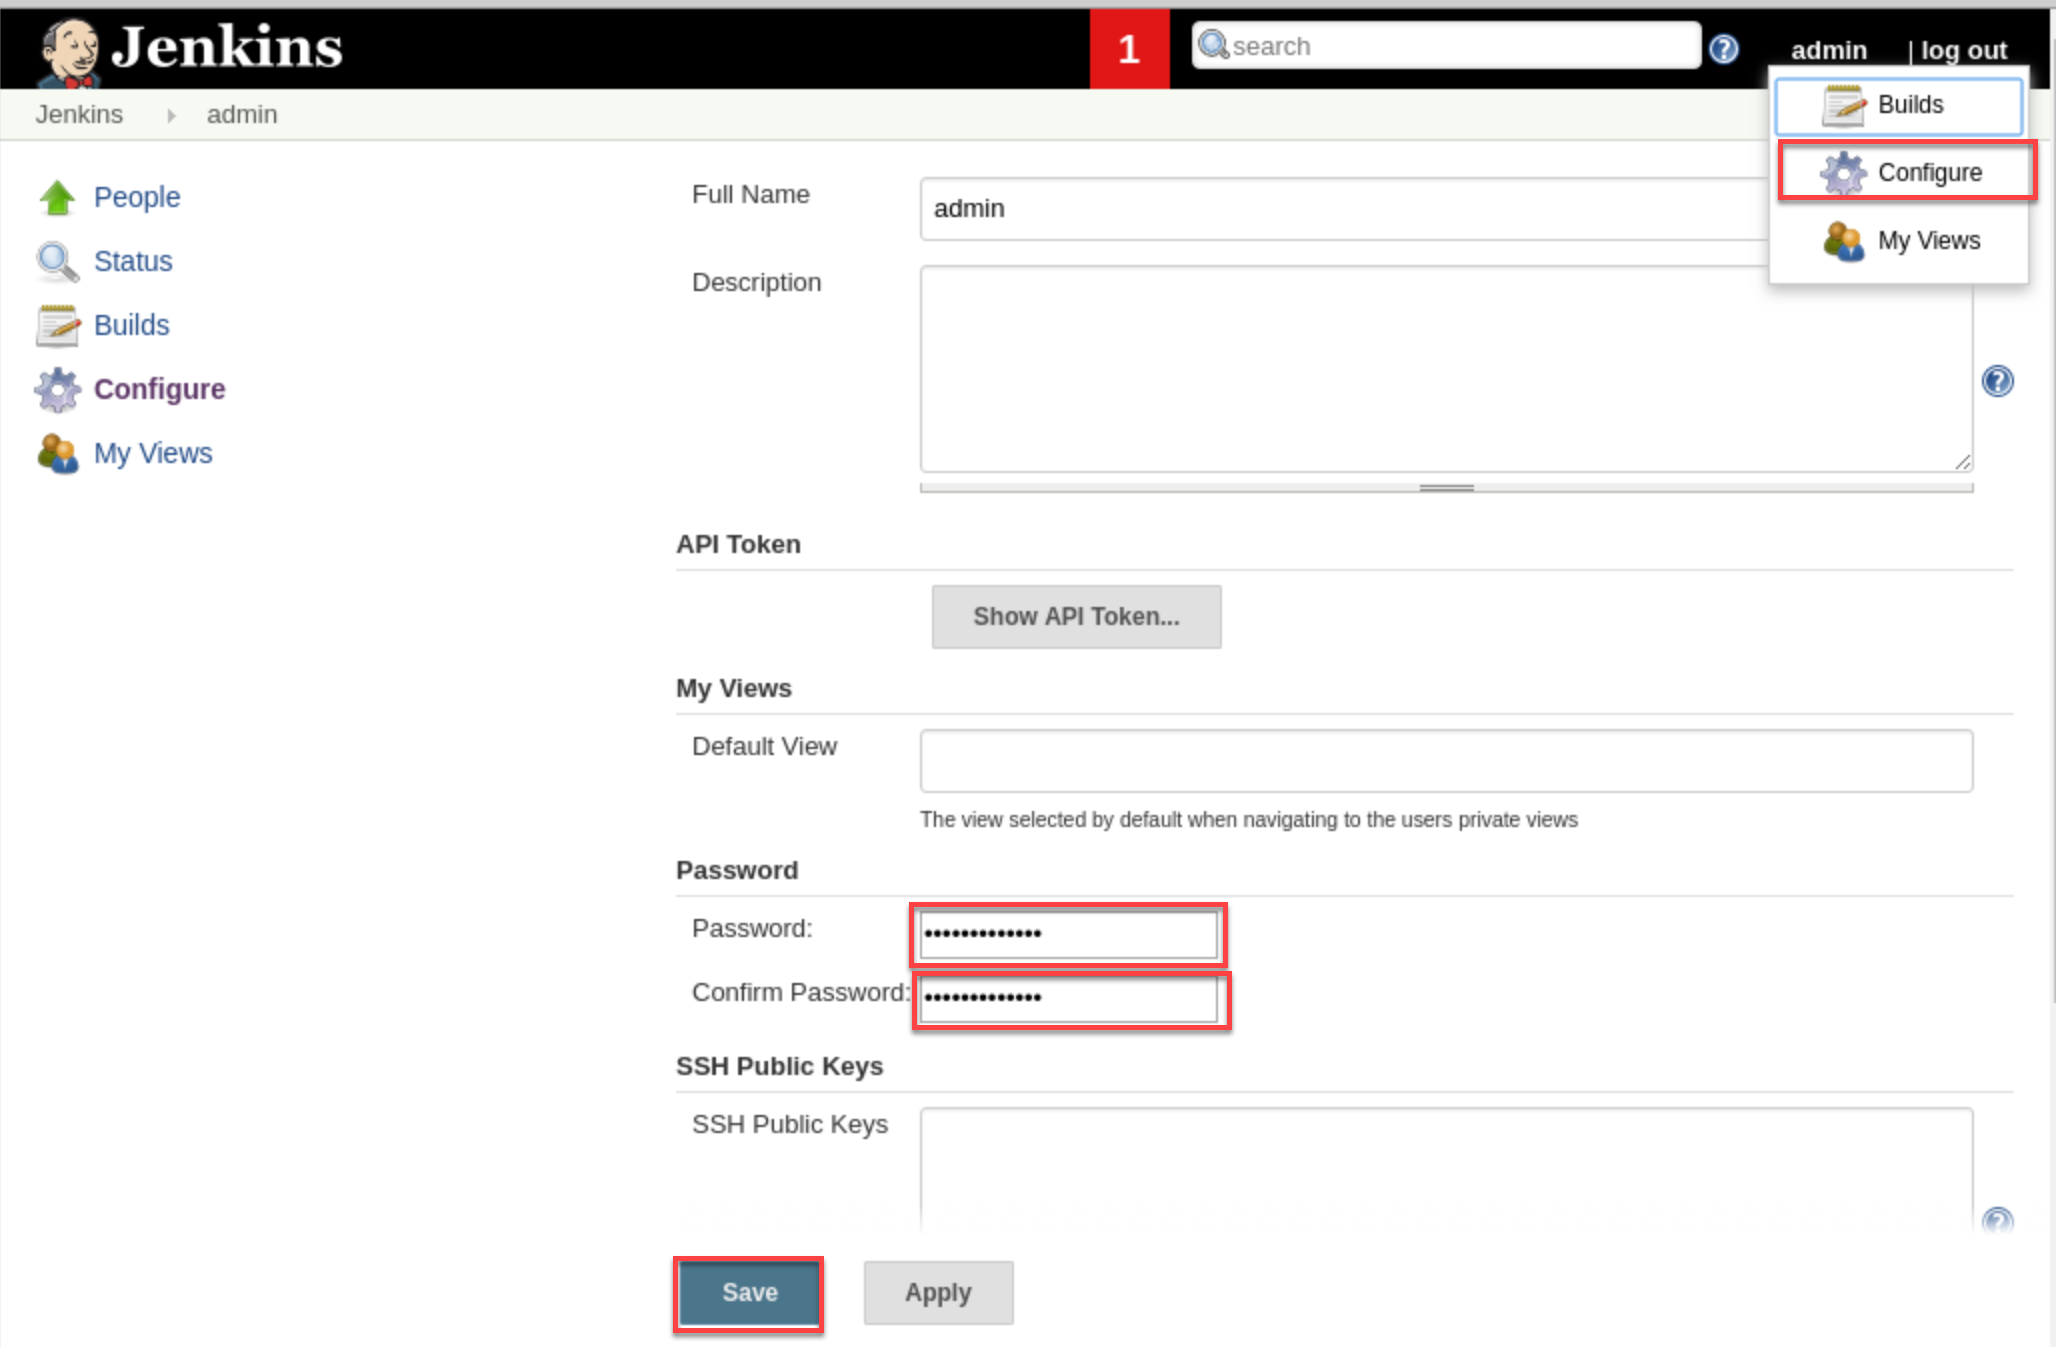
It is recommended that you change your password. After login, click on the user name on the top-right corner. Click the Configure option, scroll down to the password section to specify a new password and then click the Save button.
Installing the Git Plugin
-
Navigate to the home page of the Jenkins portal, click on the Manage Jenkins option and then click on the Manage Plugins option
-
Select the Available tab.
-
Enter the words Git plugin in the filter textbox
-
Select the Git plugin in the search list and click on the Install without Restart button
Installing VSTS Private agent
-
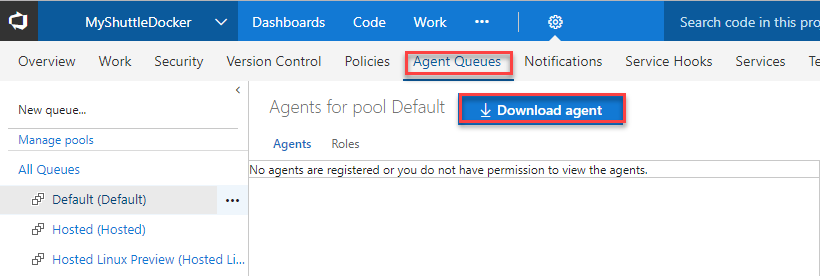
Navigate to the home page of VSTS team project and select the Admin->Agent Queues option
-
In the Agents for pool Default section, click on the Download agent button.
-
If the page is being accessed from a VM, the selected tab will default to Linux. Otherwise, select the Linux tab.
-
Click on the Download button to initiate the agent download. The downloaded file gets typically saved in the Downloads folder
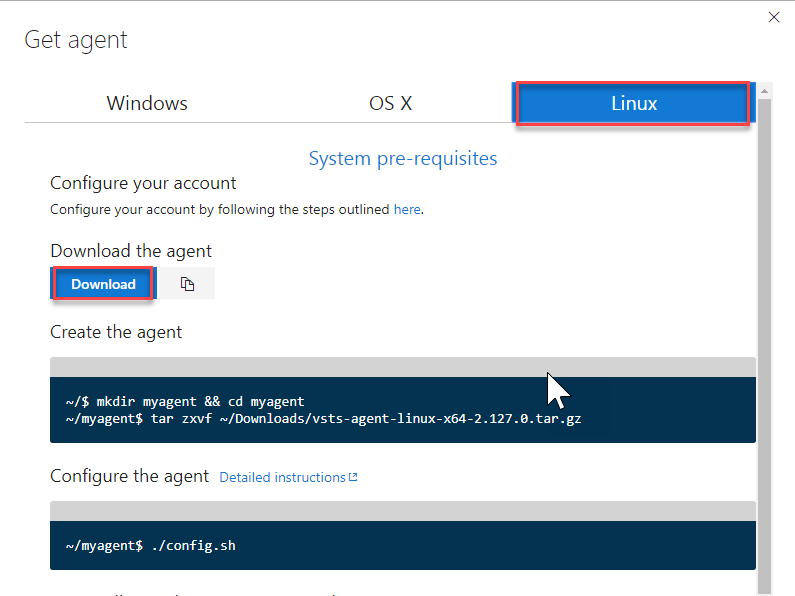
- Launch a terminal window and run the following commands in the sequence.
mkdir vstsagent cd vstsagent tar -zxvf ../Downloads/vsts-agent-linux-x64-2.126.0.tar.gz - Once the files are extracted, run the following command to configure the agent.
The VSTS URL and the PAT will be required during the configuration.
./config.sh -
After the configuration is completed, run the following command to start the agent.
./run.sh