Last updated : Aug 26,2019
Overview
Last updated : Aug 26, 2019.
Octopus Deploy is an automated deployment server that makes it easy to automate deployment of ASP.NET web applications, Java applications, NodeJS application and custom scripts to multiple environments.
Visual Studio Team Services includes a first-class, powerful release management capability that simplifies deployment of any application to any platform. But teams who prefer or already have chosen Octopus deploy, can use the Octopus Deploy Integration extension available on the Visual Studio Marketplace that provides Build and Release tasks to integrate Octopus Deploy with Team Services and Team Foundation Server.
This lab shows how we can integrate VSTS/TFS Team Build and Octopus to automate build and deployment application using a sample PHP application that will be deployed to an Azure App Service.
Prerequisites for the lab
-
Microsoft Azure Account: You will need a valid and active Azure account for the Azure labs. If you do not have one, you can sign up for a free trial
-
If you are an active Visual Studio Subscriber, you are entitled for a $50-$150 credit per month. You can refer to this link to find out more information about this including how to activate and start using your monthly Azure credit.
-
If you are not a Visual Studio Subscriber, you can sign up for the FREE Visual Studio Dev Essentials program to create a Azure free account (includes 1 year of free services, $200 for 1st month).
-
-
You will need a Visual Studio Team Services Account. If you do not have one, you can sign up for free here
-
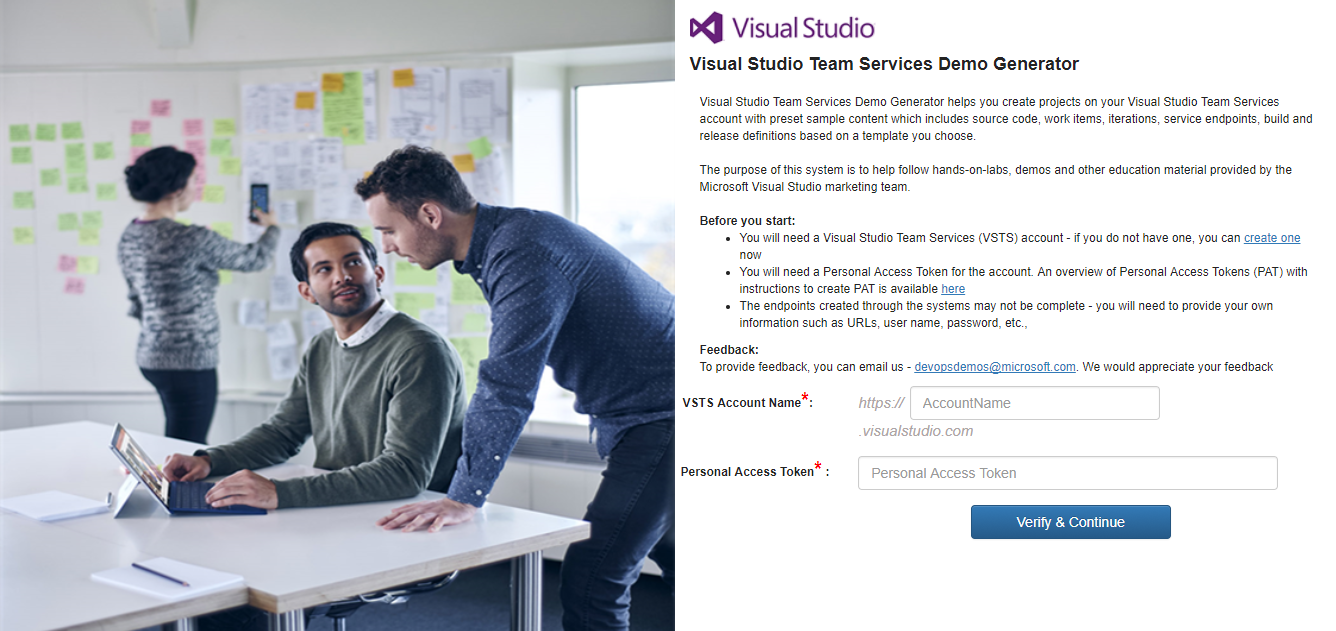
You will need a Personal Access Token to set up your project using the VSTS Demo Generator. Please see this article for instructions to create your token.
Note: You should treat Personal Access Tokens like passwords. It is recommended that you save them somewhere safe so that you can re-use them for future requests.
Setting up the Environment
Octopus Deploy has two components:
- Octopus Server - a centralized web front-end that orchestrates deployments , and
- Tentacle - agent that needs to be on every target endpoint.
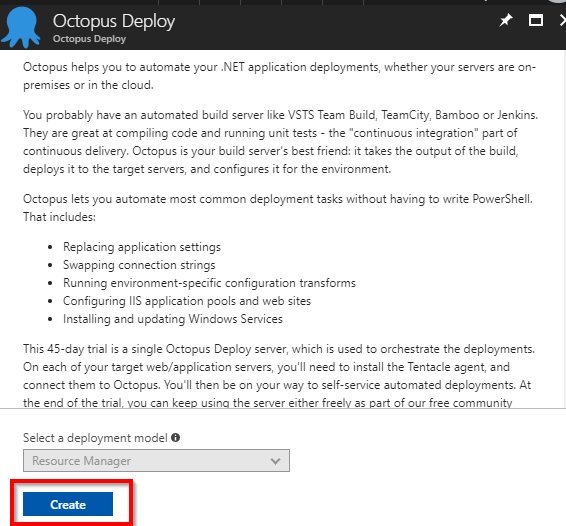
We will spin up a Octopus server on Azure. Click the Deploy to Azure button below to provision a Octopus Server.

-
Click on Create button.
-
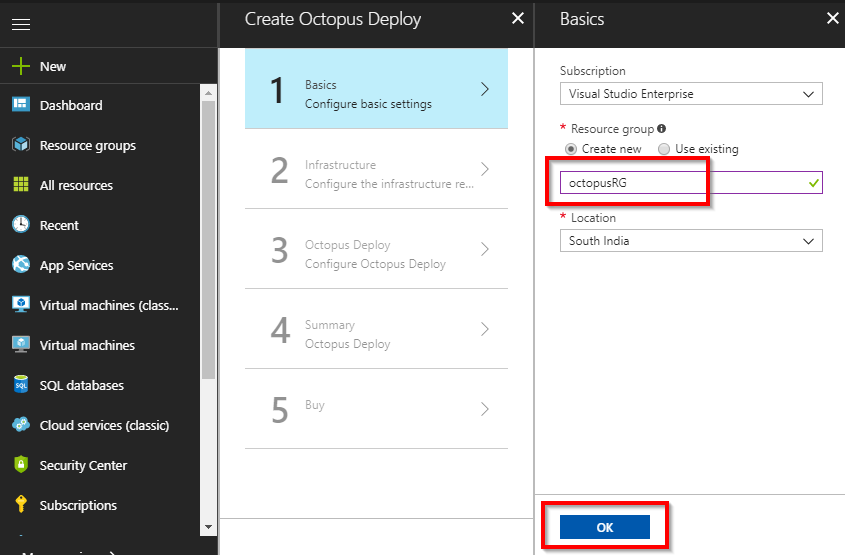
Provide Resource group name and click OK.
-
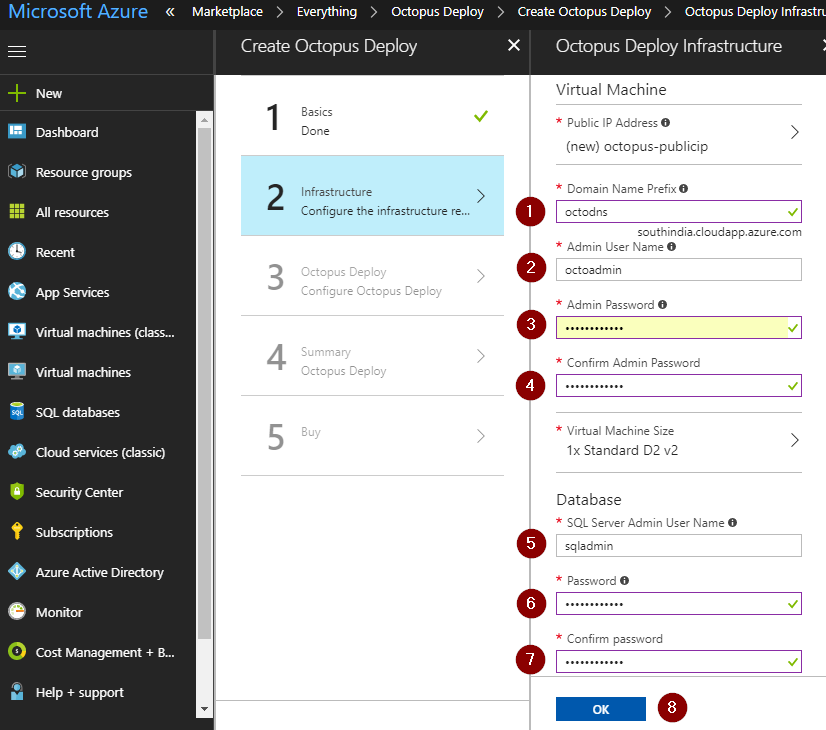
Provide Octopus server Domain Name, VM Admin username and password, and SQL admin username and password. Note down the Domain Name (DNS) as this is used later to connect to Octopus server.
-
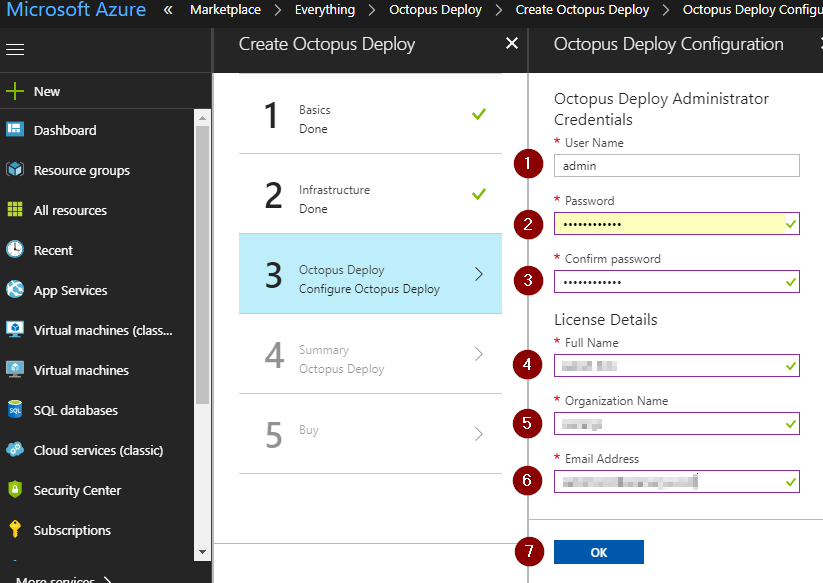
Provide Octopus Admin username and password. This is used to login to Octopus server. Also provide your name, organization name and email address to activate trial license for octopus server. Click OK.
-
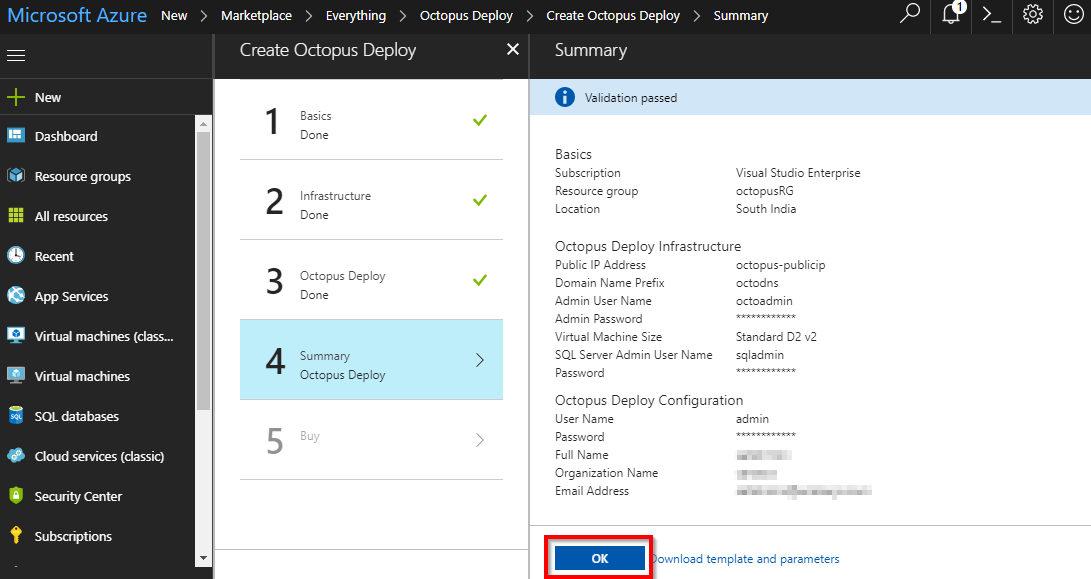
Click OK in the Summary section.
-
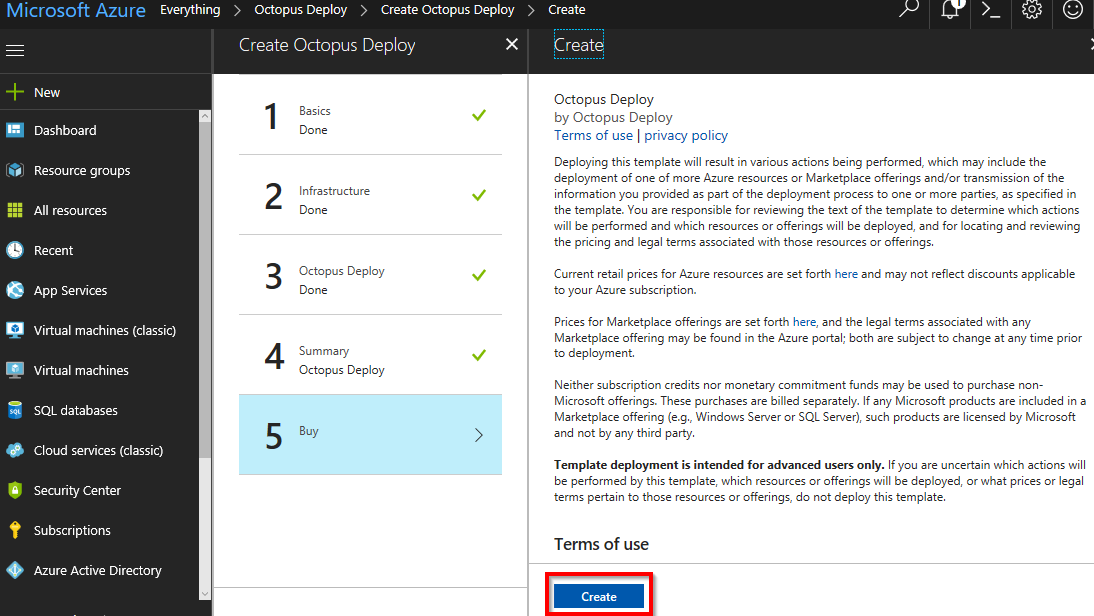
Click Create in the Buy section.
-
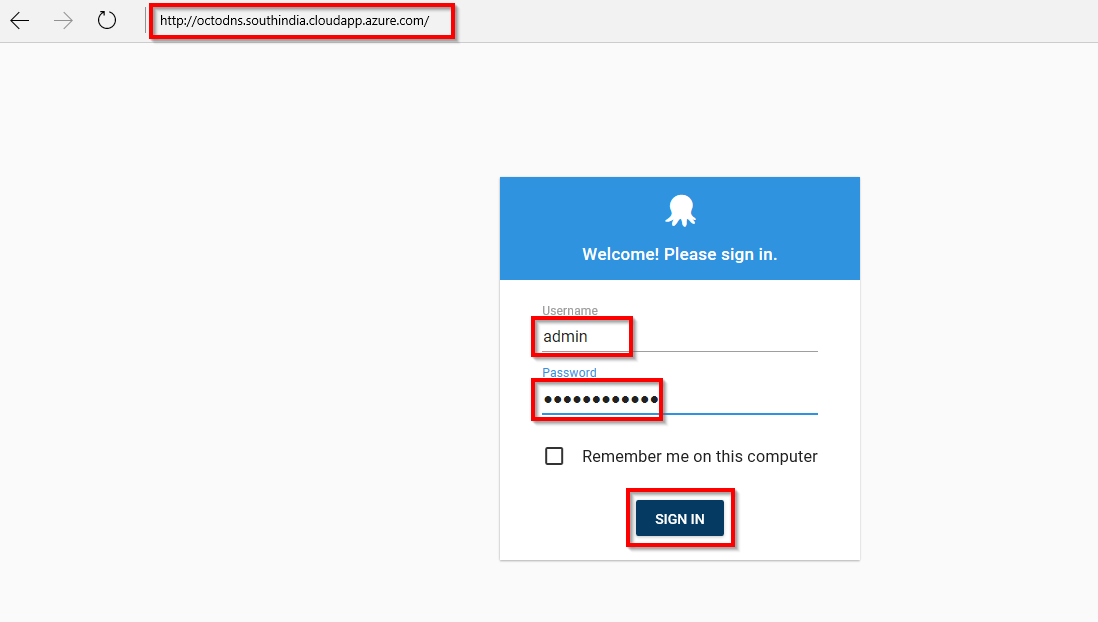
It takes approximately 15 minutes for the deployment to complete. Once the deployment is successful, connect to Octopus server using DNS, and login with Octopus Admin username and password.
-
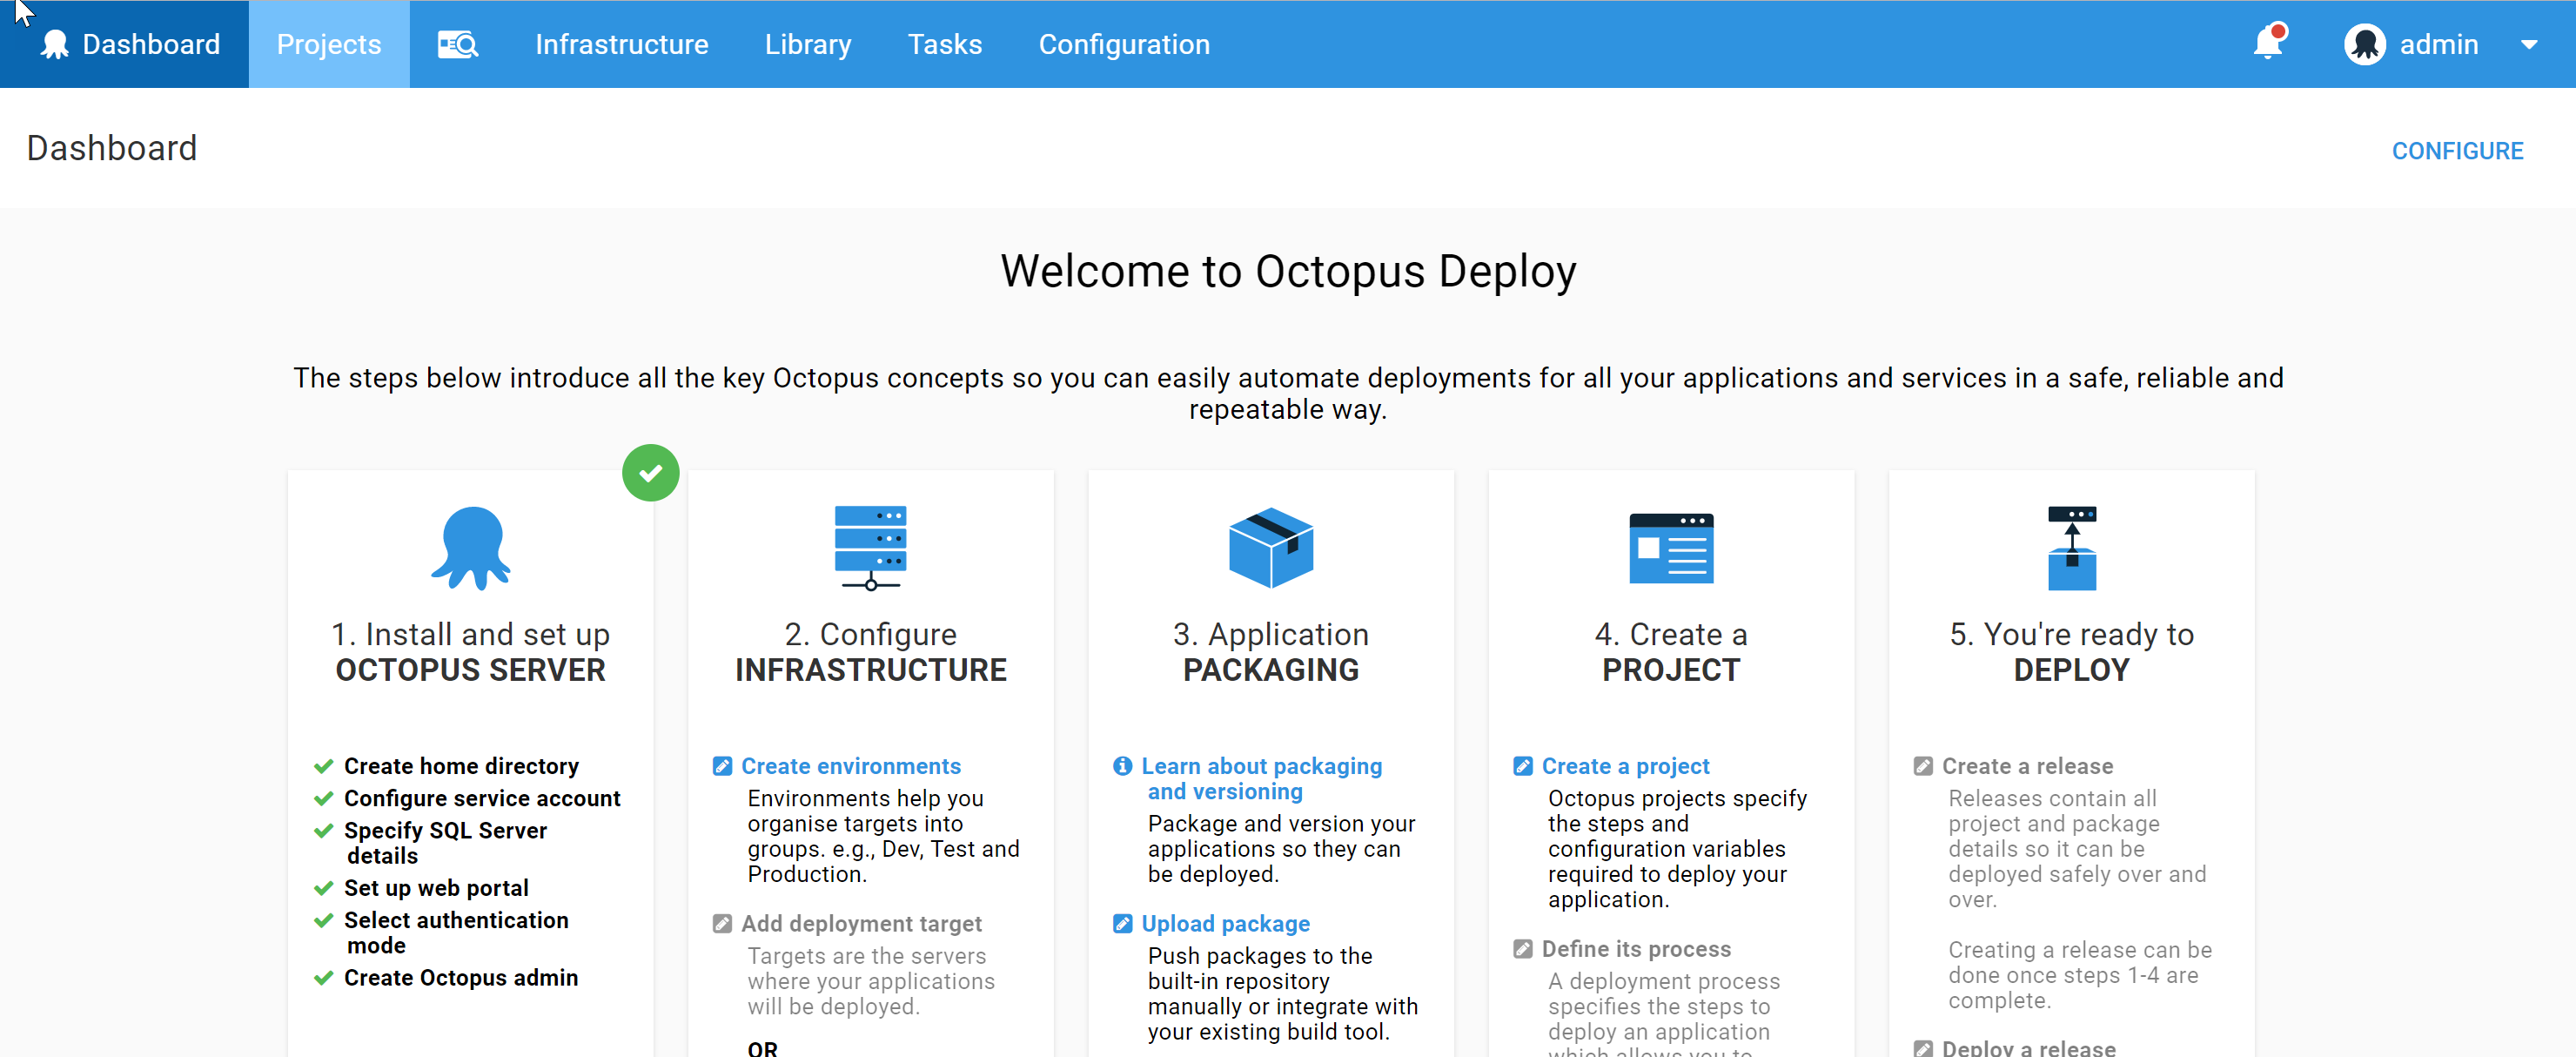
You will see the Octopus deploy web portal.
Setting up the Deployment Target
In this lab, we will use Azure WebApp as the deployment target.
Click the Deploy to Azure button below to provision Azure WebApp.
-
Provide Web App name and Resource Group. You can either create new Resource group or use existing one, and click Create

Generate Octopus API Key
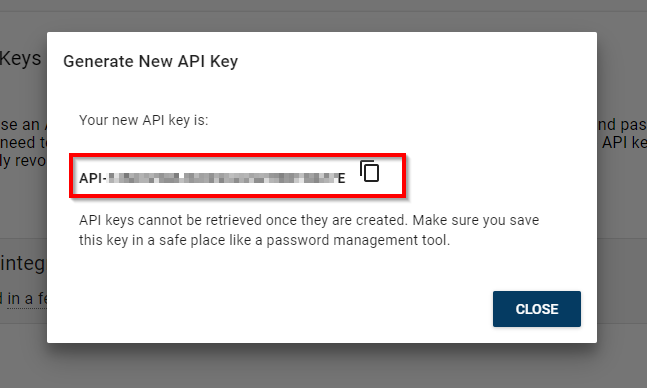
API key is used to authenticate VSTS with Octopus server. Using API key lets you keep your username and password secret.
-
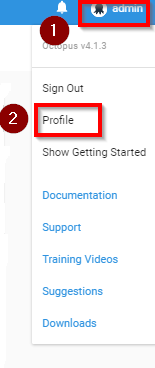
From the Octopus Deploy portal, select Profile under User menu.
-
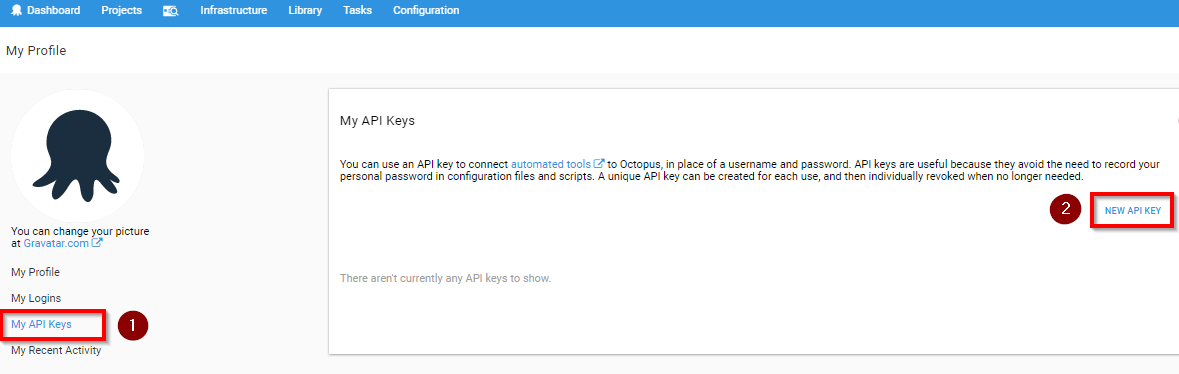
Select My API Key and click New API Key to create one. We will use the API Key to connect Octopus Deploy with Team Services
-
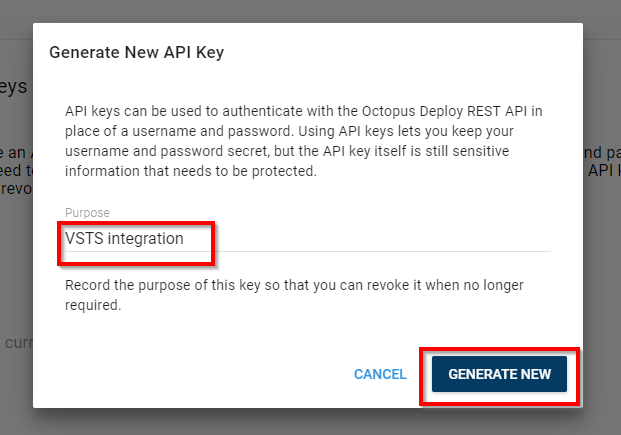
Specify a purpose, for e.g., VSTS Integration and click Generate New.
-
Copy the API Key to clipboard and save this somewhere as you may use it for future requests.
Setting up the VSTS team project
-
Use the VSTS Demo Generator to provision the project on our VSTS account.
VSTS Demo Generator helps you create team projects on your VSTS account with sample content that include source code, work items,iterations, service endpoints, build and release definitions based on the template you choose during the configuration.
-
Provide a name for your project. Paste, the Octopus URL (VM’s DNS URL) that was created previously, API Key and click on Create Project.
-
Once the project is provisioned, click the URL to navigate to the project.
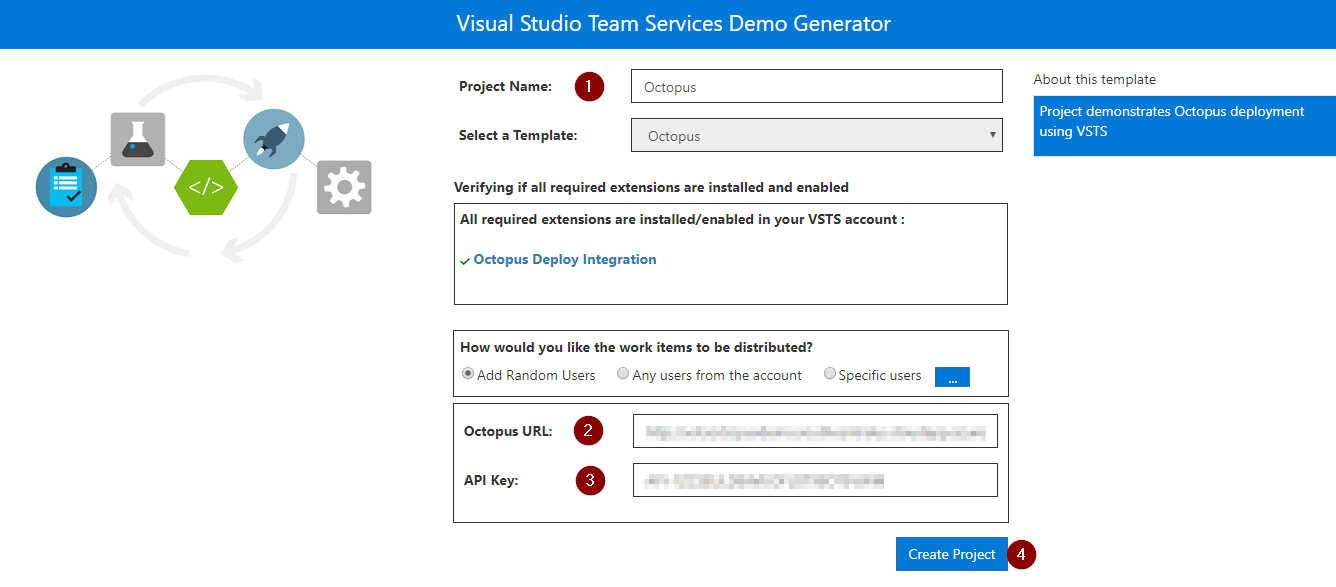 Note: This URL will automatically select Octopus template in the demo generator. If you want to try other projects, use this URL instead - https://vstsdemogenerator.azurewebsites.net/
Exercise 1: Configure Deployment Target in Octopus Server
Let us create a deployment environment in Octopus server and link to Azure using Management Certificate. Environments are deployment targets consisting of machines or services used by Octopus Deploy to deploy software. With Octopus Deploy, we can deploy software to Windows servers, Linux servers, Microsoft Azure, or even an offline package drop.
Grouping our deployment targets by environment lets you define your deployment processes and have Octopus deploy the right versions of our software to the right environments at the right time.
In this lab, we are using Azure App Service as the deployment target.
-
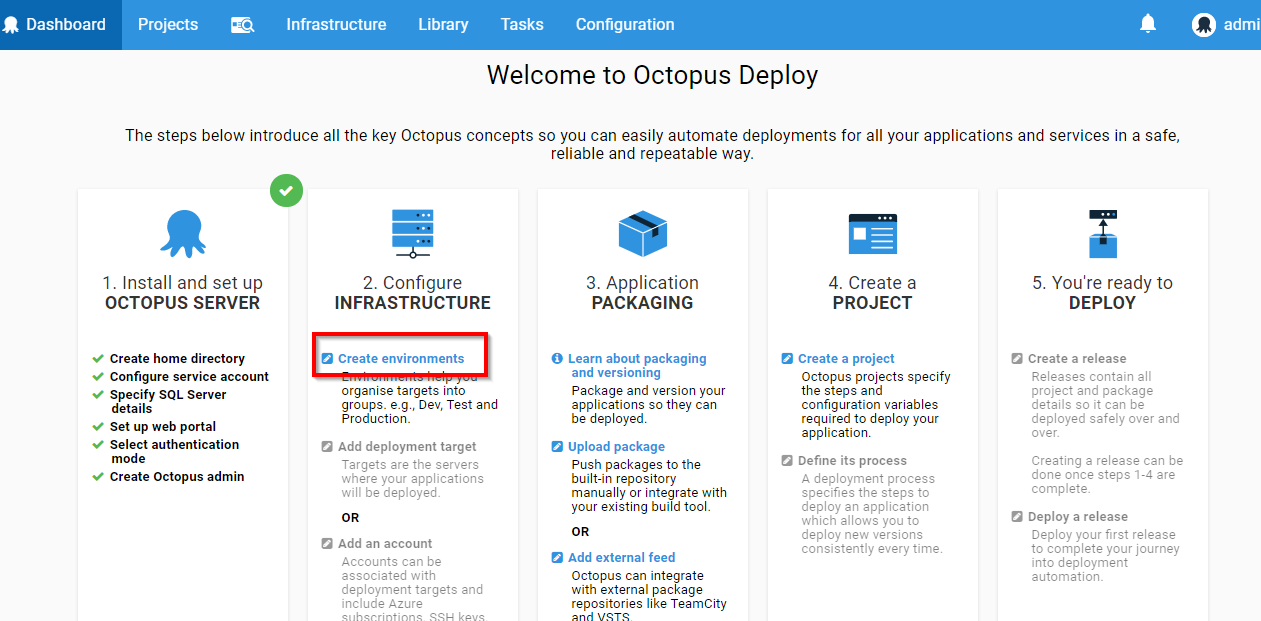
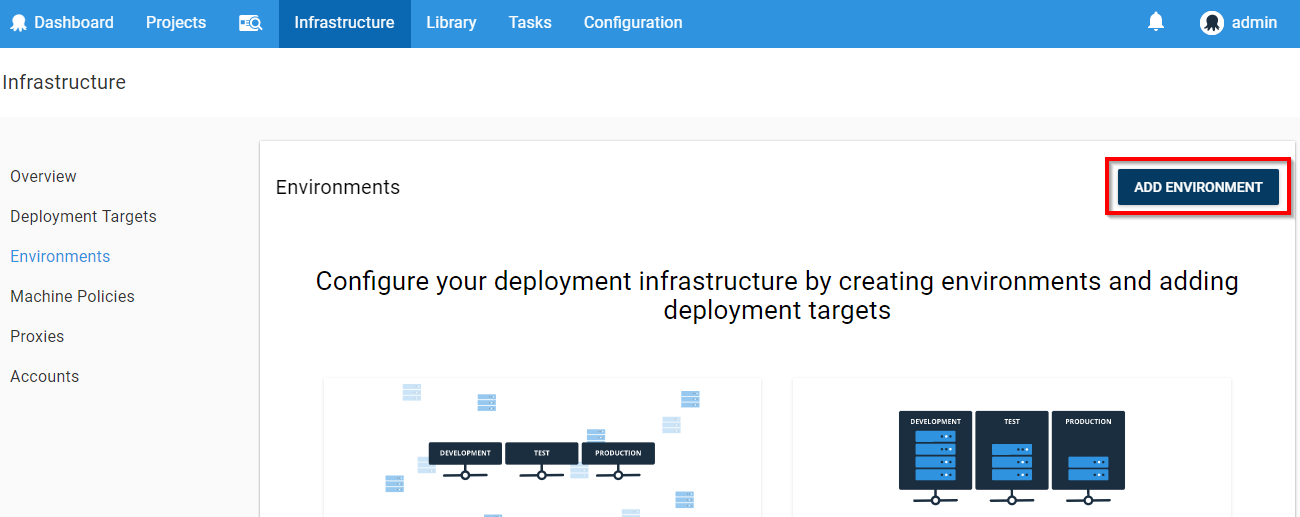
From the Octopus portal, select Create environments to go into the Infrastructure page
-
Once inside, click Add Environment.
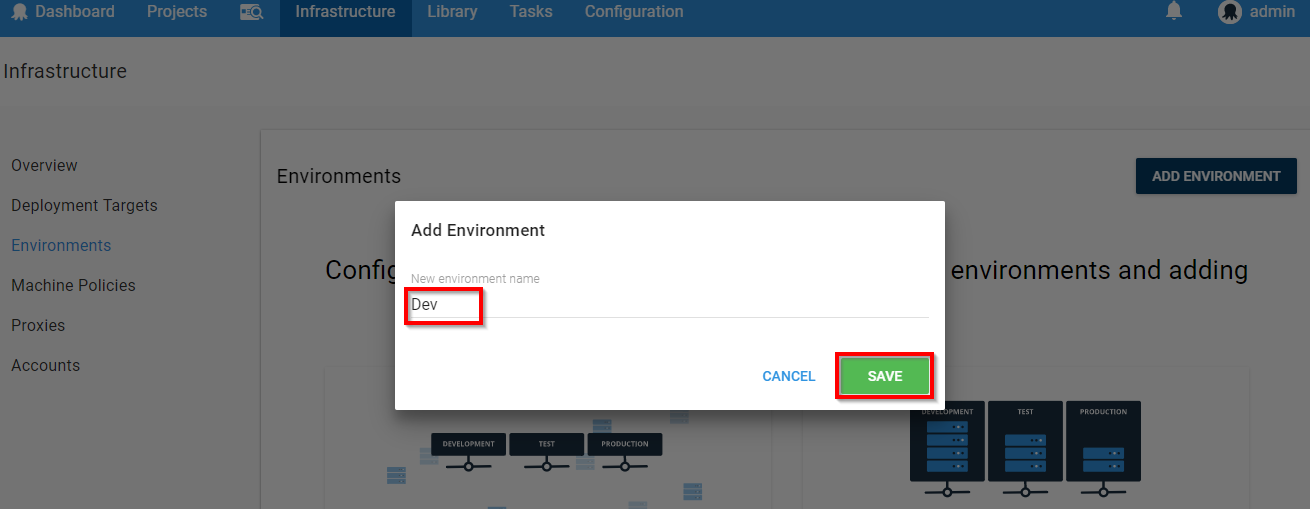
-
Provide the environment name and click Save.
-
Octopus Deploy provides first-class support for deploying Azure Cloud Services and Azure Web Applications. To deploy software to Azure, we must add our Azure subscription to Octopus Deploy, and then use the built-in step templates to deploy to the cloud. Once the environment is created, click on Accounts.
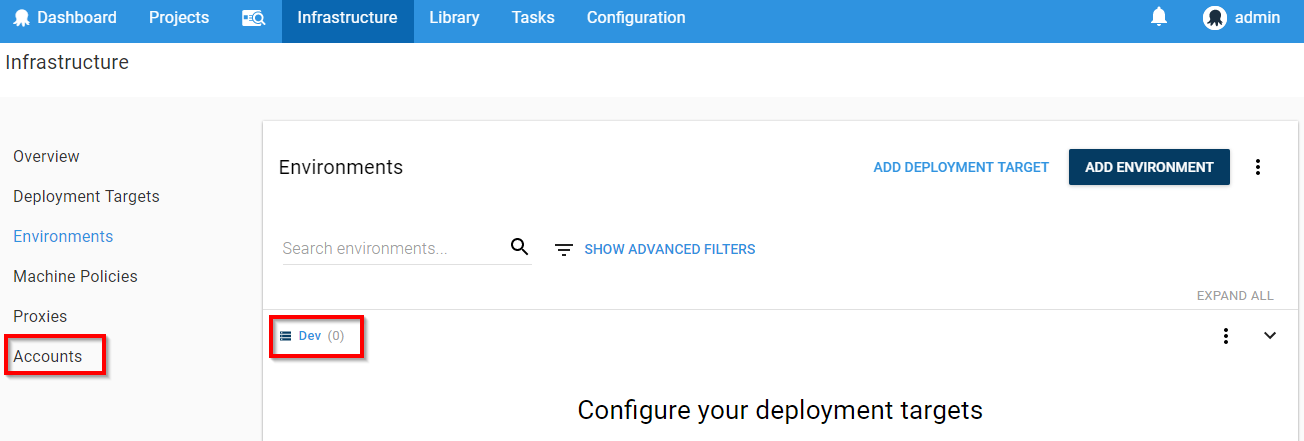
-
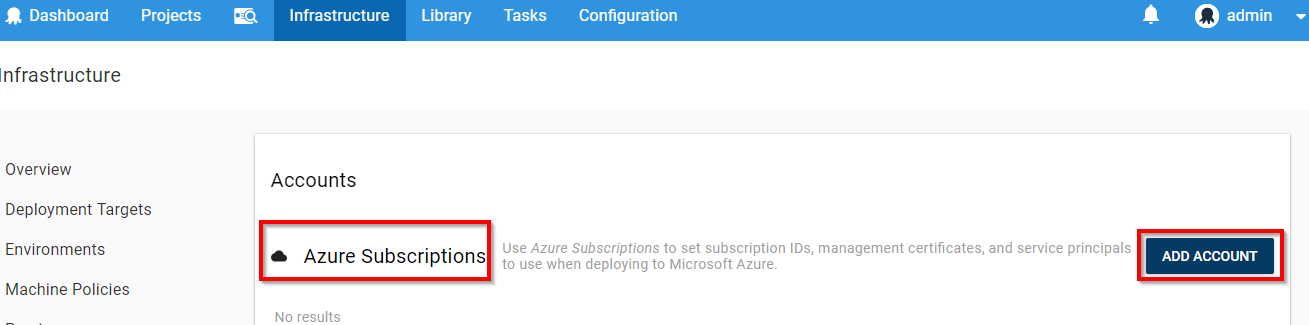
Select ADD ACCOUNT.
-
Octopus Deploy authenticates with Azure in one of two methods:
-
To deploy to Azure Resource Manager (ARM), Octopus requires Azure Service Principal Account
-
Azure Management Certificate is used by Octopus to deploy to Cloud Services and Azure Web Apps.
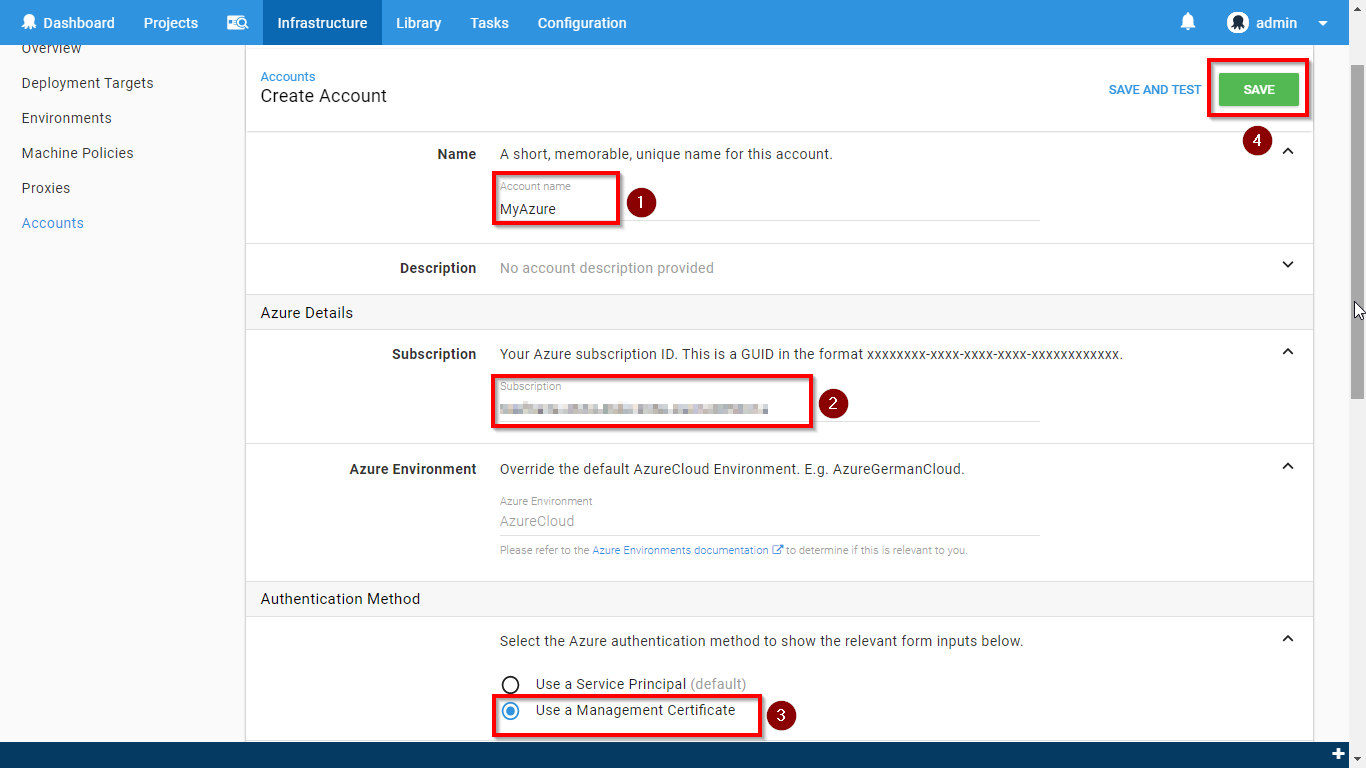
Enter the following details -
- Name: Provide an account name
- Subscription ID: Your Azure Subscription ID
- Authentication Method: Choose Use Management Certificate
-
-
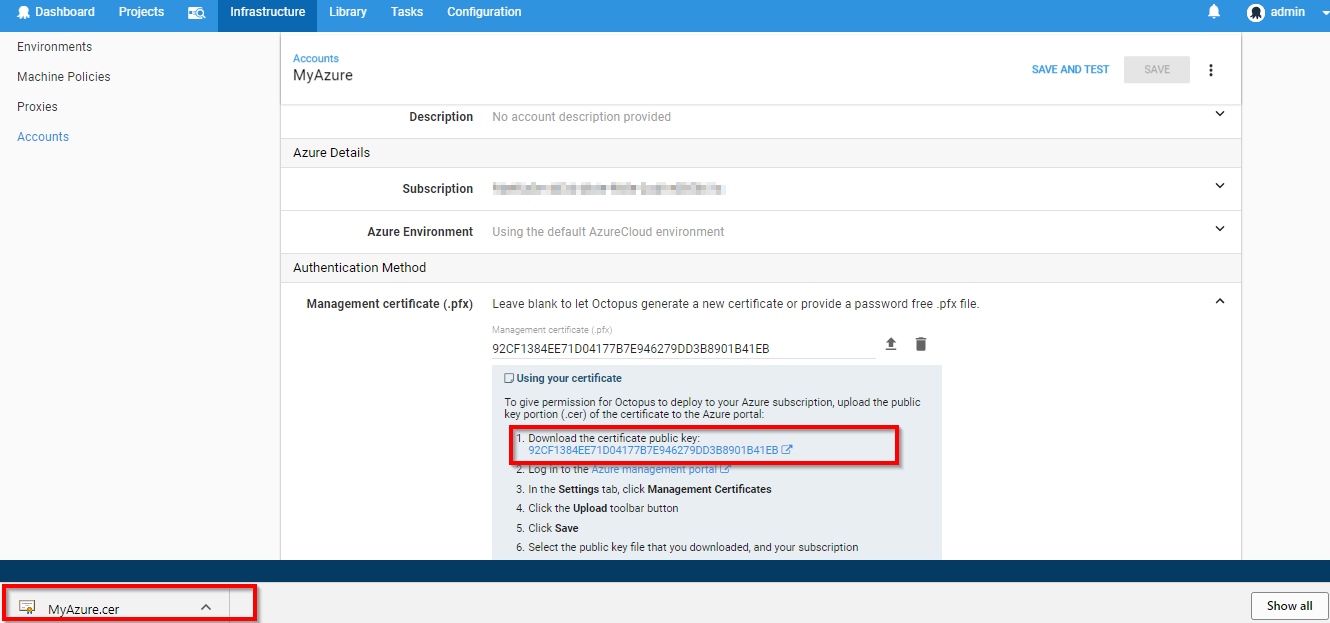
Click Save and notice that a management certificate is generated. Download this certificate.
-
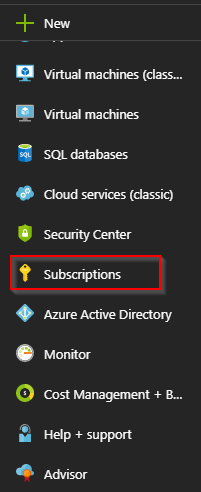
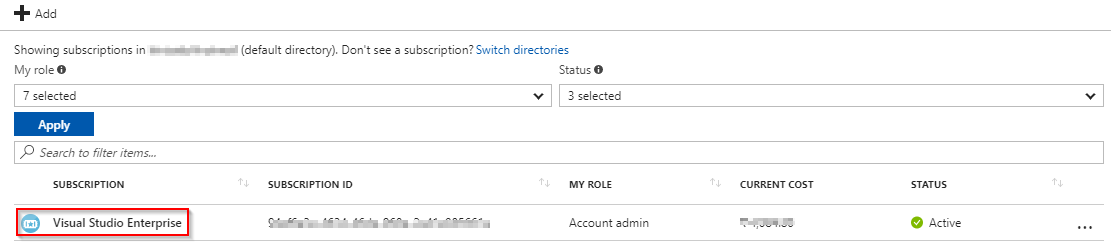
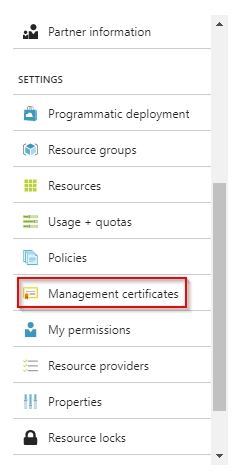
To upload the certificate in Azure, go to Azure Portal and search for Subscriptions.
-
Click on the Subscription.
-
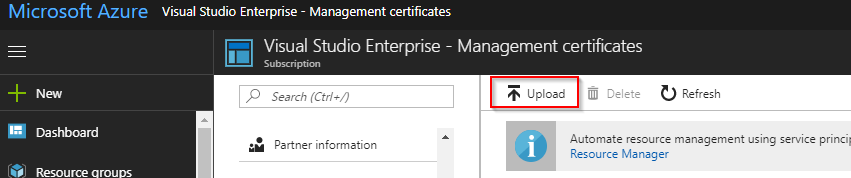
Scroll down and click Management certificates.
-
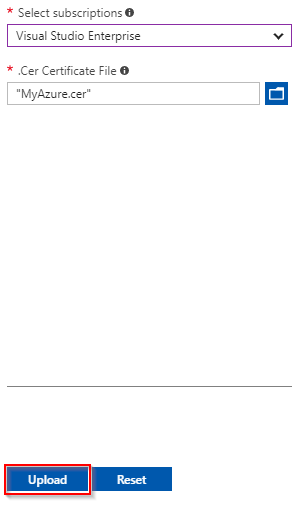
Click Upload to upload the certificate which was downloaded in the step 7.
-
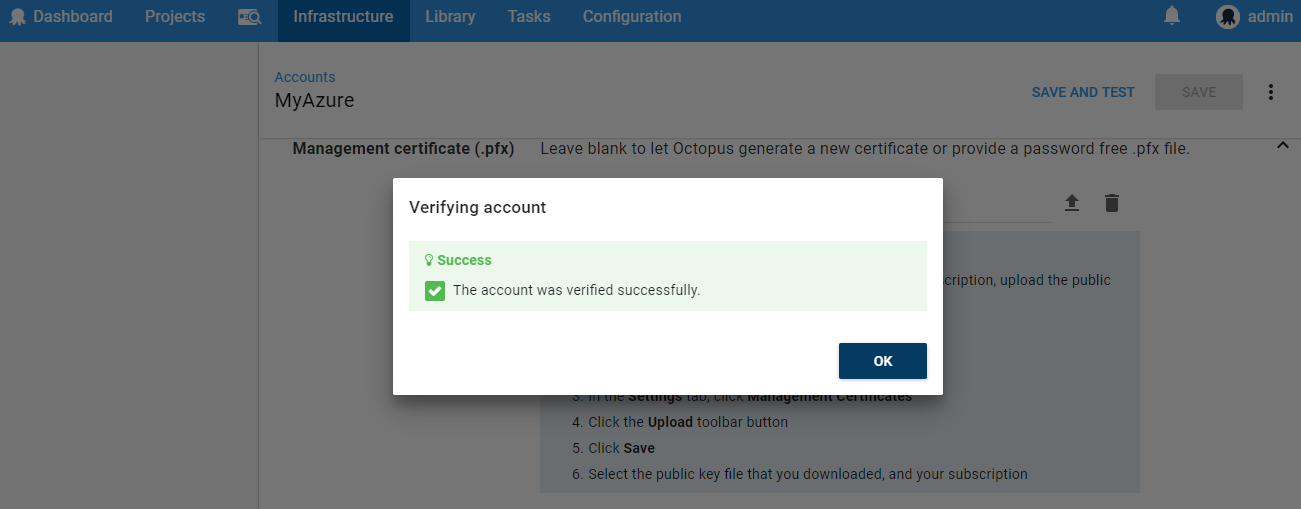
Once the certificate is uploaded successfully, go back to Octopus portal and click Save and Test. If the test succeeds, we should be able to configure Octopus to deploy application packages to Azure.
Exercise 2: Create Project in Octopus
Let us create a Project in Octopus to deploy the package to Azure App Service. A Project is a collection of deployment steps and configuration variables that define how your software is deployed.
-
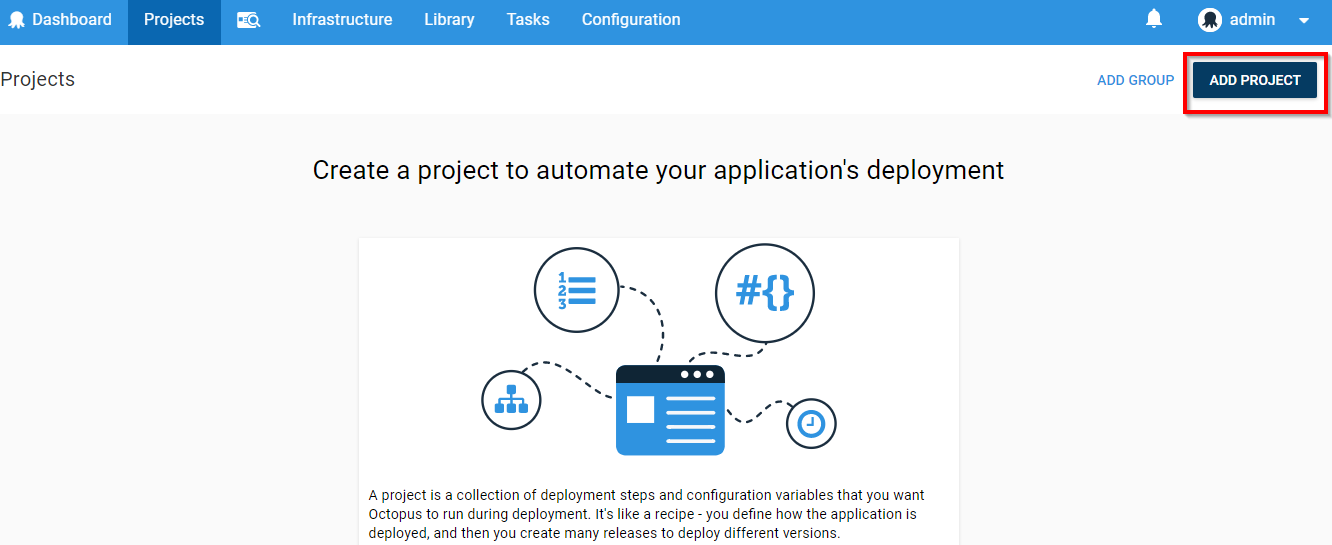
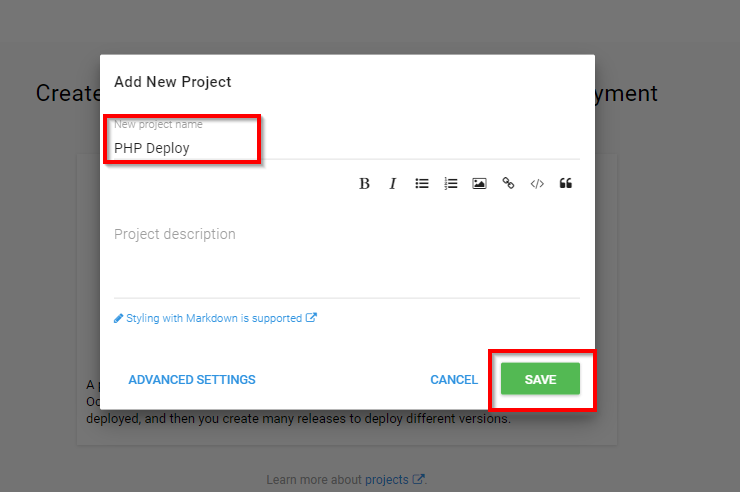
Go to Octopus dashboard and click Create a project.

-
Click on ADD PROJECT, provide the project name, description and click on SAVE.
-
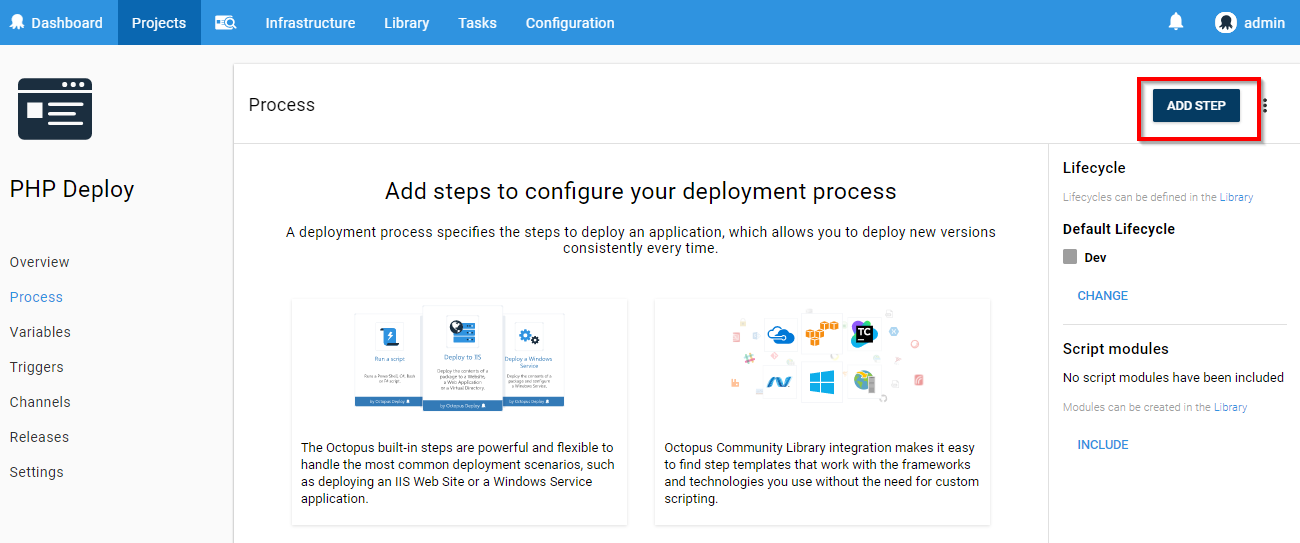
Once the project is created, click Define your deployment process. The deployment process is like a recipe for deploying your software.

-
Click on ADD STEP to see a list of built-in step templates, custom step templates, and community contributed step templates.
-
Search for Azure Web App template and click Add.
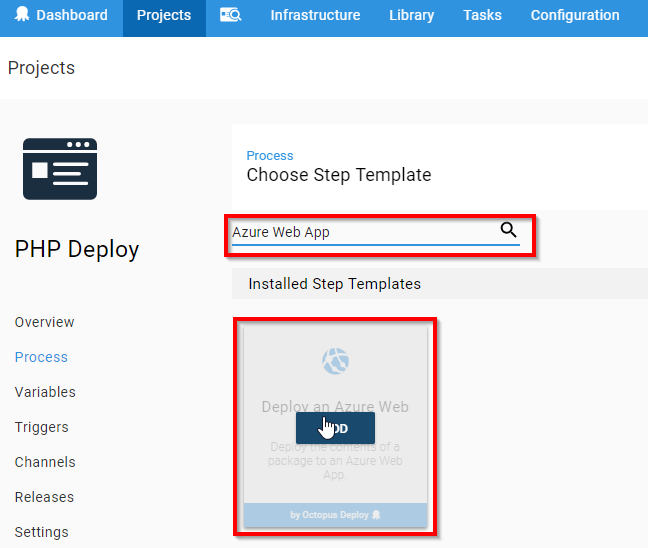
-
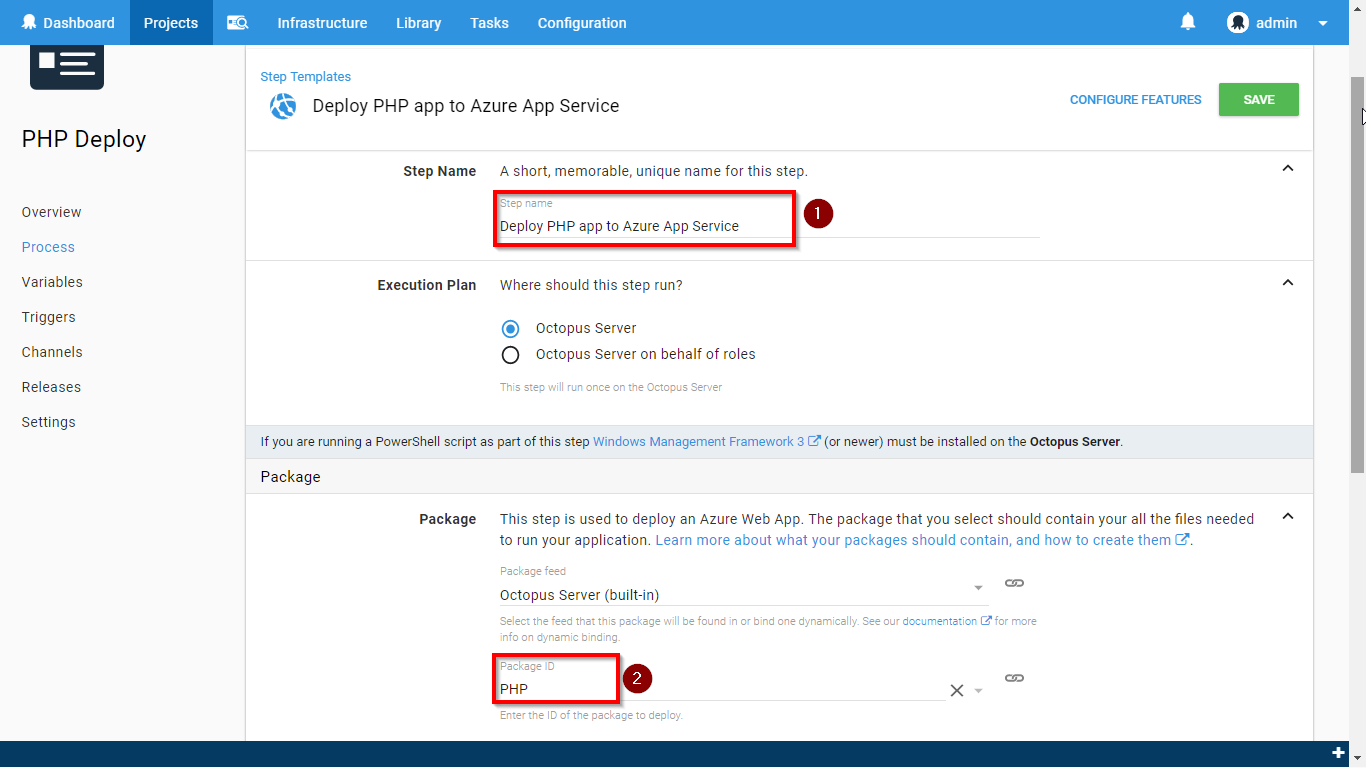
Populate the step template with required details -
- Step Name : A short, unique name for the template.
- Package ID : PHP (if you are providing different package ID, update it in Package PHP task of the build definition)
- Azure account & Web App : Select from the dropdown

-
Clicking Save should define the project creation and its deployment process.
Exercise 3: Triggering CI-CD
In this exercise, we will package PHP application and push the package to Octopus Server. We will use build tasks of Octopus Deploy Integration extension which was installed during Team Project provisioning.
| Tasks | Usage |
|---|---|
 Package Application Package Application |
We will package the PHP source code into a zip file with the version number |
 Copy Files Copy Files |
The Copy Files task will copy the generated package to artifacts directory in VSTS |
 Push packages to Octopus Push packages to Octopus |
The copied package will be pushed to Octopus server from VSTS artifacts directory |
 Create Octopus Release Create Octopus Release |
Automates the creation of release in Octopus server. A release captures all the project and package details to be deployed over and over in a safe and repeatable way |
 Deploy Octopus Release Deploy Octopus Release |
Automates the deployment of release in Octopus server. A deployment is the execution of the steps to deploy a release to an environment. An individual release can be deployed numerous times to different environments |
-
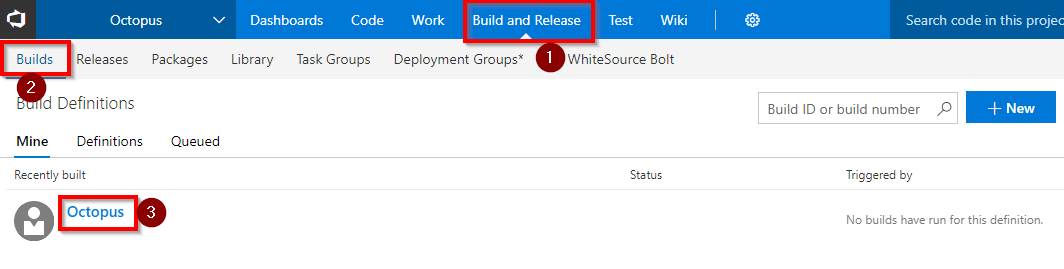
Go to Builds under Build and Release tab and click on Octopus build definition.
-
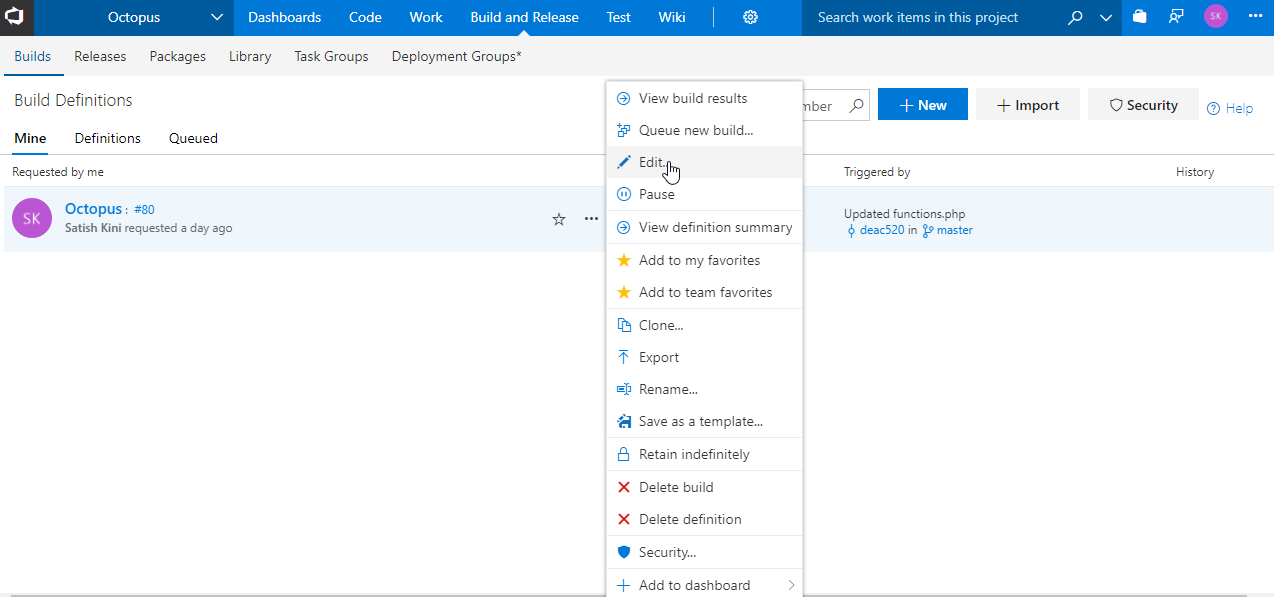
Edit the build definition to update Octopus server endpoint.
-
In Push Packages to Octopus task, update Octopus Deploy Server field with the created endpoint value.
Note: You will encounter an error - TFS.WebApi.Exception: Page not found for Azure tasks in the release definition. This is due to a recent change in the VSTS Release Management API. While we are working on updating VSTS Demo Generator to resolve this issue, you can fix this by typing a random text in the Azure Subscription field and click the Refresh icon next to it. Once the field is refreshed, you can select the endpoint from the drop down.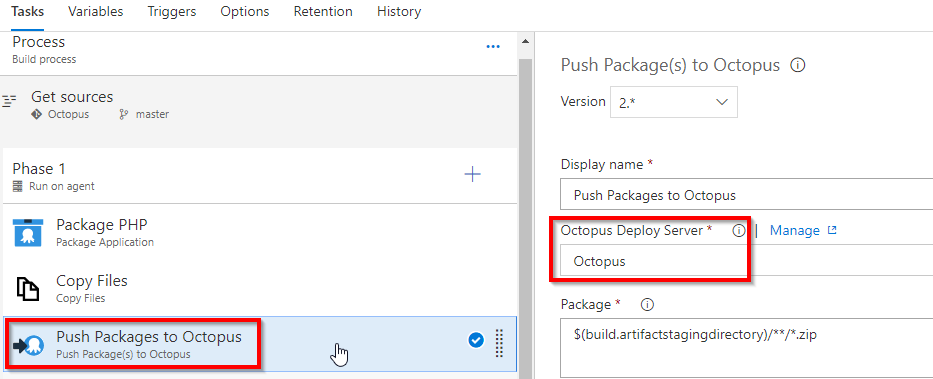
-
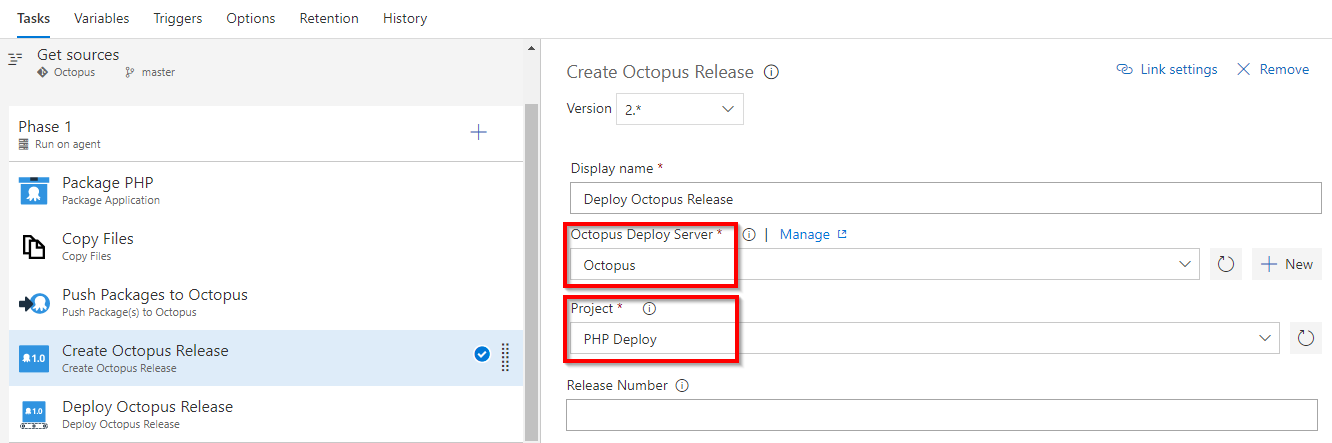
In Create Octopus Release task, update Octopus Deploy Server field with the created endpoint value and Project fields.
-
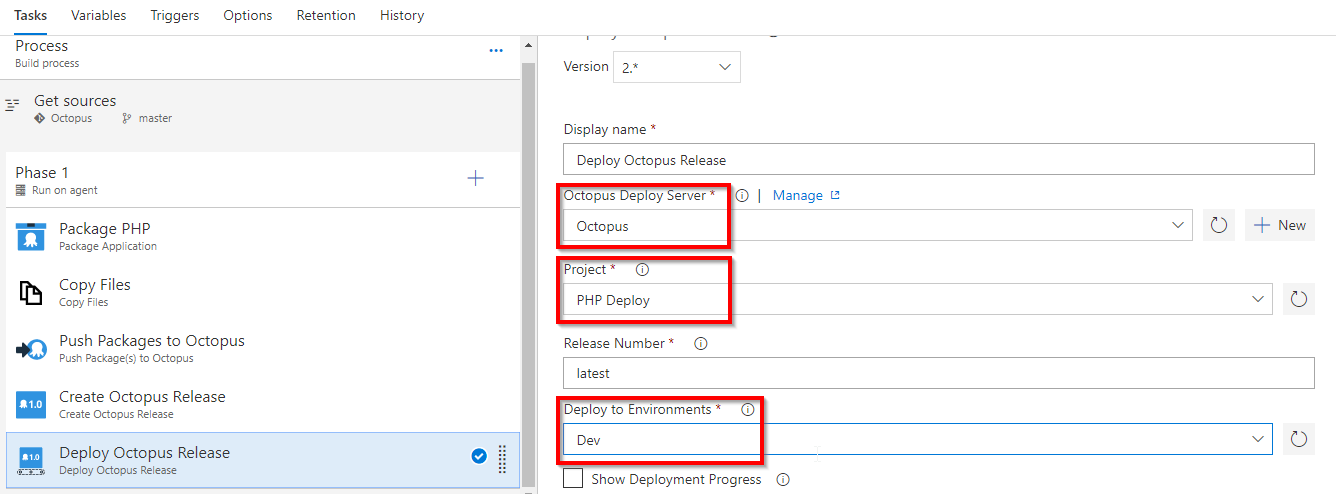
In Deploy Octopus Release task, update Octopus Deploy Server field with the created endpoint value, choose the appropriate values from the drop down for fields - Project and Deploy to Environments.
-
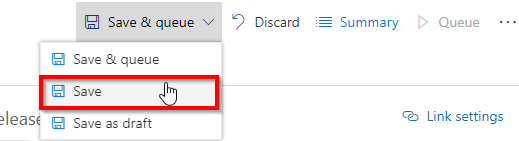
Save the build definition.
-
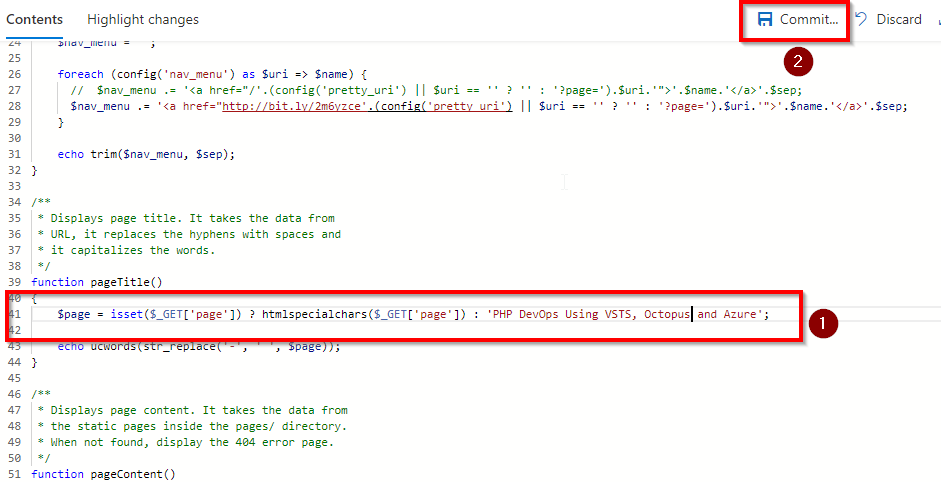
Go to Code tab and edit the file functions.php
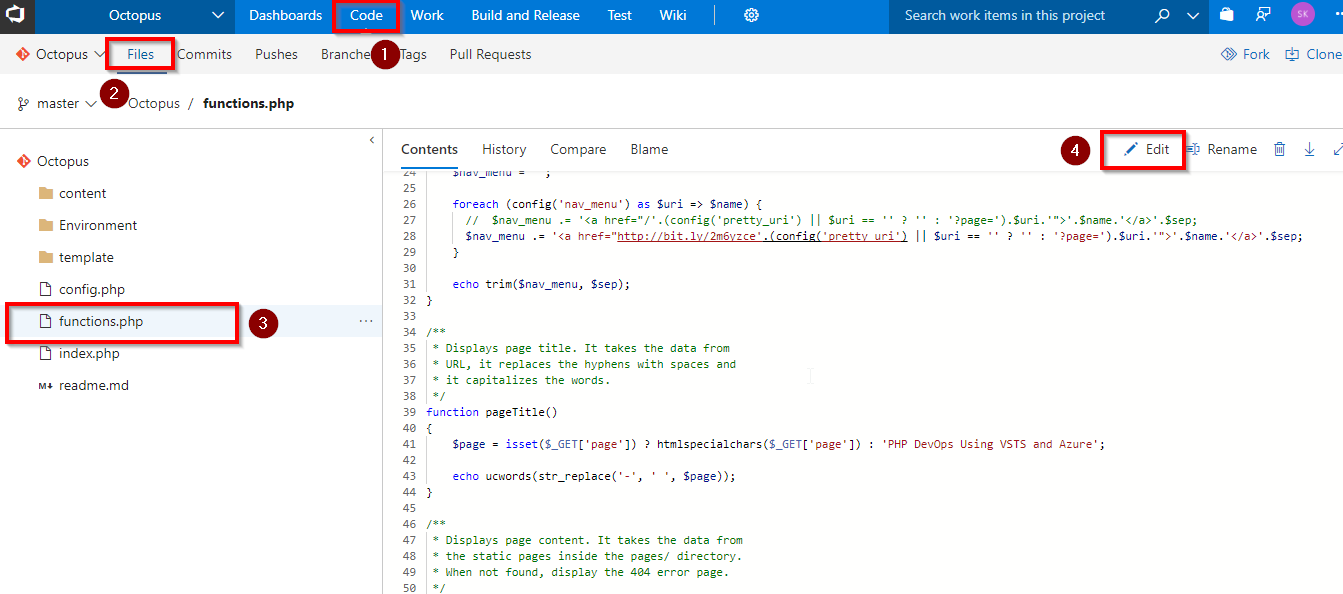
-
Update the line 41 as shown, change the title to - PHP DevOps Using VSTS, Octopus and Azure and commit the changes.
-
Go to Build tab, you will see in-progress build.

-
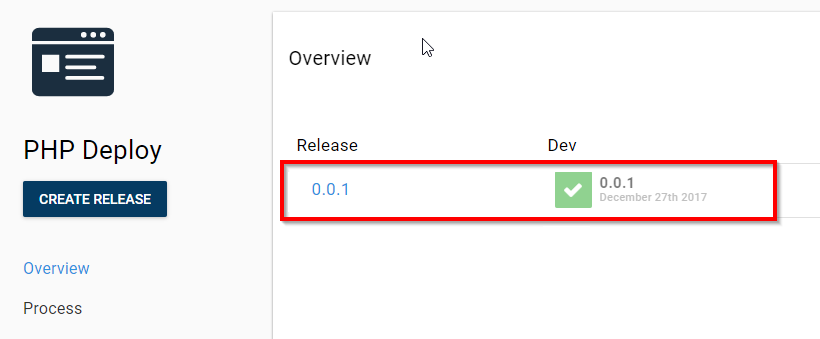
Once the build completes, go to Octopus portal project dashboard. We will see the release completion in Octopus.
-
Go to Azure Web App from your Azure Portal and click on Browse.
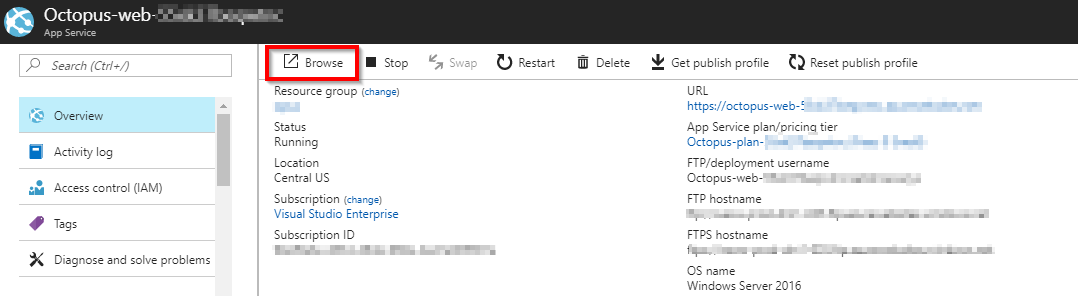
-
You will see the PHP application up and running.